Saturday, October 13, 2012

Hallowe'en Layout with Googly Ghouls

I love Hallowe'en. Not as much as Christmas, but there's something so fun about kids running around in costumes, super excited and totally juiced up on sugar ;) My favorite Hallowe'en stamp sets are the cutesy kiddie ones. Which is why I especially loved  the Googly Ghouls stamp set in the Holiday Mini. How can you NOT love witches, ghosts, bats and googly eyes??? Best of all, SU!'s Googly Eyes have glue dots on them so they're easy to stick onto your project.

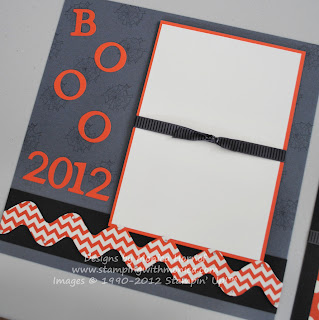
This week, two of my favorite challenges, Try Stampin' on Tuesday and Freshly Made Sketches had sketches that were just perfect for scrap page layouts. And they worked really well together. So I worked it the best I could :) First, the Freshly Made Sketch:


I used the Howlstooth and Scaringbone DSP for my layouts. I really love the way the Tangerine Tango color pops. It's so vibrant! My second page is using the Try Stampin' on Tuesday Sketch:


Tips & Tricks:

*Not sure where to start with your scrapbook layouts? If you started out as a card maker like me, you may be a bit intimidated. I used a tip from a fellow stamper - approach it like it's a card and build on it. My photo mat is the image mat from the card. I added the 'BOOO 2012' to the left to build on my page. See how simple it is?
*My flagged element on the the second page seemed a little plain. Yet I didn't want to use DSP because I thought it would be too busy. So I embossed it with the Spider Web Embossing Folder. Love how it turned out!
*I absolutely love the Wacky Wishes hostess set. I wasn't sure about it when I first saw it. But it's so fun and cute! It worked so well on my second page.
*Aren't the Googly Ghouls just adorable? Just stamp, punch out and stick on a few Googly Eyes. :)

Once we have all our fun Hallowe'en photos, I'm going to do a class Saturday November 24th so that we can scrap them without a delay :) See my Class List for more information :)

'Til next time, keep letting stamps bring out your creativity!


Scrappin' Recipe:
Stamps: Googly Ghouls, Wacky Wishes, Wicked Cool
Paper: Basic Black, Tangerine Tango, Basic Grey, Very Vanilla, Howlstooth & Scaringbone DSP
Ink: Basic Grey, Tangerine Tango
Accessories: 2-3/8" Scallop Circle Punch, 1-3/4" Circle Punch, Basic Jewels - Rhinestones, 1/2" Satin Striped Ribbon, Googly Eyes, Big Shot, Tasteful Trim Bigz XL Die, Spider Web Embossing Folder, Typeset Alphabet Bigz Die, Stampin' Dimensionals, 2-Way Glue Pen

Saturday, October 6, 2012

Simplicity with Lacy & Lovely

As I mentioned in a previous post, fall colors in Ottawa are in full swing. And they're more gorgeous than ever this year. Every day they seem to be getting more intense, more colorful. The trees are full of colors like Cajun Craze and More Mustard. Which is why I thought that the Pals Paper Arts Challenge this week was so fitting. We were asked to use the colors More Mustard, Cajun Craze and Early Espresso.


Try Stampin' on Tuesday had a most fantastic sketch for us to work with this week, as well. So simple, yet so many possibilities! And we all know I just love to mix up different DSPs. Why stick to just one package? lol! On this card I mixed together Comfort Cafe and Candlelight Christmas.

Tips & Tricks:
*The Espresso pattern I used from Candlelight Christmas has large snowflakes on it, but I cut them off enough so it doesn't look as Christmas-y. Because that's not what I was going for ;)
*I'm loving the 7/8" Cotton Ribbon. You can stamp on it! And the Lacy & Lovely has stamps that are perfectly sized for it.
*I love stamp sets like Lacy & Lovely and Delicate Doilies. The larger stamps that work coordinate together are perfect for creating a custom look on any neutral surface. This card is super simple - just a Very Vanilla base with strips of DSP!
*Love flagging but can't get your card stock/ribbon flagged evenly on both sides? Check out this quick tip. Cut a slit down the centre of your card stock/ribbon (like on the Cotton Ribbon). Then cut from one corner of the DSP down to the end of the slit (you're cutting a diagonal, see the Candlelight Christmas DSP). Finally cut out the second notch from the opposite corner (like on the Comfort Cafe DSP). And voila - easy flagging!


I hope this card inspires you to simplify your cards a bit ;) Sometimes simple is best! To my Canadian followers, I hope you have a lovely Thanksgiving! 'Til next time, keep letting stamps bring out your creativity!


Card Recipe:
Stamps: Lacy & Lovely
Card Stock: Very Vanille, Candlelight Christmas DSP, Comfort Cafe DSP
Ink: More Mustard, Cajun Craze, Early Espresso
Accessories: 7/8" Cotton Ribbon

Wednesday, October 3, 2012

Thanksgiving Decor and Tulle Rosette Tutorial

If you're in Canada, the upcoming week-end marks our Thanksgiving holiday. Since we moved into our new home a few weeks ago, I'm going to be hosting Thanksgiving this year (usually this is my Mother-in-Law's job ;) ). Being a crafter, I wanted to make some of my own decor for the occasion. We'll be having about 14 people and these will be the table centerpieces:


I had a few sources of inspiration... This week, the Friday Mashup Challenge asked us to make a 'fall leaves' project and/or use twine on our project. This was perfect, because this week the leaves in the Ottawa area are a gorgeous red/burnt orange and they have been inspiring me too. The candle on the left is made with the Gently Falling stamp set. The candle on the right is made with real leaves from our backyard :) Curious on how I made them? Stay tuned for a tutorial.

In addition, I wanted to make my own placeholders. They were pretty time consuming, but 100% worth it!


For both my candle and placeholder bases, I used the Comfort Cafe DSP and the Bigz XL Rosette Die. When I saw the Silver Setting stamp in the new catalogue, I just knew I had to use it for placeholders. Embossed in gold. What's holding the name cards? An old-school wooden clothes pin!

Love the Tulle Rosettes? They are soooo easy to make. This idea was original presented by Shelli Gardner herself at the Hamilton Regional in August this year. I wasn't able to attend (I was moving that day!) but I was fortunate that a fellow demonstrator shared the rosette with us.

You'll need a big sewing needle (check out your local dollar store if you don't have one ;) ), Linen Thread or Baker's Twine (about 8"), and about 30" of the Scalloped Tulle in the Holiday Mini (available in Early Espresso - seen here, Cherry Cobbler or Crumb Cake). Simply run the needle and twine through the centre of the tulle. Let it bunch up because that's the end effect anyhow. It doesn't have to be threaded evenly, just through the centre at 1/2" to 1" intervals:


Once you've run the Linen Thread through the entire length of tulle, scrunch it up with even lengths of twine on each side and tie the twine in a knot. The tulle will fan out into a rosette as shown below.


You can use a button to finish it off since you already have two lengths of twine. I really hope that my guests like the decor. I wanted to do more, but the placeholders and candles took WAY more time than I expected ;) Don't these things always! 'Til next time, keep letting stamps bring out your creativity! And to my Canadian followers, have a fantastic Thanksgiving!


Project Recipe:
Stamps: Gently Falling, Silver Setting
Paper: Comfort Cafe, Soft Suede, Very Vanilla, Comfort Cafe, DSP
Ink: Cajun Craze, More Mustard, Soft Suede, VersaMark
Accessories: Linen Thread, Early Espresso Scalloped Tulle, Cajun Craze Stampin' Write Marker, Big Shot, Bigz XL Rosette Die, Neutral Designer Buttons, Heat Tool, Electric Glue Gun (not SU!)