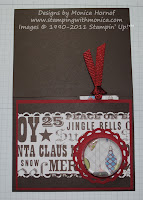
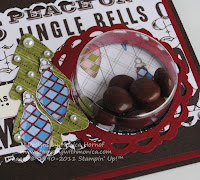
I recently did this type of card with my stamper's group. I found a few tutorials, improvised on them for the group, but didn't really like any of them. They weren't easy to follow, the photos in them didn't really help me and I knew I could make a better one :p So below is my own tutorial. The sketch I used is from Freshly Made Sketches. It works perfectly for the Treat Cup cards.
1. For your standard A2 card, cut a 8-1/2” x 11” piece of card stock for your base, a 5-1/4” x 4” piece of card stock for your mat and a 5” x 3-3/4” piece of card stock for your card front.
2. Decorate your card front with any designer paper, etc., that you will be punching through. Choose where you will be placing the Sweet Treat Cup and punch out a hole in your card base with the 1-3/4” Punch.
3. Place your card mat (Cherry Cobbler here) and card front (Early Espresso with Designer Series Paper) on your card base and position it as desired. DO NOT adhere.
4. Carefully flip the card over. With a pencil, trace the 1-3/4” circle through the card base onto the Cherry Cobbler mat. This will mark where you will punch out the circle for the top two layers.
5. Punch out the 1-3/4” circle through the top two layers of your card. Now all three layers of your card have the 1-3/4” circle punched through them and will align properly.
6. Remove the adhesive from the Sweet Treat Cup and adhere to the middle layer (Cherry Cobbler on this card). Adhere the top layer of your card (Early Espresso here) onto the middle layer, fitting the hole over the Sweet Treat Cup.
7. Cut a 2” x 4” piece of card stock for your slider. Position it over the hole in the card base (Early Espresso layer). Using Sticky Strip (to make sure that your card doesn't fall apart – the treat cup layer is quite heavy) create a 'frame' for your slider to slide in and out of and to keep it in the right spot. Put Sticky Strip on the rest of the card base and put your card together.
8. When you've put your card together, you'll see the slider through the Treat Cup as shown in the picture below. The slider goes between the middle layer and card base (Cherry Cobbler and Early Espresso).
9. Fill your treat cup from the inside of the card.
Funny thing, I didn't actually do any stamping on this card, except the Merry Christmas. But I did use a bunch of accessories including the Letters to Santa DSP, Perfect Pennants Bigz L Die as well as the Stocking Accents Originals Die. Isn't the Cherry Cobbler Waffle Ribbon just yummy? Love it!
Hope you enjoyed the tutorial and the card. Keep letting stamps bring out your creativity!


14 comments:
This is fantastic! I love the card and I LOVE, LOVE the tutorial. Hope you don't mind a technique CASE for a class (I'll reference you, of course!). So glad you joined us this week at Freshly Made Sketches!
Jen Timko
Don't mind at all! Hope your class loves it ~ it's good to have feedback on the tutorial :)
This is wonderful! So clever and cute! Perfect holiday card! Love it!
Love it! I've been wondering how to do that, so I appreciate you taking the time to show the tutorial! Love that you joined us at Freshly Made Sketches this week!
oh my goodness...i might definitely be using this technique for holiday cards that i can hand to people...CUTE!
Love this card and how you did the sliding door for the treat cup!! I will be featuring this card on My Crafty Picks #39 with a link back to your blog on 10-23-11. Make sure to stop by to check out all the picks and to pick up your blog badge to display on your blog for being featured!!
If you wish to decline please email me by responding to this comment to let me know.
Thanks and take care
Tiffany Bauer
http://www.mycraftyworld.blogspot.com
That is one fabulous take on the sketch! Thanks for sharing the tutorial too! And thanks for joining us at Freshly Made Sketches!
What a great card, a fabulous take on the sketch this week ... love the tutorial, thanks for sharing!
Thanks for joining us at Freshly Made Sketches!!!
What a wonderful Christmas card, I live the little treat cup.xxx
Wowza...good tutorial! Love the way you created this card with the sketch! Adorable and fun! Thanks for playing along at Freshly Made Sketches!
What a fun card! Thanks for the tutorial!
How nice! Great card and excellent job on the tutorial! Thanks for playing with Freshly Made Sketches!
Congratulations on being the "Queen of Clean" for this card at Freshly Made Sketches! Love it!
Jen Timko
Thanks for making me the 'Queen of Clean' - so excited!
Post a Comment