Showing posts with label FTL. Show all posts

Monday, June 25, 2012

A Fun Party Card

I had lots of fun making today's card! I used two card challenges to inspire me for today's cards. I decided not to 'mash it up' at the Friday Mashup Challenge and simply made a 'party time' card. You'd think this would be easy, but it was actually a bit harder than I anticipated... I ended up using the pinwheels from the Sweets for the Sweet stamp set which I found out worked really well with the Patio Party DSP. It has pinwheels in it too :) And do cupcakes say 'party' or what?


I used the sketch from Clean and Simple Stamping this week. I changed it up a smidge (surprise, surprise) but I really love the way the squares are lined up just a bit differently on each side. I did try putting the dahlia in the place indicated on the sketch, but it just didn't look right - it looked *much* better on the ribbon.

Tips & Tricks:

*Do you like the little flower on the Midnight Muse Stitched Satin Ribbon? It's the new In Color Dahlias. I LOVE them! And they are so easy to attach with Glue Dots.
*Since every party needs some bling, I put a few rhinestones on my pinwheels.
*So many people are too scared of cutting out their stamped shapes. But I say you should just try it! These pinwheels are very easy to cut out and I love the two-tone look it gives them!
*What do you think of the background? It's the new Argyle Embossing Folder! One of my favorite accessories from the new cattie :)

I hope this card has put you in a party kind of mood :) I really love this sketch and definitely will use it again!

'Til next time, keep letting stamps bring out your creativity!


Wednesday, June 20, 2012

Thinking of You...

A friend of mine (and a fellow demo) has been going through a hard time. I had to drop off some things at her house so I included this card for her. I just wanted to let her know that even though we were both busy women, I was there for her and thinking of her. I know she loves the pink and brown combination, so I hope she liked this card.


I'm really loving the Clean and Simple Stamping challenge site that I stumbled across a few weeks ago. As the name would suggest, their sketches are 'clean and simple', just my style.

Tips & Tricks:

*I wanted a large scallop border at the bottom, to coordinate with the wider Crumb Cake Seam Binding Ribbon. I used my Tasteful Trim Bigz XL Die, cut out the border. Then I hid the seam between the border and cardstock on the top part of the card with the ribbon.
*The butterfly is from the Creative Elements stamp set. I cut it out with my Paper Snips. If you'd prefer to punch out a butterfly, check out the new Papillon Potpourri stamp set and coordinating Elegant Butterfly Punch.
*I wanted to make the butterfly pop! I stamped it in Early Espresso and then in Pretty in Pink and then I layered them. Love how it turned out.
*The scallop border looked a bit too plain to me. To fancy it up a bit, I added the Pearl Jewels to each scallop. Love these little embellishments!

I really hope this card brightened my friend's day. 'Til next time, keep letting stamps bring out your creativity!

Monday, June 11, 2012

Clean and Simple with the Baby Wipe Technique Tutorial

I first did this technique over a year ago at a Demonstrator meeting. And I've been meaning to do it again but somehow I just haven't gotten around to it. When I saw the sketch for the Clean and Simple Stamping Challenge #193. I did change up the challenge a bit, because all three of my flowers are the same size, so I guess I broke one of the challenge's rules. But who am I to follow rules? lol! Oh and I'll say it again... THANK GOODNESS this challenge is open for two weeks :p Otherwise I wouldn't have made it!


I've also done up a little tutorial for the baby wipe technique. It is *so* easy and I wanted to show you how to do it :) What I love best about it is that each image you stamp has just a wee bit different color distribution. And the tie-dye effect - love it! With respect to my tutorial, I know the photo tutorial is sooo passe... but I can't get organized enough to do a video... yet. ;)

Step 1: Take a baby wipe and fold it twice. Then choose the colors you want for your stamped image. For my flowers, I chose Raspberry Ripple, Summer Starfruit and Primrose Petals - all new In Colors :)


Step 2: Put a few drops of reinker on the baby wipe in each color. Put the reinker on the baby wipe in any pattern you wish. I did three stripes.


Step 3: Use your inked up baby wipe as a custom ink pad: stamp your image on it :) I washed my stamp in between stamping to try to keep the ink even on the baby wipe. See how the three colors show up on the stamp?


Step 4: Because of the dampness of the baby wipe, the ink goes onto the stamp and the card stock really nicely. Do you like how each flower looks different?


My card base is Primrose Petals. Isn't it a lovely pink? I also love the Gumball Green that I used for my flower stems. I stamped the greeting in Raspberry Ripple. What a gorgeous, rich color! I did cut out all my flowers and I admit, that took a lot of work. I tried to get around all the little nooks and crannies and there sure were a lot. But these flowers from Fabulous Florets were perfect for this card.

I hope my tutorial made sense, and made you realize how easy and wonderful this technique is. 'Til next time, keep letting stamps bring out your creativity!


Thursday, May 24, 2012

My Love of DSP

I'm going to warn you right now, this is going to be a super short blog entry. My 6-year-old daughter and I have been struck down by a particularly nasty flu bug. We've barely left the bed in nearly 48 hours and have consumed very little of anything. I've been planning this blog post for a few days so I have the card all ready to go.


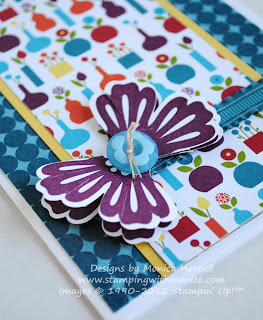
I used the sketch from Clean & Simple Stamping for my card design and lucky for me, they leave their challenges open for two weeks ;) I've been waiting for a sketch to show off the flower vase patterned DSP from Summer Smooches and this one was perfect. I love gorgeous DSP, and I especially love making it a focal point on my cards.

This sketch is a keeper, for sure! I did omit a sentiment, I couldn't figure out how to fit it in and I think the card looks fine without it.

Tips & Tricks:

*Love the butterfly? I used the Blossom Punch and coordinating Mixed Bunch stamp set. Then, I trimmed out the middle 'petals' to make a butterfly.
*I layered two butterflies to give the element even more dimension. To make sure the wings lift up well, I used Glue Dots to stick the two butterflies together.
*When I cut out the middle petals, it looked a bit 'rough'. I used a button in Tempting Turquoise to cover up the imperfections.

This card took me less than 10 minutes to make ~ that's *my* kind of card! So use that DSP, don't hoard it ;) And keep letting stamps bring out your creativity!


Monday, May 14, 2012

Something Old, Something New

Ever since getting my sneak peak stuff last week I've been dying to try the new Gumball Green In Color with my favorite color, Rich Razzleberry. I've often used Old Olive with Rich Razzleberry and love the combo. And goodness knows, I am not a gal who loves the color green. But I LOVE Gumball Green! It's awesome! And it's *even* better with Rich Razzleberry than Old Olive.


What do you think? And I got my sketch inspiration from the Clean and Simple Stamping website. I love this website, just found it last week and it's full of awesome *simple* sketches. Just what I love for my Fast & Fabulous classes (my next one is on May 30th, the last Wednesday of every month.

Tips & Tricks:

*Like the stamp set? I've again used Everything Eleanor from the upcoming catalogue. It's gorgeous!
*Even though it looks like this card has a few layers (and it does) it's actually very simple! A few flourishes, a flower stamp, a few punches and you're done!
*Don't have the Modern Label Punch yet? I'd definitely recommend it. It's my go-to stamp set for greetings!
*Although I often go for the standard 1/4" mat size, I changed it up a bit on this card and made my first mat a bit smaller. I like how it turned out :)

Hope you've enjoyed this simple, yet not-so-simple card! A woman in my sideline is just starting breast cancer treatment and we're all getting together and sending her little pick-me-up cards. I'm going to send her this one. I hope she enjoys it. 'Til next time, keep letting stamps bring out your creativity!


Sunday, May 13, 2012

*New* In Color Birthday

I have some more product sneak peeks for you today :) I love sneak peeks, and hope you love them as much as I do! My first card is a birthday card for my dad who turns 71 on Tuesday. As part of my Sneak Peek products, I got a FREE bundle from SU! that included the Itty Bitty Banners and Make a Cake Stamp Set, as well as the Patio Party DSP. Love them all, especially all the contrasting patterns in the DSP. I thought it would look fantastic using the Herringbone Technique (see my tutorial). I love how it worked out.


The base color of my card is Summer Starfruit and the mat is Midnight Muse. I did the Happy Birthday greeting in Raspberry ripple. I must say, I think that's my fave new In Color :) And how do you like all the different patterns in the DSP?

Tips & Tricks:

*The Make a Cake stamp set is a two-step stampin' set. You can make a single tier cake, 3-tier cake and add some embellishments. Love sets that provide so much variety and so many options.
*Are you loving the Stitched 1/4" Grosgrain Ribbon as much as I am? It's much easier to work with than I anticipated, too! Always a pleasant surprise.
*I again used the Bitty Banners Framelits for the greeting. So easy to use and gives a perfect little banner everytime!
*Though I often come up with my own cards and ideas, I use a lot of different websites for inspiration. I came across a new one, Clean & Simple Stamping. They have weekly sketch challenges using clean and simple sketches (what else ;) ). I used #189 for this card and made it a bit less simple with the herringbone pattern.

I hope my dad enjoys this card and that he has a great birthday. 'Til next time, keep letting stamps bring out your creativity!