Showing posts with label Tutorials. Show all posts

Saturday, October 6, 2012

Simplicity with Lacy & Lovely

As I mentioned in a previous post, fall colors in Ottawa are in full swing. And they're more gorgeous than ever this year. Every day they seem to be getting more intense, more colorful. The trees are full of colors like Cajun Craze and More Mustard. Which is why I thought that the Pals Paper Arts Challenge this week was so fitting. We were asked to use the colors More Mustard, Cajun Craze and Early Espresso.


Try Stampin' on Tuesday had a most fantastic sketch for us to work with this week, as well. So simple, yet so many possibilities! And we all know I just love to mix up different DSPs. Why stick to just one package? lol! On this card I mixed together Comfort Cafe and Candlelight Christmas.

Tips & Tricks:
*The Espresso pattern I used from Candlelight Christmas has large snowflakes on it, but I cut them off enough so it doesn't look as Christmas-y. Because that's not what I was going for ;)
*I'm loving the 7/8" Cotton Ribbon. You can stamp on it! And the Lacy & Lovely has stamps that are perfectly sized for it.
*I love stamp sets like Lacy & Lovely and Delicate Doilies. The larger stamps that work coordinate together are perfect for creating a custom look on any neutral surface. This card is super simple - just a Very Vanilla base with strips of DSP!
*Love flagging but can't get your card stock/ribbon flagged evenly on both sides? Check out this quick tip. Cut a slit down the centre of your card stock/ribbon (like on the Cotton Ribbon). Then cut from one corner of the DSP down to the end of the slit (you're cutting a diagonal, see the Candlelight Christmas DSP). Finally cut out the second notch from the opposite corner (like on the Comfort Cafe DSP). And voila - easy flagging!


I hope this card inspires you to simplify your cards a bit ;) Sometimes simple is best! To my Canadian followers, I hope you have a lovely Thanksgiving! 'Til next time, keep letting stamps bring out your creativity!


Card Recipe:
Stamps: Lacy & Lovely
Card Stock: Very Vanille, Candlelight Christmas DSP, Comfort Cafe DSP
Ink: More Mustard, Cajun Craze, Early Espresso
Accessories: 7/8" Cotton Ribbon

Wednesday, October 3, 2012

Thanksgiving Decor and Tulle Rosette Tutorial

If you're in Canada, the upcoming week-end marks our Thanksgiving holiday. Since we moved into our new home a few weeks ago, I'm going to be hosting Thanksgiving this year (usually this is my Mother-in-Law's job ;) ). Being a crafter, I wanted to make some of my own decor for the occasion. We'll be having about 14 people and these will be the table centerpieces:


I had a few sources of inspiration... This week, the Friday Mashup Challenge asked us to make a 'fall leaves' project and/or use twine on our project. This was perfect, because this week the leaves in the Ottawa area are a gorgeous red/burnt orange and they have been inspiring me too. The candle on the left is made with the Gently Falling stamp set. The candle on the right is made with real leaves from our backyard :) Curious on how I made them? Stay tuned for a tutorial.

In addition, I wanted to make my own placeholders. They were pretty time consuming, but 100% worth it!


For both my candle and placeholder bases, I used the Comfort Cafe DSP and the Bigz XL Rosette Die. When I saw the Silver Setting stamp in the new catalogue, I just knew I had to use it for placeholders. Embossed in gold. What's holding the name cards? An old-school wooden clothes pin!

Love the Tulle Rosettes? They are soooo easy to make. This idea was original presented by Shelli Gardner herself at the Hamilton Regional in August this year. I wasn't able to attend (I was moving that day!) but I was fortunate that a fellow demonstrator shared the rosette with us.

You'll need a big sewing needle (check out your local dollar store if you don't have one ;) ), Linen Thread or Baker's Twine (about 8"), and about 30" of the Scalloped Tulle in the Holiday Mini (available in Early Espresso - seen here, Cherry Cobbler or Crumb Cake). Simply run the needle and twine through the centre of the tulle. Let it bunch up because that's the end effect anyhow. It doesn't have to be threaded evenly, just through the centre at 1/2" to 1" intervals:


Once you've run the Linen Thread through the entire length of tulle, scrunch it up with even lengths of twine on each side and tie the twine in a knot. The tulle will fan out into a rosette as shown below.


You can use a button to finish it off since you already have two lengths of twine. I really hope that my guests like the decor. I wanted to do more, but the placeholders and candles took WAY more time than I expected ;) Don't these things always! 'Til next time, keep letting stamps bring out your creativity! And to my Canadian followers, have a fantastic Thanksgiving!


Project Recipe:
Stamps: Gently Falling, Silver Setting
Paper: Comfort Cafe, Soft Suede, Very Vanilla, Comfort Cafe, DSP
Ink: Cajun Craze, More Mustard, Soft Suede, VersaMark
Accessories: Linen Thread, Early Espresso Scalloped Tulle, Cajun Craze Stampin' Write Marker, Big Shot, Bigz XL Rosette Die, Neutral Designer Buttons, Heat Tool, Electric Glue Gun (not SU!)

Sunday, September 30, 2012

Carry On Note Cards and Box

It's Sunday! And that means another Sunday Stamps Challenge. The design team that we have for this challenge is really great because they keep challenging me. :) This week, Joan brings us a color challenge: Gumball Green, Marina Mist and Soft Suede. I love all three of these colors but never would have thought to put them together.

Last week, I also got the super cute Hostess Exclusive set, Carry On in an order and really wanted to use it. But I couldn't choose which stamps from the set I should use. So, I used all of them :) I made a set of little mini note cards along with a little box to hold them all. I mixed and matched all the challenge colors in the note cards.


I ordered this stamp set in clear mount and I'm really glad I did. I was able to mount the word stamps together on one block and have perfectly spaced words. My cards are 3"x3" note cards and they fit perfectly in the Mini Envelopes. I love how the picture stamps are small enough to decorate my envelopes, too.

I came up with the pattern for the little box on my own. Below is the pattern. It's handdrawn, so please bear with me. My sister is visiting from Germany and I haven't had much time to stamp ;) You'll need a piece of card stock that is 5-1/4" x 9-1/4" in size (there's a small typo on my pattern, the piece of card stock that will be the flap of the box should be 3/4"). Score at 1" and 4-1/4" on the short side. Score at 1", 4-1/4", 5-1/4" and 8-1/2" on the long side. Cut on the 'cut' lines, fold on the 'fold' lines and put your box together with a strong adhesive such as Sticky Strip.


To decorate my box, I used the Be of Good Cheer DSP (Gumball Green polka dot pattern) and the Comfort Cafe DSP (Soft Suede patterns).

Hope you liked my little box and the note cards. It would definitely make a super cute gift, you could even fill it with Christmas tags. 'Til next time, keep letting stamps bring out your creativity!


Card Recipe:
Stamps: Carry On 
Paper: Gumball Green, Soft Suede, Marina Mist, Very Vanilla, Comfort Cafe DSP, Be of Good Cheer DSP
Ink: Gumball Green, Soft Suede, Marina Mist
Accessories: 1-1/4" Scallop Circle Punch, Brights Glitter Brads, 3/8" Soft Suede Taffeta Ribbon, Stampin' Dimensionals, Stampin' Sponges,


Monday, June 11, 2012

Clean and Simple with the Baby Wipe Technique Tutorial

I first did this technique over a year ago at a Demonstrator meeting. And I've been meaning to do it again but somehow I just haven't gotten around to it. When I saw the sketch for the Clean and Simple Stamping Challenge #193. I did change up the challenge a bit, because all three of my flowers are the same size, so I guess I broke one of the challenge's rules. But who am I to follow rules? lol! Oh and I'll say it again... THANK GOODNESS this challenge is open for two weeks :p Otherwise I wouldn't have made it!


I've also done up a little tutorial for the baby wipe technique. It is *so* easy and I wanted to show you how to do it :) What I love best about it is that each image you stamp has just a wee bit different color distribution. And the tie-dye effect - love it! With respect to my tutorial, I know the photo tutorial is sooo passe... but I can't get organized enough to do a video... yet. ;)

Step 1: Take a baby wipe and fold it twice. Then choose the colors you want for your stamped image. For my flowers, I chose Raspberry Ripple, Summer Starfruit and Primrose Petals - all new In Colors :)


Step 2: Put a few drops of reinker on the baby wipe in each color. Put the reinker on the baby wipe in any pattern you wish. I did three stripes.


Step 3: Use your inked up baby wipe as a custom ink pad: stamp your image on it :) I washed my stamp in between stamping to try to keep the ink even on the baby wipe. See how the three colors show up on the stamp?


Step 4: Because of the dampness of the baby wipe, the ink goes onto the stamp and the card stock really nicely. Do you like how each flower looks different?


My card base is Primrose Petals. Isn't it a lovely pink? I also love the Gumball Green that I used for my flower stems. I stamped the greeting in Raspberry Ripple. What a gorgeous, rich color! I did cut out all my flowers and I admit, that took a lot of work. I tried to get around all the little nooks and crannies and there sure were a lot. But these flowers from Fabulous Florets were perfect for this card.

I hope my tutorial made sense, and made you realize how easy and wonderful this technique is. 'Til next time, keep letting stamps bring out your creativity!


Monday, January 30, 2012

Waterfall Card and Tutorial

This past week-end, I had a stamper's group and after seeing a fantastic swap at Leadership (I wish I could give credit but it wasn't a swap I received, I just saw it in passing...) I decided to do a waterfall card. This card has such an impact, looks so complicated but is actually very easy to make! I also designed this card with the Friday Mashup Challenge in mind. They asked us to do a card:
1) using the sketch they provided; or
2) using something new in our stamping stash; or
3) mash it up and do both.

Because I knew I wanted to do a waterfall card, the sketch didn't work for my card. But I did have a Sale-a-Bration stamp set, Elementary Elegance, that I hadn't used yet. I've used the Sweet Shop DSP before, but it's still pretty new in my stash and I love the colors so I used that, too. Finally, the waterfall card I saw at Leadership used the Labels Framelits and it looked so great! They're pretty new in my stash too :)


Look what happens when you pull the ribbon tab:


How awesome is that? The best thing about it is that it's not even that hard to make. See below for a quick and easy tutorial:

Step 1: For a standard 4-1/4 x 5-1/2 (A2) card, cut a piece of card stock that is 8-1/2" long. The width will depend on how wide you want the waterfall to be. Here I used the 2nd smallest Label Framelit and my strip is 2-1/2" wide.

Step 2: For four waterfall elements, score your cardstock (on the bad side of the card stock) in five places at even intervals with your Simply Scored scoring tool. I scored my card stock at 3/4", 1-1/2", 2-1/4", 3" and 3-3/4". You NEED that 5th score line, even if you have only 4 elements.


Step 3: Fold the card stock on all the score lines as shown.


Step 4: Adhere the waterfall elements (on this card, the labels) just below the following score lines: 3-3/4" for the upper most element, 3", 2-1/4" and 1-1/2"  for the last element. DO NOT adhere anything to the last scored area (3/4" score line;.


Step 5: On your card mat, use brads to attach a 4" x 1" strip of card stock or DSP about 1-1/4" from the bottom of the mat. DO NOT adhere this card stock with adhesive; you need your waterfall to pass through here.


Step 6: Put a strip of Sticky Strip at the top of the 1st score line (at 3/4").


Step 7: This is the tricky part. Slide the unscored portion of the waterfall card stock underneath the 4" x 1" strip of card stock or DSP that you attached with brads. Then, attach the Sticky Strip you put on in Step 6 to the top of 4" x 1" strip of card stock/DSP. Be very careful to adhere your waterfall on straight.  


Step 8: Decorate your card as desired.


See how it's *really* not that hard? There's a few steps, but once you've got the hang of it, it only takes about 20 minutes to make! The girls at my stamper's groups were thrilled with this card and I'm so glad! My mom will be getting this card for her birthday on Saturday and I hope she loves it too.

Does this card make you wonder a bit more about Stamper's Groups? If you're in Ottawa, drop me a line and I can tell you a bit more about how you can learn new techniques! 'Til next time, keep letting stamps bring out your creativity.

Wednesday, October 19, 2011

Sliding Treat Cup Card - Tutorial

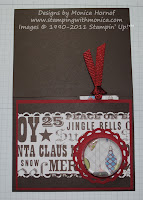
I recently did this type of card with my stamper's group. I found a few tutorials, improvised on them for the group, but didn't really like any of them. They weren't easy to follow, the photos in them didn't really help me and I knew I could make a better one :p So below is my own tutorial. The sketch I used is from Freshly Made Sketches. It works perfectly for the Treat Cup cards.


1. For your standard A2 card, cut a 8-1/2” x 11” piece of card stock for your base, a 5-1/4” x 4” piece of card stock for your mat and a 5” x 3-3/4” piece of card stock for your card front.


2. Decorate your card front with any designer paper, etc., that you will be punching through. Choose where you will be placing the Sweet Treat Cup and punch out a hole in your card base with the 1-3/4” Punch.


3. Place your card mat (Cherry Cobbler here) and card front (Early Espresso with Designer Series Paper) on your card base and position it as desired. DO NOT adhere.


4. Carefully flip the card over. With a pencil, trace the 1-3/4” circle through the card base onto the Cherry Cobbler mat. This will mark where you will punch out the circle for the top two layers.


5. Punch out the 1-3/4” circle through the top two layers of your card. Now all three layers of your card have the 1-3/4” circle punched through them and will align properly.


6. Remove the adhesive from the Sweet Treat Cup and adhere to the middle layer (Cherry Cobbler on this card). Adhere the top layer of your card (Early Espresso here) onto the middle layer, fitting the hole over the Sweet Treat Cup.


7. Cut a 2” x 4” piece of card stock for your slider. Position it over the hole in the card base (Early Espresso layer). Using Sticky Strip (to make sure that your card doesn't fall apart – the treat cup layer is quite heavy) create a 'frame' for your slider to slide in and out of and to keep it in the right spot. Put Sticky Strip on the rest of the card base and put your card together.

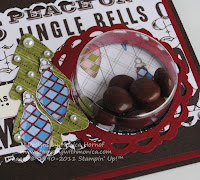
8. When you've put your card together, you'll see the slider through the Treat Cup as shown in the picture below. The slider goes between the middle layer and card base (Cherry Cobbler and Early Espresso).


9. Fill your treat cup from the inside of the card.


Funny thing, I didn't actually do any stamping on this card, except the Merry Christmas. But I did use a bunch of accessories including the Letters to Santa DSP, Perfect Pennants Bigz L Die as well as the Stocking Accents Originals Die. Isn't the Cherry Cobbler Waffle Ribbon just yummy? Love it!

Hope you enjoyed the tutorial and the card. Keep letting stamps bring out your creativity!


Thursday, October 13, 2011

Origami Diamond Fold Tutorial

If you read my blog on a semi-regular basis, you know that I like to do challenges. Someone recently asked my why I do so many challenges. Well, it pushes me to do things I may not think of, gives me new ideas for projects and keeps me blogging :) The challenges also bring new readers to my blog who hopefully enjoy my work!

This week's Pals Paper Arts Challenge challenged us to create a fall or Hallowe'en card based on the image to the left. Lots of leaves, Crumb Cake color and just a nice fall feel. We're doing a very autumn-feeling project with my Saturday night Stamper's Group this week-end and I thought I'd share this tutorial I made for the ladies. I love love love this special card style and hope the ladies too. I learned it at a Sparkledaisy Team Meeting a few months back.


I do have to preface this tutorial by saying that the original tutorial and idea is by Wendy Bell who made this video. I don't do well with video, I need step-by-step instructions and find they work better in my classes too. So I came up with this step-by-step text- and image-based tutorial. Enjoy!

1. Trim your favorite sheet of Designer Series Paper (DSP) to 11” x 11”. Pick the side you want showing on your card and put that side facedown on your Simply Scored Scoring Board.


2. Bring the bottom right corner of the DSP to the top left corner. Using your bone folder, create a nice, crisp fold across the middle. Make sure that the paper is folded right through the middle.


3. Turn the DSP with its folded edge to the top of board. Place your scoring board markers at 3” and 5.5” and score your DSP. Flip your DSP over and score at 3” and 5.5” again.


4. Turn your DSP 90 degrees so that the fold is straight down the 7.75” line of the scoring board and the tip of the triangle is touching the left edge of the scoring board. Make sure the folded edge is EXACTLY on the 7.75” line straight down (as shown). Score the DSP at 3.5”.


5. Cut out the small triangular notches as shown.


6. Fold inwards along all of the score lines.


7. Push the left and right folded sides 'inwards' to create the 'diamonds'. The diamond on the left-hand side will be the pocket for the top flap.


8. Open the folds of the DSP to reveal the inside. Put adhesive on all edges except what will be the left-hand diamond – as shown in red. Adhering the DSP together keeps its edges nice and clean.


9. Fold the card over on the main score line and put your Origami Diamond Fold Card together. Add embellishments, etc., as desired.


This is what it looks like opened up :

 
I used the Spice Cake DSP for my card as well as Dazzling Details on my leaves to jazz them up a bit. Hope you've enjoyed this tutorial. 'Til next time, keep letting stamps bring out your creativity!