Monday, May 13, 2013

Stampin' Up! Starter Kit... $40 more in free product!

Have you heard? You can get $195 in stampin' supplies for only $125 - tax and shipping included! Have you heard of a better deal?


Until May 30th, sign up to be a Stampin' Up! Demonstrator and you'll get $40 more in free product for your Starter Kit. What other perks does being a demonstrator offer?

*No commitment... If you decide you want to be a hobby demonstrator or that you can't demonstrate at all, that's fine! Take the kit and run :)
*You can PREORDER some items from the new catalog! And you'll be able to see the new catalog before anyone else! Can you say Woot woot! ;)
*Get 20% off on all your orders as long as you're a demonstrator.
*Get other demonstrator perks - there's TOOOO many to list!

For more information you can email me at stampingmonica@gmail.com or sign up directly on my Stampin' Up! Website (click on Join Now). I've been doing this for 5 years now and wouldn't change it for the world. I've been a hobby demonstrator, a full-on business demo and everything in between. Stampin' Up! works and evolves with my life :)

'Til next time, keep letting stamps bring out your creativity!

Monica
Shop Stampin' Up! Online 24/7

Sunday, May 12, 2013

I'm back with Wildflower Meadow!

I just got back from Stampin' Up!'s annual incentive trip, this year in FIJI. Let me tell you, it was amazing! Thank you to SU! for a fantastic trip to somewhere I probably wouldn't have ever visited and for spoiling us rotten :) I met some great demonstrators and made some new friends. It was perfect.

 
Also, I'm coming off another break. Doesn't mean I stopped stamping, but I did stop posting. I started a new job in mid-February and was having trouble keeping up with everything. But I'm going to try to keep my posts short & sweet so I should be able to do it all ;)

The new catalogue is coming at the end of May and I was able to preorder some new catalogue stamps and the new In Colors. A BIG perk of being a Demonstrator! (contact me how you can enjoy these perks as well as a 20% discount off your orders). One of the stamps I ordered was Wildflower Meadow, a beautiful background stamp. I did use the sketch at CAS(E) this Sketch! though I did change it up a bit ;)


Tips & Tricks:
*Love the colors? They're Smoky Slate (a new color introduced during this year's Color Refresh) as well as Coastal Cabana, a new In Color. LOVE this color combination.
*Those aren't brads framing the greeting! The are SU!'s new Candy Dots. You can attach them to brad bases for a little lift or simply adhere them to your project just like the jewels. So easy and they come in all the colors of all 4 Color Collections.
*To layer my image, I stamped it twice on separate pieces of card stock and they happened to line up... I think I was lucky ;) But you could also put the smaller piece of Whisper White right on the larger piece and stamp once. You'll always have a perfectly aligned image.

Hope you'll keep on reading and stamping with me, 'til next time, keep letting stamps bring out your creativity!

Monica
Shop Stampin' Up! Online 24/7


Card Recipe:
Stamps: Wildflower Meadow, Teeny Tiny Wishes
Card Stock: Coastal Cabana, Smoky Slate, Whisper White
Ink: Coastal Cabana, Smoky Slate
Accessories: Modern Label Punch, Word Window Punch, Basic Jewels - Rhinestones, Candy Dots, Stampin' Dimensionals

Sunday, February 24, 2013

Chalkboard Technique with Forever Young

I have been wanting to try this technique for, well, ever! I've seen it used many times and since I'm doing an All About Heat Embossing Class this Friday I decided to try it out. There's still some time to sign up for the class - we're doing 5 techniques!).

This card is a very special card for my new Godson, Zander, who was baptized today :) I don't have any religious stamps, as I'm not too religious. But to me, trees represent life and growth. I thought that the tree from the Forever Young stamp set and 'Dream' from Loving Thoughts would be appropriate. The tree in white and the white ribbon represent the purity that Zander's baptism has given him.


This week's sketch at Freshly Made Sketches was a very simple one, with just the one big element on the card. I did add the ribbon because my card needed it with the Oval Accent. And I always need to do things my way ;) I really love this technique because it's soooo simple, but makes a big impression. Here are some Tips & Tricks:

*For a crisp white embossed image, use Stampin' Up!'s Whisper White Craft Ink. It's a bit thicker than the VersaMark and will lead to a crisper white on the black. But careful not to goop your stamp up too much ;)
*I sponged the edges of my Basic Black card stock and the surface with some Whisper White Craft Ink. I didn't want the ink on my card stock to be too heavy, so I spread it out some more with a clean sponge.
*To trim my Oval Accent Die Cut to the right size, I first adhered it to the embossed Baja Breeze layer and only after did I trim it with my Paper Trimmer.

Zander's parents loved the card and were touched by the beautiful image. I hope when he sees it when he grows up he loves it too. I'm honored to be a part of his life :) Amazing what an impact a simple handmade card can make. 'Til next time, keep letting stamps bring out your creativity!

Monica
Shop Stampin' Up! Online 24/7


Card Recipe:
Stamps: Forever Young, Loving Thoughs
Card Stock: Basic Black, Baja Breeze
Ink: VersaMark, Whisper White Craft
Accessories: Stampin' Sponges, Whisper White 3/8" Taffeta Ribbon, Big Shot, Square Lattice Embossing Folder, Oval Accent Clear Bigz Die, Stampin' Dimensionals

Thursday, February 21, 2013

A Pretty Petites Birthday

I had ordered the Petite Curly Label Punch with my Spring Mini/SAB preorder (one of the perks of being a Demonstrator!) but didn't get the Pretty Petites coordinating stamp set until recently. When it came, I knew I had to break them out and use them together. Both of these items are Sale-a-Bration items, FREE with any order of $60 or more!


I based my card on this week's Sunday Stamps sketch. Of course I changed it up a big, but it's pretty close ;) I am loving the Poetry Prints Designer Paper Stack. There are some really girly papers in there, but there are some fabulous masculine papers there too! And this card fits the bill for a good men's card, I think.

Tips & Tricks:

*Even though there are fewer images suitable for masculine cards, you can use Designer Papers to fill the void! I like DSPs that have both masculine and feminine patterns.


*I am loving the new Large Basic Jewels. They are so easy to use instead of a button or brad. And much more cost effective ;)
*I didn't adhere the Linen Thread for the banner to the card. I just mounted my punched out images to the card with Stampin' Dimensionals and made sure that the Dimensionals covered the Linen Thread, holding it in place.

We will be making this card at my next Fast & Fabulous Card Class on Wednesday February 27th. Hope you'll be able to join us. 'Til next time, keep letting stamps bring out your creativity!

Monica
Shop Stampin' Up! Online 24/7  


Card Recipe:
Stamps: Pretty Petites (SAB)
Card Stock: Midnight Muse, Very Vanilla, Poetry Prints DSP Stack
Ink: Midnight Muse, Gumball Green, Summer Starfruit
Accessories: Linen Thread, Petite Curly Label Punch, Big Shot, Square Lattice Embossing Folder, Stampin' Dimensionals, Large Basic Rhinestones - Jewels

Wednesday, February 20, 2013

Paper Pumpkin Welcome Kit

Have you heard? Stampin' Up! is starting a monthly crafting kit subscription service called Paper Pumpkin! Why Paper Pumpkin? Because you get a bunch of paper/accessories and in half an hour of creativity, you can transform it into something beautiful!

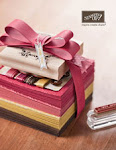
Every month for only $24.95 (shipping INCLUDED!) you'll get a kit that includes everything you need to make super cute projects. Ink, paper, stamps, accessories - the only thing you need to provide is adhesive. What an awesome idea! And because I went to Leadership, I have the first kit, the Welcome Kit, to show you!


The whole thing comes in a super cute box with instructions. Right to your door :)


That's right - there's a D clear block in there! Your Welcome Kit (the first one you get after you sign up) has one in there in so you can stamp right away if you don't have one. And if you DO have one, well now you have another :)

Here's what I made with the supplies given: one card following the directions, one card reversing the design.


And then, adding a different ink color (Tempting Turquoise) and some White Baker's Twine/White Taffeta Ribbon, I created the following two cards (that's right, your kit makes 4 cards!)


The best thing about Paper Pumpkin is that you can sign up, stay with it a few months and cancel anytime :) You can get more information here on my Paper Pumpkin Page or if you LOVE it as much as I do, you can sign up at www.mypaperpumpkin.com. Remember to select me, Monica Hornof, Stittsville ON, as your Demonstrator and to selected the Canada tab at the top right.

Here's one more idea for you - use the materials that come in the Paper Pumpkin Kit to create a card holder for the cards:


I used chipboard from the kit and tore the piece in half. Then I punched out part of the adhesive embellishment leftovers for the top circle. The 'hey there friend' sentiment is also framed with embellishment leftovers... what a great way to get more mileage from your kit!

I'm sooo excited about Paper Pumpkin that the 2nd Friday of every month I'm going to be holding a Paper Pumpkin Palooza! Bring your Paper Pumpkin supplies and you can use my ink, Big Shot, stamps and punches to make your projects even more fun! This event is FREE for anyone who signs up for Paper Pumpkin with me :) You'll also get a few free embellishments from me (if you're out of town, I'll mail these to you).

Hope to be creating Paper Pumpkin projects with you soon! 'Til next time, keep letting stamps bring out your creativity.


Monica
Shop Stampin' Up! Online 24/7