Showing posts with label Try Stampin' on a Tuesday. Show all posts

Saturday, October 13, 2012

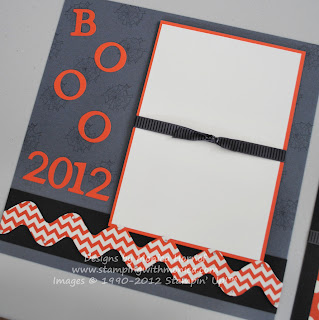
Hallowe'en Layout with Googly Ghouls

I love Hallowe'en. Not as much as Christmas, but there's something so fun about kids running around in costumes, super excited and totally juiced up on sugar ;) My favorite Hallowe'en stamp sets are the cutesy kiddie ones. Which is why I especially loved  the Googly Ghouls stamp set in the Holiday Mini. How can you NOT love witches, ghosts, bats and googly eyes??? Best of all, SU!'s Googly Eyes have glue dots on them so they're easy to stick onto your project.

This week, two of my favorite challenges, Try Stampin' on Tuesday and Freshly Made Sketches had sketches that were just perfect for scrap page layouts. And they worked really well together. So I worked it the best I could :) First, the Freshly Made Sketch:


I used the Howlstooth and Scaringbone DSP for my layouts. I really love the way the Tangerine Tango color pops. It's so vibrant! My second page is using the Try Stampin' on Tuesday Sketch:


Tips & Tricks:

*Not sure where to start with your scrapbook layouts? If you started out as a card maker like me, you may be a bit intimidated. I used a tip from a fellow stamper - approach it like it's a card and build on it. My photo mat is the image mat from the card. I added the 'BOOO 2012' to the left to build on my page. See how simple it is?
*My flagged element on the the second page seemed a little plain. Yet I didn't want to use DSP because I thought it would be too busy. So I embossed it with the Spider Web Embossing Folder. Love how it turned out!
*I absolutely love the Wacky Wishes hostess set. I wasn't sure about it when I first saw it. But it's so fun and cute! It worked so well on my second page.
*Aren't the Googly Ghouls just adorable? Just stamp, punch out and stick on a few Googly Eyes. :)

Once we have all our fun Hallowe'en photos, I'm going to do a class Saturday November 24th so that we can scrap them without a delay :) See my Class List for more information :)

'Til next time, keep letting stamps bring out your creativity!


Scrappin' Recipe:
Stamps: Googly Ghouls, Wacky Wishes, Wicked Cool
Paper: Basic Black, Tangerine Tango, Basic Grey, Very Vanilla, Howlstooth & Scaringbone DSP
Ink: Basic Grey, Tangerine Tango
Accessories: 2-3/8" Scallop Circle Punch, 1-3/4" Circle Punch, Basic Jewels - Rhinestones, 1/2" Satin Striped Ribbon, Googly Eyes, Big Shot, Tasteful Trim Bigz XL Die, Spider Web Embossing Folder, Typeset Alphabet Bigz Die, Stampin' Dimensionals, 2-Way Glue Pen


Saturday, October 6, 2012

Simplicity with Lacy & Lovely

As I mentioned in a previous post, fall colors in Ottawa are in full swing. And they're more gorgeous than ever this year. Every day they seem to be getting more intense, more colorful. The trees are full of colors like Cajun Craze and More Mustard. Which is why I thought that the Pals Paper Arts Challenge this week was so fitting. We were asked to use the colors More Mustard, Cajun Craze and Early Espresso.


Try Stampin' on Tuesday had a most fantastic sketch for us to work with this week, as well. So simple, yet so many possibilities! And we all know I just love to mix up different DSPs. Why stick to just one package? lol! On this card I mixed together Comfort Cafe and Candlelight Christmas.

Tips & Tricks:
*The Espresso pattern I used from Candlelight Christmas has large snowflakes on it, but I cut them off enough so it doesn't look as Christmas-y. Because that's not what I was going for ;)
*I'm loving the 7/8" Cotton Ribbon. You can stamp on it! And the Lacy & Lovely has stamps that are perfectly sized for it.
*I love stamp sets like Lacy & Lovely and Delicate Doilies. The larger stamps that work coordinate together are perfect for creating a custom look on any neutral surface. This card is super simple - just a Very Vanilla base with strips of DSP!
*Love flagging but can't get your card stock/ribbon flagged evenly on both sides? Check out this quick tip. Cut a slit down the centre of your card stock/ribbon (like on the Cotton Ribbon). Then cut from one corner of the DSP down to the end of the slit (you're cutting a diagonal, see the Candlelight Christmas DSP). Finally cut out the second notch from the opposite corner (like on the Comfort Cafe DSP). And voila - easy flagging!


I hope this card inspires you to simplify your cards a bit ;) Sometimes simple is best! To my Canadian followers, I hope you have a lovely Thanksgiving! 'Til next time, keep letting stamps bring out your creativity!


Card Recipe:
Stamps: Lacy & Lovely
Card Stock: Very Vanille, Candlelight Christmas DSP, Comfort Cafe DSP
Ink: More Mustard, Cajun Craze, Early Espresso
Accessories: 7/8" Cotton Ribbon

Tuesday, September 25, 2012

Dancing, Eaten Gingerbread Men

I'll be honest. I wasn't too fond of the Scentsational Season when I first saw it. I got it in wood-mount because it seemed so childlike and my 6-year-old daughter said she'd like to stamp with it (and she has :) ). But then I saw a few cards made with this set that I thought were cute and I've had fun with it. Funny how that happens ;)

I saw a super cute card somewhere, can't remember where now, but it had the gingerbread men in the stamp set tumbling all over the place. Using that card and the Try Stampin' on Tuesday Challenge as my starting point, I came up with this:


I have this cookie cutter that has gingerbread men with body parts cut off - arm, leg, head. So I thought that would be a fun way to make this card a bit unique :) I used the 1-1/4" Scallop Circle Punch to create the bite marks.

Tips & Tricks:
*Have you tried the new Coredinations Card Stock? It has a natural core so when you sand it down the core shows through. I love the look with lacy and intricate embossing folders. Makes it look antiqued!


*Even though you can't smell through the computer, imagine a lovely gingerbread smell coming from my gingerbread men. I embossed them with the Sugar & Spice Embossing Powder. I love how the embossing powder gives them that 'gingerbread-y' look.
*As much as I love my punches, sometimes I like to just stamp on a scrap piece of card stock and 'flag' it. To ensure perfectly centered notches, snip your cardstock right down the middle and then snip diagonally to the middle point. Voila, perfectly formed flag.
*To add a bit more vintage feel, I sponged my greeting with Soft Suede and peeled apart the very Vanilla card stock. I used my Bone Folder to tease the card stock and then simply pulled apart the layers.

I can't wait to send this car away for Christmas. And I can't wait to play around with this stamp set a bit more. :) 'Til next time, keep letting stamps bring out your creativity!


Card Recipe:
Stamps: Scentsational Season, More Merry Messages
Card Stock: Crumb Cake, Very Vanilla, Be of Good Cheer DSP, Early Espresso Core-dinations
Ink: Soft Suede, Cherry Cobbler
Accessories: Stampin' Sponges, Big Shot, Holiday Collection Framelits, Lacy Brocade Embossing Folder, Sanding Block, Stampin' Dimensionals

Sunday, September 9, 2012

A Truly Joyous Celebration

Friday was a super exciting evening in this new household! I had 25 women (and one boy who came with mom) fill my new stampin' studio and my basement. As my husband said, it was a good test for the house and having a party! My kids were super excited to answer the door for everyone and they certainly made fantastic hosts!

I was super excited to show the studio off to everyone and everyone had a great time! Unfortunately, I completely forgot to take pictures :( I was planning on it, but was excited with everything that it slipped my mind. We had three make-and-takes, one of which I used the sketch from this week's Try Stampin' on Tuesday Challenge.


I haven't taken pictures of the other two make-and-takes yet. Still struggling with photographing my cards and other crafts in my new space. But I've ordered a small light tent so my photo issue should be resolved soon :)

Tips & Tricks:
*Did you know you can do the marker-to-stamp technique with our new Silver & Gold Satmpin' Dazzle Marker? Color the stamp with the marker just like you would with any other colored Stampin' Write Marker and stamp! Voila, I've got a silver reindeer with minimal fuss.
*I love the flagged elements on this week's Try Stampin' On Tuesday's sketch. I know many people use a Square Punch to do their flagging but I much prefer to free-hand them.
*I love how festive and diverse the Snow Festival DSP is. So many different patterns in the package but they work so nicely together! And how gorgeous are Cherry Cobbler and Baja Breeze together?
*Are you loving the 3-1/2" Scalloped Tulle Ribbon in the Holiday Mini Catalogue? I wasn't sure how to use it on a card because it's pretty thick. So I folded it over a couple of times, tied a little Baker's Twine ribbon on it, and I had a unique ribbon with lots of dimension.


I'm so glad that everyone enjoyed themselves last Friday. And I really love this sketch, I'll have to use it again! 'Til next time, keep letting stamps bring out your creativity!


Card Recipe:
Stamps: Joyous Celebration, Tiny Tags
Paper: Baja Breeze, Cherry Cobbler, Whisper White, Snow Festival DSP
Ink: Baja Breeze, Cherry Cobbler
Accessories: 3-1/2" Cherry Cobbler Scalloped Tulle Ribbon, Cherry Cobbler Baker's Twine, Wide Oval Punch, Oval Punch, Jewelry Tag Punch, Big Shot, Lacy Brocade Embossing Folder, Stampin' Dimensionals, Silver Stampin' Dazzle Marker

Friday, July 27, 2012

A Fun Sketch for Birthday and Christmas

This is going to be a double post. Try Stampin' on a Tuesday had a fantastic sketch for us this week and when I saw it, I saw two types of cards. A birthday card using Papaya Collage and a Christmas card using Christmas Lodge.

I also made sure to use some super fun DSP's: Fan Fair for the birthday card and Candlelight Christmas for the Christmas card. The Fan Fair DSP coordinates well with the Postage Due stamp set, but I love it with Papaya Collage, too. It has a nice, vintage feel to it and I love the colors.

I really love the rose in that stamp set. It's so pretty, classic and vintage-looking. I thought it looked fantastic in the frame and I especially love the layered roses. What do you think of the button? It's one of the new Natural Buttons. I threaded a bit of Hemp Twine through it to complete the look.

I was inspired to do another Christmas card by the Friday Mashup. The challenge this week was to create a Christmas card and/or decorate the inside of the card. I did both. I chose the Candlelight Christmas DSP (a sneak peek from the Holiday Mini) and I love how it has a sparkly feel to it. A shimmer, just like candlelight. I also finally used my favorite Christmas stamp set this year - Christmas Lodge.


I just love how classic this stamp set is. For this card, something was missing on the 'banner' pieces of DSP. So I added a few Adhesive Pearls at the bottom of them. I love how easy they are to use. This DSP works perfectly with the Christmas Lodge set, too. Classic Christmas. I used my Paper Snips to free-hand the notches in my DSP.

I decorated the inside of my card with the same DSP that I used on the inside of my card. Then I used some of the stamps I hadn't used on the front of the card to make sure the person who received the card knew I wanted them to have a Merry Christmas. :)


I hope you like my two-in one card. I think I'll have to use this sketch a few more times. 'Til next time, keep letting stamps bring out your creativity!


Friday, July 20, 2012

Blast Off Birthday

I finally got my hands on the new Blast Off stamp set in the SU! cattie. I absolutely love this set, it's perfect for boys and even girls who love anything to do with space. The two-step stampin' possibilities as well as the coordination with punches is simply fantastic too. I did get this stamp set in wood because I anticipated that the kids will want to use it ~ I was right. I always get stamps for the kids in wood because it's much more user-friendly for wee hands and I don't have to worry about them putting stamps on clear blocks and losing them.

A good friend's son turned 9 yesterday and I really wanted to use this set. I worried that it may be a bit 'young' for him, but he seemed to like the card just fine ;) I was going to use the #9 from Memorable Moments for inside the space ship. but settled on the alien instead. I used this week's Try Stampin' on a Tuesday sketch but I have to admit that I did find this sketch a bit challenging. It was definitely outside my box. ;)


Tips & Tricks:

*I wanted the alien inside my space ship so I stamped him on the Whisper White card stock and stamped the space ship on a separate piece of card stock. Cutting the space ship out was really easy and I punched out the window with the 1-inch Circle Punch. I mounted the whole thing on Stampin' Dimensionals.
*The Polka Dot Parade DSP is perfect for fun, kids cards. The colors are bright and what kid doesn't love polka dots?
*Although the sketch doesn't have the ribbon on it, when I put my card together something was missing. So I wrapped some Daffodil Delight 1/4" Stitched Grosgrain Ribbon and suddenly it came together!
*I added the Basic Jewels - Rhinestones to the space ship to give it a bit of a metallic feel.

I'm glad my friend's son liked this card - I still can't believe he's 9! 'Til next time, keep letting stamps bring out your creativity!


Card Recipe:
Stamps: Blast Off
Paper: Basic Grey, Pumpkin Pie, Whisper White, Polka Dot Parade DSP
Ink: Basic Grey, Old Olive, Pumpkin Pie, Tangerine Tango
Accessories: Modern Label Punch, 1-inch Circle Punch, Paper Snips, Stampin' Dimensionals, Basic Jewels - Rhinestones, 1/4-inch Circle Punch, Daffodil Delight 1/4" Stitched Ribbon

Tuesday, July 10, 2012

More Daydreams, More Medallions

This week at Try Stampin' on a Tuesday we had a lovely simple sketch. They actually apologized for the simplicity of the sketch. I'm not sure why though, it's a lovely sketch. And because there aren't too many details in the sketch, we can use our imagination a bit more :)

I was trying to decide between using the Oval Accent Clear Bigz Die or the Floral Frames Framelits. Both are new to the catalogue and I haven't used them much yet. In the end, because I knew I wanted to use the Floral District DSP I thought the second largest Floral Frame would look best with the flower-patterned paper.


Because the Daydream Medallions stamp set coordinates with the Floral Frames I was super excited to use this stamp set again. But I didn't want to have a repeat of one of my last cards. So I decided to mix it up and use the Mixed Bunch stamp set and coordinating punch. LOVE how everything with Stampin' Up! works together so well!

Tips & Tricks:

*Before you ADHERE your card together, make sure that you're happy with how it all looks. That way you're not ripping anything apart if you're not happy with it ;)
*My card was missing dimension when I first put it together (see it above ;)). So I took it apart and sponged all the edges. Suddenly the DSP flower, the Razzleberry medallion and the daffodils popped out!
*The white stitching in the Rich Razzleberry 1/4" Stitched Grosgrain Ribbon really pops on this card. I thought I was going to really miss the plain grosgrain ribbon, but the Stitched style is really starting to grow on me.
*When I sponged the daffodil, I had already adhered the button with White Baker's Twine. So I added a bit of color to it by sponging it as well.
*I still can't get over how well these new Firm Foam Ink Pads work. Such a gorgeous, crisp image!

As I mentioned before, this sketch really allowed me some creativity and to combine a few different stamp sets and accessories. I really love simple :) 'Til next time, keep letting stamps bring out your creativity!


Thursday, July 5, 2012

A Twitterpated Canvas

Well, almost a canvas ;) I just need to mount this scrapbook page on a 12x12 canvas with Mod Podge. But you get the idea. When I was working on this week's Try Stampin' on a Tuesday Sketch, I realized that the sketch would make a really great scrap page. And I promised you all that I'd make one. So here it is :)


I was excited to use the Twitterpated DSP because the pink and blue tones worked well with my little girl's picture. That's her school picture from last September when she was about 5-1/2 years old. We're moving to a new home in about 6 weeks and I'm super excited to display this new canvas there :)

Tips & Tricks:

*Do you see those gorgeous little flourishes in the background? I used the large flourish from Flowering Flourishes and stamped them on the Pink Pirouette card stock in the same color.
*The Twitterpated DSP has some very varied patterns. I love how I could incorporate sweet flowers into the butterflies, but could use the a more neutral grey pattern as a background for my daughter's photo.
*I used the Fancy Fan Embossing Folder on some Vellum Card Stock (not the Paper, the embossing folder will just chew it up, it has to be the Card Stock) for the top and bottom butterflies.
*I find I don't use the strips of adhesive Rhinestones enough but they were perfect for the centers of my butterflies. Adds a bit of bedazzle to my canvas :)
*Some patterns in the Designer Paper have a vintage feeling to them. The Baja Breeze Seam Binding Ribbon is perfect for vintage projects with a modern touch.
*I used my Simply Scored Scoring Tool to score my Baja DSP on both ends. This gave me a raised piece of DSP for my journaling.


I hope you like my canvas. My daughter was tickled pink when she saw it ;) I hope this also showed you how easily you can turn a card sketch into a scrapbooking sketch. 'Til next time, keep letting stamps bring out your creativity!


Tuesday, July 3, 2012

A Button, Button Birthday

After a busy long week-end, I was planning on taking things relatively easy. But in the end I had a bit of a crazy day and made today's card to relax a bit. I used this week's Try Stampin' on a Tuesday sketch as my inspiration. After looking at this sketch again, I realized it would also make a really great scrapbook layout. Just imagine a mat for two 4x6 photos in place of the Happy Birthday and three 2-1/2" or 3" circles cut out from DSP instead of the buttons stamps. I actually like this idea so much that I'm going to sit down tomorrow and do this - stay tuned!

On my card, I used a stamp set I haven't used in a long time: Button, Button. I don't use this stamp set enough. It's fun, versatile, and this card could be easily made into a men's card using a different 'button'. I love pulling out a stamp set, accessory or DSP that is totally underused and playing around with it. It always makes me remember why I loved that stamp set in the first place.

Tips & Tricks:

*I loved this sheet of DSP from Summer Smooches. Not surprising since Rich Razzleberry is my favorite color. I didn't use it here, but it coordinates well with the Fancy Fan Embossing Folder.
*I wasn't sure what colors to use for my card so I relied on the colors in the DSP: Island Indigo, Daffodil Delight, Tangerine Tango, and Rich Razzleberry.
*All the buttons in Button, Button coordinate with one of the many circle punches SU! carries. Once again, coordination made easy :)


*I really love the simplicity of this sketch. The circles could be flowers, butterflies, whatever you want!

Quick post for today, but I'm tired. ;) 'Til next time, keep letting stamps bring out your creativity!


Thursday, June 28, 2012

Colorful Daydream Medallions

Wow - it's Thursday! How did that happen? I'm having a hard time keeping up with things lately... my daughter finished school for the summer last week and we've been spending lots of time hanging out. But that means that my crafting time has been seriously reduced ;) Actually, that's not true... Anna's a crafter, she helped me scrapbook today :) But everything takes a bit longer and I just don't have the same amount of time to blog, write newsletters, etc. But I'll get on top of it. Tonight!

What do you think of the sketch at Try Stampin' on a Tuesday this week? I love it! I know it looks like it was made for the Delicate Doily Sizzlit, but to me it screamed Daydream Medallions and the Floral Frames Framelits. And conveniently, the wonderful brown UPS truck brought them for me on Tuesday when I made this card. I did cheat a bit because I made the card a standard A2 size, not square. But in retrospect, I should've made it square and then made my own envelope with my Simply Scored Diagonal Plate. Next time :)


Tips & Tricks:

*Like the DSP? It's the new International Bazaar. The UPS guy was nice enough to bring that for me on Tuesday, too :)
*SU! tells us which colors are in the DSP. It made choosing the colors for my medallions a snap! I really love the Pacific Point, Tangerine Tango, Daffodil Delight and Lucky Limeade color combo. Using the color combinations in the DSP also forces me to think outside my box.
*I know some of the International Bazaar DSP is pretty busy. But it makes a fantastic background. Don't be afraid to use these busier patterns - your cards will thank you for it :)
*I sponged the edges of the medallions with Soft Suede. They needed a little something to make them stand out a bit. I also used my Bone Folder to curl the edges of the biggest medallion.
You know what I love most about this card? It looks great in both landscape and portrait orientations.
*Did I ever mention how much I love Framelits? These new Floral Framelits have such wonderful shapes and are so easy to use. One of my fave accessories, hands down!

Hope you've enjoyed this card. Which is just a smidge out of my box. 'Til next time, keep letting stamps bring out your creativity!


Tuesday, June 19, 2012

Playing With Some New Toys

Today was a great day. The little brown truck (aka UPS truck) pulled up at my house and dropped off a 23 lbs box of goodies for me to play with! No, it wasn't all mine, there were lots of goodies for the ladies who attended my New Catalog Event almost two weeks ago. But I did get a bunch of stamp sets, all of the new In Color Ribbons, some of the 1/4" Stitched Grosgrain Ribbon, new DSP, some Big Shot stuff and some new punches. Fun times!!! :)

I used the sketch above from Let's Try Stampin' on Tuesday for my card today. I wanted a sketch where I could use my new stamps, new DSP and In Color Ribbon. I think it worked :) Of course, as you can see I changed it up - a bit. Lol. I also used the Four Seasons Hostess Set. Isn't that birdie so cute!


Tips & Tricks:

*I love love love the new Fancy Fan Embossing Folder. It is so gorgeous and classic! I can see myself using this one a lot!
*Have you seen the new Paper Piercer and Essentials Paper-Piercing Pack? So many shapes you can pierce: the Heart, Curly Label, Designer Label and more! All coordinating with our punches! I used the circle template on this card.
*I really loved these rolled flowers and I replaced the scallop edge on the sketch with them. The technique is simplified paper quilling. I had done this technique a few weeks ago in another card and I had to refer to my own post about it to remember how to do it. How silly is that!
*The ladies at my Stamper's Group are doing this card this Sunday. I really wanted them to try out some of the new products. Want to come and learn some advanced techniques? Come try the group out on Sunday or join a new one starting in August/September :)
*I am *really* loving the Stitched In Color Ribbon. It is so soft and shiny! And don't you love how the Summer Starfruit Ribbon looks golden? So pretty...


The Polka Dot Parade DSP is so much fun! I love the bright colors and all the polka dots! (Of course ;) ) I really hope the ladies enjoy this card on Sunday! And I'm so glad I've finally got my new goodies... I have a few more coming next week :) Happy days!

'Til next time, keep letting stamps bring out your creativity!

Friday, June 15, 2012

Special Thank You for a Special Teacher

My daughter Anna is finishing up Senior Kindergarten this year and she has been lucky enough to have the most fantastic teacher for the past two years. She is patient, caring and just plain fantastic. We truly couldn't have asked for better. Last year I gave her an alphabet collage (on the left) that she loved. We didn't know she'd have her again this year again and I knew I couldn't really top last year's gift (I gave her 10 handmade cards and garnet earrings straight from the Czech Republic). But I could make her a great card ;)

I used two challenges as the inspiration for my card:
1) The Paper Players challenged us to use Basic Grey, Lucky Limeade and Melon Mambo in our card.
2) Try Stampin' On a Tuesday (a NEW one for me!) gave us a great sketch to work with.


I was pretty happy with the final product and her teacher liked it too :) My daughter goes to an all French school so I used this non-SU! embossing folder that has 'Merci' in it.


Tips & Tricks:

*I colored the apple stamps from Fruits and Flowers with Stampin' Write Markers, cut them out and then re-stamped them with Basic Grey ink and cut out the center heart.
*The apples and hearts are both mounted on Stampin' Dimensionals to make sure that they pop out. I love how easy it is to add texture to cards with these little sticky pop-ups.
*To coordinate my button 'thread' with my card (and to add a bit of visual contrast in colors) I threaded a thin strip of card stock through the button. It really pops!
*I did stamp the whole apple, including the center heart, in Melon Mambo. I wanted that little bit of pink peeking out from under the grey ;)
*I've been in a bit of a Crystal Effects mode lately. I love the glossy look it gives my card elements. I've had the same bottle for almost four years now and used it for many many projects. Talk about good bang for your buck!

I'm glad Anna's teacher loved her card and hopefully this will inspire to make a special card for your child's fantastic teacher. 'Til next time, keep letting stamps bring out your creativity!