Showing posts with label Kids Cards. Show all posts

Friday, July 20, 2012

Blast Off Birthday

I finally got my hands on the new Blast Off stamp set in the SU! cattie. I absolutely love this set, it's perfect for boys and even girls who love anything to do with space. The two-step stampin' possibilities as well as the coordination with punches is simply fantastic too. I did get this stamp set in wood because I anticipated that the kids will want to use it ~ I was right. I always get stamps for the kids in wood because it's much more user-friendly for wee hands and I don't have to worry about them putting stamps on clear blocks and losing them.

A good friend's son turned 9 yesterday and I really wanted to use this set. I worried that it may be a bit 'young' for him, but he seemed to like the card just fine ;) I was going to use the #9 from Memorable Moments for inside the space ship. but settled on the alien instead. I used this week's Try Stampin' on a Tuesday sketch but I have to admit that I did find this sketch a bit challenging. It was definitely outside my box. ;)


Tips & Tricks:

*I wanted the alien inside my space ship so I stamped him on the Whisper White card stock and stamped the space ship on a separate piece of card stock. Cutting the space ship out was really easy and I punched out the window with the 1-inch Circle Punch. I mounted the whole thing on Stampin' Dimensionals.
*The Polka Dot Parade DSP is perfect for fun, kids cards. The colors are bright and what kid doesn't love polka dots?
*Although the sketch doesn't have the ribbon on it, when I put my card together something was missing. So I wrapped some Daffodil Delight 1/4" Stitched Grosgrain Ribbon and suddenly it came together!
*I added the Basic Jewels - Rhinestones to the space ship to give it a bit of a metallic feel.

I'm glad my friend's son liked this card - I still can't believe he's 9! 'Til next time, keep letting stamps bring out your creativity!


Card Recipe:
Stamps: Blast Off
Paper: Basic Grey, Pumpkin Pie, Whisper White, Polka Dot Parade DSP
Ink: Basic Grey, Old Olive, Pumpkin Pie, Tangerine Tango
Accessories: Modern Label Punch, 1-inch Circle Punch, Paper Snips, Stampin' Dimensionals, Basic Jewels - Rhinestones, 1/4-inch Circle Punch, Daffodil Delight 1/4" Stitched Ribbon


Sunday, July 15, 2012

Sunday Lollipops

Before doing today's post, I wanted to update a bit on my 'Papaya Collages' mystery. It's the stamp set I used in my last post. It was bugging me, because no one seemed to know. Then I got a comment on my post from karmi84 saying "i really like the papaya and the colours you have used, it is a really lovely card". And that got me thinking... is the papaya a type of bird? It wasn't easy but I came up with this on Google. The papaya refers to the 'papaya bird'. In Suriname, the Black Spotted Barbet is known as the Papaya Bird. In Hawaii, the House Finch is known as the Papaya Bird. I'm not bird expert, but to me they look like the same bird :) Below are some references. If I'm wrong, feel free to call me on it ;) In the meantime, thanks to karmi84 for help figuring this mystery out!

http://www1.nhl.nl/~ribot/english/canig_ng.htm
http://www.bird-friends.com/BirdPage.php?name=House%20Finch

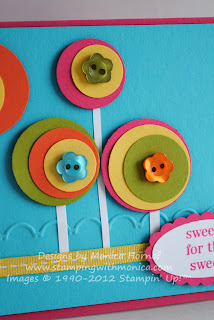
Onwards and upwards to this week's Sunday Stamps Challenge. We had a lovely sketch to work with today. I really love butterflies, but I wanted to change it up a bit. I've seen these layered circle lollipops done on a few cards now ~ various blogs, Pinterest and other places. I loved them so much, they're so fun and I thought I could use them with this sketch.


Ususally I use colors from colour challenges or I use DSP as my inspiration. For this card, I wanted to do BRIGHT :) And I think I've achieved that with the Melon Mambo, Tempting Turquoise, Tangerine Tango, Daffodil Delight and Old Olive.

Tips & Tricks: 

*This card is easy-peasy, even though there are quite a elements/layers. But it's all punch art! I just punched out a whole pile of different-sized, different-colored circles and put them together with colors I thought looked good.
*Something was missing on the lollipops, they were just too plain. So I used Glue Dots to adhere a flower Brights Designer Button to the middle of each. Problem solved :)
*I wanted to use Baker's Twine for the 'stick' of the lolli. But it was a pain to stick on properly. So I just trimmed little strips of Whisper White Card Stock and used those as sticks.


*For the scalloped layer, I didn't want to take away from the lollipops and ribbon with another layer. So I used my scalloped embossing strip. I like the way it kind of looks like grass.

Even though this card has pink in it, I think it would make a perfect birthday card for any young girl and young boy. What child can resist lollipops? I hope you'll find time to play with us and this great sketch at the Sunday Stamps Challenge.

'Til next time, keep letting stamps bring out your creativity!


Wednesday, April 25, 2012

A Thank You to Our Vet

As I mentioned in a post last week, my family and I just got back from a two-week trip to Germany and the Czech Republic. We were visiting relatives and with the visit came a TON of chocolate for my two children. We have been a bit slow at unpacking and this past week-end our dog Nyla got into it. We thought most of it was gone, but she has a super nose and found some. For those who aren't dog lovers, chocolate, especially dark chocolate, is toxic to dogs. It was a lot of dark chocolate and she's a Jack Russell Terrier (the smaller the dog, the less they can eat without being affected).

She had already thrown up some of the chocolate (that's how we realized she ate it) but we quickly called our vet who was luckily still open on the Saturday. We had to feed our dog hydrogen peroxide (for wounds) to make her throw up. Then we had to give her an activated carbon solution to empty her system more and coat her intestines to prevent absorption of the theobromine (the compound in chocolate toxic to dogs). It was absolutely no fun for Nyla and heartwrenching for us. The vet gave us her home number, cell number and didn't charge us anything except for the carbon solution.  We always say that she's fantastic with the animals but has horrible people bedside manner ;) But she really loves the pets and it shows. So we gave her a heartfelt card (what else? lol!) and a gift cards to Starbucks.


I knew I wanted to use the D is for Dog stamp set (on the Retiring List so if you love it, make sure you get it before it's gone on May 31st). I also wanted to use this week's Mojo Monday Challenge. Usually with a quilted or checkered sketch, I'd use a whole bunch of different squares from DSP. But the D is for Dog stamp set have 3 images, perfectly sized for the 1-1/4" Square Punch.

Tips & Tricks:

*I alternated between using Stampin' Dimensionals under one square and not using them under the other. Love how this gives the card extra dimension.
*I used a neutral palette for this card: Early Espresso, Crumb Cake, Soft Suede and Very Vanilla. I thought it reflected our dog's coloring and markings quite well.
*I love how Stampin' Up! Card Stock is dyed all the way through and nice and thick. When I tease the card stock it splits into layers and adds even more dimension to my card.
*Don't you love how it looks like the dog is actually wagging its tail? Sooo cute!!!

I hope our vet her little treat. We are so thankful she is always so willing to help us out when needed and I'm happy to report that our dog is fine! 'Til next time keep letting stamps bring out your creativity!


Tuesday, March 6, 2012

Baby, Baby, Baby Shower!!!

I know my blog posts have been few and far between lately. We've recently decided to sell our house and we're getting ready to list. I didn't realize how much stuff we'd accumulated in 10 years. It's ridiculous! The toys, the clothes, the stamping stuff! lol! It's total and utter insanity. So between decluttering and prepping for multiple workshops this month, my stampin' time is sadly limited.

I did get to play around with my stuff last week though. One of my good friends is having a baby at the end of a month so a mutual friend and I threw her a shower this past week-end. I got it into my head that I'd make decorations, favours and thank you cards so that my friend could properly thank all of her guests. Did everything turn out beautiful? Oh yeah! Especially the banner - it was such a hit my friend hung it in baby's room after the shower :) But was it a lot of work? OH YEAH! lol! Bare with me, there's quite a few pics :) But most of all, enjoy!

*The favours using the Baby Bundle stamp set and Everyday Elegance DSP. They were filled with chocolates which made our younger guests (it was a mom and me shower) very happy :) I made 28 of these. Lots and lots of Sticky Strip used on these ;)


*Pinwheels using Elementary Elegance DSP. I made four large pinwheels and six small pinwheels.


*Thank you cards using the baby from the retired Cuddles & Tickles stamp set. LOVE that stamp set! I made 20 cards for my friend.


*And finally, the banner. Baby's name will be Zander. I used the Beau Chateau DSP, the Perfect Pennants Big Shot Die and I embossed the letters with the Perfect Polka Dots Embossing Folder. I LOVED the way it turned out!


I hope Baby Zander loves the banner above his crib - the colour works perfectly. I also hope these ideas inspired you a little bit when you have a party to throw. 'Til next time, keep letting stamps bring out your creativity!

Tuesday, February 28, 2012

Quasi-Telescoping Card

One of my good friends is having a baby very shortly. This week-end, another friend and I are hosting a baby shower for her so I needed to make a shower card for her. I combined two challenges for this card, the Mojo Monday Sketch Challenge as well as the Friday Mashup Challenge. The Mojo Monday Challenge was 'Round or Square' and the Friday Mashup Challenge asked us to make a project using the kissing technique and/or a round project. I didn't do the kissing technique on my card but I did make a quasi-telescoping round card. Why do I say it's quasi-telescoping? Well, one element of the card flips out from the bottom and one element flips out from the top.

I'll write a little something on the top scallop circle. I love the Baby Bundle stamp set for anything baby. It has greetings, onesies, teddies, booties, and more.


Tips & Tricks:

*Think that the Twitterpated DSP is for feminine cards only? Think again! I used it on this card and I think the Basic Grey pattern works very well!
*I love the clear Itty Bitty Buttons. I love threading them with super skinny strips of coordinating card stock even more. Instant color coordination!
*Can't figure out how to color in teeny details like the stroller polka dots? Stampin' Up!'s Stampin' Write Markers have two tips, a fine tip and a thicker brush-style tip.
*Don't forget to attach the circles that will be flipping out upside down. Because when they flip up, they will be right side up :)

I hope you've enjoyed this card and I hope my friend enjoys this card even more! 'Til next time, keep letting stamps bring out your creativity!


Wednesday, February 8, 2012

A Moveable Digger

My original plan for this card was to use the Dinoroar stamp set. I need birthday cards for two soon-to-be 3-year-old boys. But then, as I was looking through my stamps, I remembered a card that one of my downline, Tara, made. She cut apart the arm of the big digger in I Dig You and made it moveable with small Mini Silver Brads. So I took her idea (thanks Tara!) and used it on my own card.

For the sketch, I used this week's Freshly Made Sketch. I flipped the sketch to suit the digger image and turned the two strips in the sketch into grass/field.


I will warn you, this card is very labour intensive. But I think it's still 'clean-looking' and fits the bill for a 'fresh' card. The digger needs to be stamped three times - you need to first cut out the digger base and the shovel (from the first stamped image), and the two parts of the arms (second and third stamped images). But it's so fun when it's done! What little (or big!) boy wouldn't love this?


Tips & Tricks:
*I love making my own grass out of card stock because it's so simple! Just take a strip of card and snip away at irregular but small intervals with your Paper Snips. Just be careful to not snip right through the the card stock ;)
*I made the dried (yellow) grass out of So Saffron card stock and sponged it with Daffodil Delight to give it some dimensions. I sponged the Lucky Limeade grass with Lucky Limeade ink.
*I love using markers on my stamps to get two colors. But sometimes, it can look streaky. For my digger, I stamped the whole image in a Daffodil Delight ink pad and then I used Basic Black marker on the shovel and the digger's track. Voila! No streaks!
*I love how the Lucky Limeade Baker's Twine adds just a little touch of color!
*I free-handed the rock with my Paper Snips and then sponged the Basic Grey card stock with the same color ink. I was pretty pleased with the result!

Wow - that's a lot of tips & tricks! I hope the birthday boys love this card. And I hope you love it too. Don't be scared away by all the cutting, the result is most definitely worth it. 'Til next time, keep letting stamps bring out your creativity!

Tuesday, February 7, 2012

A Creepy Crawly Thank You

When you see the card I made for this week's Mojo Monday Challenge, you may be thinking "Oh no! She's finally lost it!". But don't worry my stampin' friends, I know it's not Hallowe'en... even though this week's card uses the Hallowe'en Scaredy Cat stamp set as well as the Frightful Sight DSP.


Why the spidery card? I needed a 'thank you' for the kids who came to my daughter's 6th birthday party last week (where did the time go?!?!). I wanted an insect-y card because for the party because Little Ray's Reptiles came and showed us some really great insects, reptiles and amphibians. It was awesome! If you're in the Ottawa area, I highly suggest you have them do a birthday party for your child. It was worth every single penny. Isn't she cute all wrapped up in a python?


I did change up the Mojo Monday Sketch a little bit to include pennants from the Petite Pennants punch.I thought the spiders worked really nicely with the pennants. To make the card less 'Hallowe-eny' (because it is NOT a Hallowe'en card ;) ) I used the Calypso Coral Organdy Ribbon which you can earn FREE during Sale-a-Bration when you place an order of $60 or more. Still gorgeous, can't get enough of it!


Tips & Tricks:

*Because the Organdy Ribbon is translucent and 1/8" inch wide, it's great for wrapping around a card multiple times. Adds a unique look without being too 'heavy' looking.
*Not sure how to layer your Modern Label Punch? Try layering it on top of the Scalloped Oval Punch - fits perfectly in the center and just peeks over the sides. Super cute!
*SU!'s Basic Black Ink is waterproof and some people don't like using it because it stains their stamps. Here's a little tip... ink your stamp in a dark ink such as Chocolate Chip or Early Espresso and then ink it in black. Makes it much easier to clean off with the Stampin' Scrub.
*Love the Baker's Twine and love how it's now available in the 2011-2013 In Colors. Isn't it lovely how it coordinates with the Calypso Coral card stock and ribbon?

Hope the kids love their cards and hope you like it too! I think I made pretty good use of my Hallowe'en stamps in February, too! 'Til next time, keep letting stamps bring out your creativity!

Monday, January 23, 2012

Happy New Baby Trifold Shutter

Back from Leadership and ready to get posting :) I sent my sister and her husband a card and a little gift to welcome their new blue bundle of joy. She got her package today so I'll finally post the card I made ~ I didn't want to spoil the surprise!

I wanted to make something super special and I know my sister loves Trifold Shutter Cards (click on the link for directions :) ). She loves how fancy they look and how they're so easy to display. So I went in that direction.


I once again used the Beau Chateau DSP - I've made some girly cards with it, but the Marina Mist and Bashful Blue colors are perfect for a little boy.


You may be wondering where I got the greeting. It's from an old, retired (from 1997!) stamp set, Cuddles & Tickles. I bought it when I first got into stamping over 4 years ago and it's one I won't give up ~ it's just too perfect. The baby carriage is from a current stamp set though, Baby Bundle.

Tips & Tricks:

*Don't you just love the baby feet? Our new stamp set in the Spring Mini, Baby Prints, is very similar.
*I just love the baby booties and onesie in the Baby Bundle stamp set. Even if you don't like cutting images out, these ones are pretty easy to trim with you Paper Snips.
*When I have a lot of card stock showing on a fancy card, I like using textured card stock. It just adds that much needed detail :)
*I love the new buttons in the Twitterpated suite of products. Aren't they adorable?

Hope you've enjoyed this card and I hope my sister does too. I'll be back soon! 'Til next time, keep letting stamps bring out your creativity!

Tuesday, January 10, 2012

A Yummy Birthday Card

Happy Birthday!!! I'm trying a new challenge this week, the Friday Mashup. Every week, the give us two challenges and we can 1) do one challenge, 2) do the other challenge or 3) 'mash up our creativity' and do both on one card. This week we were asked to make a birthday card and/or use pastel colors on the card. For my first Mashup, I did both :)

I also needed to make a children's card for my Birthday Card Class this Friday ~ so I once again used this challenge to help me along in my class prep :) I'm so busy ~ I can only do so many things at a time so if I can kill two birds with one stone, I will!


After using my cherry-scented embossing powder last week, I was itching to try my melon-scented and vanilla-scented powders as well. I know my ice cream cone is green, but there is no pistachio-scented embossing powder and I wanted to use Lucky Limeade on my card, so vanilla-green it was :) And the melon... mmmmmmmmmm. Think melon-flavored Jolly Ranchers... yummmmmmmy! Love these powders!


Tips & Tricks:

*I used markers to color my stamps and then use my Versamarker overtop the colored images. Then I applied the Scented Embossing Powders and heat embossed them! Super easy to use :)
*Don't you love how the Mouthwatering stamp set coordinates perfectly with the Sweet Shop DSP? Stampin' Up! makes coordination so easy - that's one of the things I love best about their products.
*The Occasions Mini offers Baker's Twine in all of the 2011-2013 In Colors. I love the Twine because it's so cost effective ($3.95 for 25 yards!) and you can wrap it around the card a few times without giving it a second thought :)

Hope you love this card and hope it's tempted some others to join us on Friday at my class! 'Til next time, keep letting stamps bring out your creativity!

Monday, December 5, 2011

Happy Birthday, Sweet Baby Boy

My family lives overseas and my cousin just had her first baby. He came a few weeks earlier than planned and was almost born in their car. Other than being teeny tiny he's doing well. I wish I was closer so that I could give him a little snuggle ~ he's the sweetest little guy ever! (well, except for my own little guy of course ;) ).

I decided to use today's Mojo Monday sketch to make the little guy and his proud mommy and daddy a card. I used a stamp set I haven't used in a while but absolutely love, Baby Bundle. It's got so many cute little baby accessories and is perfect for two step stampin'. If you're feeling like putting in a bit of extra effort, you can cut out some of these accessories for your card, like I did.


Tips & Tricks:

*Want a Designer Series Paper that works for feminine, masculine, kids and baby cards? Look no further than Beau Chateau. I know I've sang the praises of this DSP before, but now I've used it for this baby card... how awesome is that?
*Create and extra special customized card by lining one of our Medium Envelopes with a coordinating Designer Series Paper.
*Once again I'm using the Basic Jewels - Pearls on my card. I love how it adds a bit of special detail to the stroller.
*The Perfect Polka Dot Embossing Folder is my go-to embossing folder for kids cards.
*I popped my main stroller image on as well as the booties and onesie on Stampin' Dimentionals to make sure they're a focal point on my card.

I hope my cousin and her husband enjoy the card and are enjoying their new little bundle even more! 'Til next tiem, keep letting stamps bring out your creativity!

Monday, October 31, 2011

A Circus Birthday

BOOO!!!  Happy Hallowe'en to all my stampin' friends :)  I've shown many Hallowe'en projects so I'm going birthday today.

My friend's little guy is turning 3 on Sunday which means a card is needed :) I love using challenges for my cards, they generally make me think out of my box! I used the Mojo Monday Sketch Challenge for this card.

I love the Big Top Birthday DSP for kid's birthdays - it's so fun and festive! The colors are perfect for both boys AND girls, too. I added the monkeys from Fox and Friends because I thought it was quite fitting for this little guy. Even though his older brother is more of a monkey than him, he broke his arm at the start of last summer by being a little monkey. Silly boy. Hope he enjoys this card!


Tips & Tricks:

*Don't have a Circle Scissor Plus to cut bigger circles? No problem! Neither do I! So how'd I cut out my DSP circle? I learned this little trick from my upline, Marlayne. Use a plate, glass (or in my case, a spool of 1/4" grosgrain ribbon) and trace it on your DSP (the side you won't be using). Then cut it out carefully with your Paper Snips. Voila! A circle of any size :)
*I love how the Tempting Turquoise Stampin' Emboss Powder makes my monkeys POP!
*To add a bit of texture to my stars DSP I embossed it with my Stripes Embossing Folder. I love the look of embossed DSP!
*My greeting is in French because my friend's children speak primarily French. I have Teeny Tiny Wishes in both English and French because I have a large Francophone customer base.

'Tis all for today... have a safe Hallowe'en and 'til next time... keep letting stamps bring out your creativity!

Wednesday, August 31, 2011

Stampin' with Kids

A lot of my friends and customers are truly shocked when I tell them that I not only let my 5-year-old stamp with my supplies, but I let my 2-year-old stamp with them too! In fact, he's been stamping since he's been 8 or 9 months old - he saw his big sister doing it and wanted to join in. I figured, why not? The ink is non toxic, washes off (eventually - depending on color) and is great for mastering those fine motor skills :)

Do I let them use MY stamp sets? The ones my customers use? Heck ya! Why not? Half the time my customers get them dirtier than my kids do. And really, who cares? If they're being enjoyed, that's all I care about! Dirty blocks don't stop the stamps from working ;) As for inks, as you can see below, Charlie has his 'own' inks so he can mix and match colors as he pleases. And they ARE SU! inks... a number of years ago there used to be a 'Stampin' Kids' line and I bought them before they were discontinued. My 5-year-old has graduated to be allowed to use two SU! ink pads at a time ;)  But when she wants to muck around, she uses the Stampin' Kids inks too.


Tips & Tricks: 

*Don't worry too much about mess - in the grand scheme of things, stamping is one of the less messy crafts you could be doing with your kids.
*If you really don't want to share your stamps, get your child his/her own stamp set and an ink pad or two - you won't regret it!
*My daughter makes all her own birthday cards for her friends. Think about how much time and money this will save you in the long run ;) So what if sometimes the cards say 'Get Well Soon'... 
*Now that my daughter has been stamping for a while, I LOVE the fact that she's getting into techniques like 'Rock and Roll' and 'Two-Step Stampin''.  I love having this creativity to share with her.
*I get more stamping done since both my kids stamp too. I just set them up at their own station when I want to get something done and it keeps them occupied for half an hour to an hour. Even my 2-year-old!

So get out there, give your kids some stamps, some ink and let stamps bring out their creativity!