Last Friday, I hosted a birthday party for my daughter (who turned 7) and ten of her 'best' friends. She actually had many more 'best' friends, but we were able to cap it at 10. Thank goodness. Because as fun as it is crafting with eleven 6-9 year olds, it is crazy and exhausting! Luckily I had a good friend helping me. Funny thing is, she's not super crafty, but she was the one doing all the stamping and punching with the girls :D I think she's good for the rest of the year now with respect to craftiness ;)
So what did we make? Well, my daughter wanted to make a card - so we made a Valentine's card for the girls' parents with the Dress Up stamp set as well as various Happy Valentine's Day greetings. But the bigger project was an 8x10 canvas. I wanted to keep the project simple. The girls were old enough to punch and stamp, but I also wanted to leave some room for their creativity.
Each girl got their initial in Silver Glimmer Paper so that they could personalize their canvas. I focused the project around the Floral District DSP because it's so pretty and girly. I thought the girls would love it and I was right :) Here are a few Tips & Tricks I've learned along the way on stamping with kids:
*Keep it simple! Leave a lot of room for personalization. Every single girl had a completely different canvas when she was finished. Only two loosely followed my example. The other nine did their own thing. It's one of the things I love so much about stamping with kids - the uninhibited creativity.
*Have a lot of extra DSP and card stock on hand. I let the girls go crazy with the Full Heart and Blossom Punches, and crazy they went. They used nearly five full sheets of DSP! I kept cutting more to keep them happy. They were punching and gluing flowers and hearts everywhere!
*Do the ribbon tying for them. It will avoid wasted ribbon as well as frustration. Many adult stampers have a hard time with ribbon and bows, the kids will too (for the record, I adhered their ribbon and tied the bow where they wanted it).
*Offer them some personalization. The girls were THRILLED to have their initial for the canvas.
*You can never go wrong with bling. Silver Glimmer Paper and Basic Jewels were definitely popular!
*Use wood mount stamps. They won't fall of the block and are less likely to get lost.
To show you I'm not a one trick pony, I made the cake below for my daughter's birthday as well. She wanted a Barbie cake. She didn't tell me how she wanted it decorated but I think I know her pretty well because she said it was exactly what she'd imagined :)
I hope these little tips are helpful if you're ever stamping with kids! The girls had a blast and you know what? So did I! :) 'Til next time, keep letting stamps bring out your creativity!
Showing posts with label Not just cards.... Show all posts
Monday, February 4, 2013
Wednesday, October 3, 2012
Thanksgiving Decor and Tulle Rosette Tutorial
If you're in Canada, the upcoming week-end marks our Thanksgiving holiday. Since we moved into our new home a few weeks ago, I'm going to be hosting Thanksgiving this year (usually this is my Mother-in-Law's job ;) ). Being a crafter, I wanted to make some of my own decor for the occasion. We'll be having about 14 people and these will be the table centerpieces:
I had a few sources of inspiration... This week, the Friday Mashup Challenge asked us to make a 'fall leaves' project and/or use twine on our project. This was perfect, because this week the leaves in the Ottawa area are a gorgeous red/burnt orange and they have been inspiring me too. The candle on the left is made with the Gently Falling stamp set. The candle on the right is made with real leaves from our backyard :) Curious on how I made them? Stay tuned for a tutorial.
In addition, I wanted to make my own placeholders. They were pretty time consuming, but 100% worth it!
For both my candle and placeholder bases, I used the Comfort Cafe DSP and the Bigz XL Rosette Die. When I saw the Silver Setting stamp in the new catalogue, I just knew I had to use it for placeholders. Embossed in gold. What's holding the name cards? An old-school wooden clothes pin!
Love the Tulle Rosettes? They are soooo easy to make. This idea was original presented by Shelli Gardner herself at the Hamilton Regional in August this year. I wasn't able to attend (I was moving that day!) but I was fortunate that a fellow demonstrator shared the rosette with us.
You'll need a big sewing needle (check out your local dollar store if you don't have one ;) ), Linen Thread or Baker's Twine (about 8"), and about 30" of the Scalloped Tulle in the Holiday Mini (available in Early Espresso - seen here, Cherry Cobbler or Crumb Cake). Simply run the needle and twine through the centre of the tulle. Let it bunch up because that's the end effect anyhow. It doesn't have to be threaded evenly, just through the centre at 1/2" to 1" intervals:
Once you've run the Linen Thread through the entire length of tulle, scrunch it up with even lengths of twine on each side and tie the twine in a knot. The tulle will fan out into a rosette as shown below.
You can use a button to finish it off since you already have two lengths of twine. I really hope that my guests like the decor. I wanted to do more, but the placeholders and candles took WAY more time than I expected ;) Don't these things always! 'Til next time, keep letting stamps bring out your creativity! And to my Canadian followers, have a fantastic Thanksgiving!
Project Recipe:
Stamps: Gently Falling, Silver Setting
Paper: Comfort Cafe, Soft Suede, Very Vanilla, Comfort Cafe, DSP
Ink: Cajun Craze, More Mustard, Soft Suede, VersaMark
Accessories: Linen Thread, Early Espresso Scalloped Tulle, Cajun Craze Stampin' Write Marker, Big Shot, Bigz XL Rosette Die, Neutral Designer Buttons, Heat Tool, Electric Glue Gun (not SU!)
I had a few sources of inspiration... This week, the Friday Mashup Challenge asked us to make a 'fall leaves' project and/or use twine on our project. This was perfect, because this week the leaves in the Ottawa area are a gorgeous red/burnt orange and they have been inspiring me too. The candle on the left is made with the Gently Falling stamp set. The candle on the right is made with real leaves from our backyard :) Curious on how I made them? Stay tuned for a tutorial.
In addition, I wanted to make my own placeholders. They were pretty time consuming, but 100% worth it!
For both my candle and placeholder bases, I used the Comfort Cafe DSP and the Bigz XL Rosette Die. When I saw the Silver Setting stamp in the new catalogue, I just knew I had to use it for placeholders. Embossed in gold. What's holding the name cards? An old-school wooden clothes pin!
Love the Tulle Rosettes? They are soooo easy to make. This idea was original presented by Shelli Gardner herself at the Hamilton Regional in August this year. I wasn't able to attend (I was moving that day!) but I was fortunate that a fellow demonstrator shared the rosette with us.
You'll need a big sewing needle (check out your local dollar store if you don't have one ;) ), Linen Thread or Baker's Twine (about 8"), and about 30" of the Scalloped Tulle in the Holiday Mini (available in Early Espresso - seen here, Cherry Cobbler or Crumb Cake). Simply run the needle and twine through the centre of the tulle. Let it bunch up because that's the end effect anyhow. It doesn't have to be threaded evenly, just through the centre at 1/2" to 1" intervals:
Once you've run the Linen Thread through the entire length of tulle, scrunch it up with even lengths of twine on each side and tie the twine in a knot. The tulle will fan out into a rosette as shown below.
You can use a button to finish it off since you already have two lengths of twine. I really hope that my guests like the decor. I wanted to do more, but the placeholders and candles took WAY more time than I expected ;) Don't these things always! 'Til next time, keep letting stamps bring out your creativity! And to my Canadian followers, have a fantastic Thanksgiving!
Project Recipe:
Stamps: Gently Falling, Silver Setting
Paper: Comfort Cafe, Soft Suede, Very Vanilla, Comfort Cafe, DSP
Ink: Cajun Craze, More Mustard, Soft Suede, VersaMark
Accessories: Linen Thread, Early Espresso Scalloped Tulle, Cajun Craze Stampin' Write Marker, Big Shot, Bigz XL Rosette Die, Neutral Designer Buttons, Heat Tool, Electric Glue Gun (not SU!)
Thursday, July 5, 2012
A Twitterpated Canvas
Well, almost a canvas ;) I just need to mount this scrapbook page on a 12x12 canvas with Mod Podge. But you get the idea. When I was working on this week's Try Stampin' on a Tuesday Sketch, I realized that the sketch would make a really great scrap page. And I promised you all that I'd make one. So here it is :)
I was excited to use the Twitterpated DSP because the pink and blue tones worked well with my little girl's picture. That's her school picture from last September when she was about 5-1/2 years old. We're moving to a new home in about 6 weeks and I'm super excited to display this new canvas there :)
Tips & Tricks:
*Do you see those gorgeous little flourishes in the background? I used the large flourish from Flowering Flourishes and stamped them on the Pink Pirouette card stock in the same color.
*The Twitterpated DSP has some very varied patterns. I love how I could incorporate sweet flowers into the butterflies, but could use the a more neutral grey pattern as a background for my daughter's photo.
*I used the Fancy Fan Embossing Folder on some Vellum Card Stock (not the Paper, the embossing folder will just chew it up, it has to be the Card Stock) for the top and bottom butterflies.
*I find I don't use the strips of adhesive Rhinestones enough but they were perfect for the centers of my butterflies. Adds a bit of bedazzle to my canvas :)
*Some patterns in the Designer Paper have a vintage feeling to them. The Baja Breeze Seam Binding Ribbon is perfect for vintage projects with a modern touch.
*I used my Simply Scored Scoring Tool to score my Baja DSP on both ends. This gave me a raised piece of DSP for my journaling.
I hope you like my canvas. My daughter was tickled pink when she saw it ;) I hope this also showed you how easily you can turn a card sketch into a scrapbooking sketch. 'Til next time, keep letting stamps bring out your creativity!
I was excited to use the Twitterpated DSP because the pink and blue tones worked well with my little girl's picture. That's her school picture from last September when she was about 5-1/2 years old. We're moving to a new home in about 6 weeks and I'm super excited to display this new canvas there :)
Tips & Tricks:
*Do you see those gorgeous little flourishes in the background? I used the large flourish from Flowering Flourishes and stamped them on the Pink Pirouette card stock in the same color.
*The Twitterpated DSP has some very varied patterns. I love how I could incorporate sweet flowers into the butterflies, but could use the a more neutral grey pattern as a background for my daughter's photo.
*I used the Fancy Fan Embossing Folder on some Vellum Card Stock (not the Paper, the embossing folder will just chew it up, it has to be the Card Stock) for the top and bottom butterflies.
*I find I don't use the strips of adhesive Rhinestones enough but they were perfect for the centers of my butterflies. Adds a bit of bedazzle to my canvas :)
*Some patterns in the Designer Paper have a vintage feeling to them. The Baja Breeze Seam Binding Ribbon is perfect for vintage projects with a modern touch.
*I used my Simply Scored Scoring Tool to score my Baja DSP on both ends. This gave me a raised piece of DSP for my journaling.
I hope you like my canvas. My daughter was tickled pink when she saw it ;) I hope this also showed you how easily you can turn a card sketch into a scrapbooking sketch. 'Til next time, keep letting stamps bring out your creativity!
Tuesday, March 6, 2012
Baby, Baby, Baby Shower!!!
I know my blog posts have been few and far between lately. We've recently decided to sell our house and we're getting ready to list. I didn't realize how much stuff we'd accumulated in 10 years. It's ridiculous! The toys, the clothes, the stamping stuff! lol! It's total and utter insanity. So between decluttering and prepping for multiple workshops this month, my stampin' time is sadly limited.
I did get to play around with my stuff last week though. One of my good friends is having a baby at the end of a month so a mutual friend and I threw her a shower this past week-end. I got it into my head that I'd make decorations, favours and thank you cards so that my friend could properly thank all of her guests. Did everything turn out beautiful? Oh yeah! Especially the banner - it was such a hit my friend hung it in baby's room after the shower :) But was it a lot of work? OH YEAH! lol! Bare with me, there's quite a few pics :) But most of all, enjoy!
*The favours using the Baby Bundle stamp set and Everyday Elegance DSP. They were filled with chocolates which made our younger guests (it was a mom and me shower) very happy :) I made 28 of these. Lots and lots of Sticky Strip used on these ;)
*Pinwheels using Elementary Elegance DSP. I made four large pinwheels and six small pinwheels.
*Thank you cards using the baby from the retired Cuddles & Tickles stamp set. LOVE that stamp set! I made 20 cards for my friend.
*And finally, the banner. Baby's name will be Zander. I used the Beau Chateau DSP, the Perfect Pennants Big Shot Die and I embossed the letters with the Perfect Polka Dots Embossing Folder. I LOVED the way it turned out!
I hope Baby Zander loves the banner above his crib - the colour works perfectly. I also hope these ideas inspired you a little bit when you have a party to throw. 'Til next time, keep letting stamps bring out your creativity!
I did get to play around with my stuff last week though. One of my good friends is having a baby at the end of a month so a mutual friend and I threw her a shower this past week-end. I got it into my head that I'd make decorations, favours and thank you cards so that my friend could properly thank all of her guests. Did everything turn out beautiful? Oh yeah! Especially the banner - it was such a hit my friend hung it in baby's room after the shower :) But was it a lot of work? OH YEAH! lol! Bare with me, there's quite a few pics :) But most of all, enjoy!
*The favours using the Baby Bundle stamp set and Everyday Elegance DSP. They were filled with chocolates which made our younger guests (it was a mom and me shower) very happy :) I made 28 of these. Lots and lots of Sticky Strip used on these ;)
*Pinwheels using Elementary Elegance DSP. I made four large pinwheels and six small pinwheels.
*Thank you cards using the baby from the retired Cuddles & Tickles stamp set. LOVE that stamp set! I made 20 cards for my friend.
*And finally, the banner. Baby's name will be Zander. I used the Beau Chateau DSP, the Perfect Pennants Big Shot Die and I embossed the letters with the Perfect Polka Dots Embossing Folder. I LOVED the way it turned out!
I hope Baby Zander loves the banner above his crib - the colour works perfectly. I also hope these ideas inspired you a little bit when you have a party to throw. 'Til next time, keep letting stamps bring out your creativity!
Tuesday, October 25, 2011
Calorie-Free Advent Calendar
Today I have post to share a project that I made for two upcoming classes ~ the calorie-free advent calendar, similar to the one on Page 39 of the SU! Holiday Mini. I made a few changes to my calendar. I used a Chocolate Chip base, as well as the Holly Berry DSP. I also wanted each flap on the calendar to open, rather than some remaining closed.
I went to get a 12x12 frame last night, but the only one they had was a chocolate brown and that wouldn't have looked right. But they did have a nice 12x16 frame. So I added 4" of textured Very Vanilla card stock at the bottom and tied a bow with 1-1/4" Ridinghood Red Ribbon that I got on the Clearance Rack.
I do still have room in my November 12 class. You'll make this calendar, get a roll of Sticky Strip, a roll of Real Red 1/8" Taffeta Ribbon, and a sheet of Stampin' Dimensionals. The cost is only $35 without a canvas and $40 with a canvas. RSVP at stampingmonica@gmail.com by October 31st.
All in all, the calendar took about 20 hours to put together... from design to creation. But come to my class and it should only take about 3 hours :) Hope you've enjoyed my calendar ~ 'til next time, keep letting stamps bring out your creativity!
I went to get a 12x12 frame last night, but the only one they had was a chocolate brown and that wouldn't have looked right. But they did have a nice 12x16 frame. So I added 4" of textured Very Vanilla card stock at the bottom and tied a bow with 1-1/4" Ridinghood Red Ribbon that I got on the Clearance Rack.
I do still have room in my November 12 class. You'll make this calendar, get a roll of Sticky Strip, a roll of Real Red 1/8" Taffeta Ribbon, and a sheet of Stampin' Dimensionals. The cost is only $35 without a canvas and $40 with a canvas. RSVP at stampingmonica@gmail.com by October 31st.
To make sure that everything stays together on my calendar year after year, I used Sticky Strip on pretty much every single element of my calendar.
Friday, September 23, 2011
Hallowe'en Tags
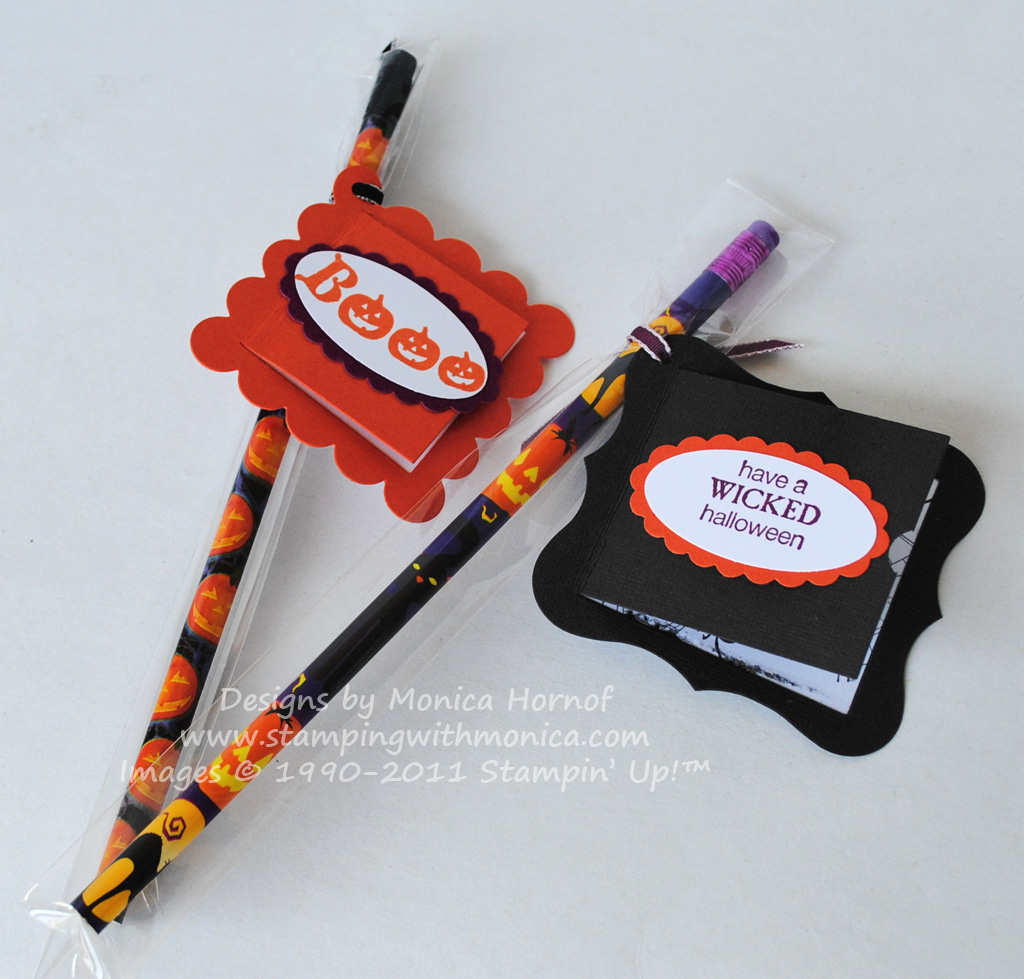
Quick post for today, but I just had to share! I have my first Crazy 4 Christmas Class today and as a door prize, I wanted to give away something I'm planning on doing for the children in my kids' classes. It uses the new Peekaboo Frames Bigz L die as well as the 1" x 8" Cellophane Bags - both found in the Holiday Mini. I guess it's kind of odd that I'm giving away Hallowe'en treats for a Christmas card class door prize. But then again, it's an unusually warm September day too... definitely not Christmas-y! So why not mix it up?
I can't even begin to tell you how much I love these products! There are so many things you can do with the Peekaboo Frames die - cards, tags, scrapbook peekaboo pictures or journalling - the sky's the limit! The Cellophane Bags are a perfect treat size. They fit gumballs, jellybeans, M&Ms or a pencil :)
Tips & Tricks:
*To adhere the inner card stock to the frame, I ran my 2-way Glue Pen around the outside of the frame and stuck the card stock on. This prevents adhesive from being on the stamped back of the tag.
*The 1" x 8" Cellophane Bag has adhesive at the top (similar to the Translucent Envelopes) so you can easily close in any treat you want to put in it.
*The Peekaboo Frames die makes making fun tags a snap! I made these beauties in less than 5 minutes each :)
*1/8" Taffeta Ribbon is the perfect size for tags. I used my Crop-a-Dile to make a 1/8" hole in the tags.
'Tis all for this Friday. Until next time, keep letting stamps bring out your creativity!
I can't even begin to tell you how much I love these products! There are so many things you can do with the Peekaboo Frames die - cards, tags, scrapbook peekaboo pictures or journalling - the sky's the limit! The Cellophane Bags are a perfect treat size. They fit gumballs, jellybeans, M&Ms or a pencil :)
Tips & Tricks:
*To adhere the inner card stock to the frame, I ran my 2-way Glue Pen around the outside of the frame and stuck the card stock on. This prevents adhesive from being on the stamped back of the tag.*The 1" x 8" Cellophane Bag has adhesive at the top (similar to the Translucent Envelopes) so you can easily close in any treat you want to put in it.
*The Peekaboo Frames die makes making fun tags a snap! I made these beauties in less than 5 minutes each :)
*1/8" Taffeta Ribbon is the perfect size for tags. I used my Crop-a-Dile to make a 1/8" hole in the tags.
'Tis all for this Friday. Until next time, keep letting stamps bring out your creativity!
Monday, September 19, 2011
Spice Cake Scrappin'
The Spice Cake DSP in the 2011 Holiday Mini is one of my favorite DSPs so far - and I've been stamping with Stampin' Up! for 4 years now! It's gorgeous, the patterns are beautiful - all 12 of them - and the colors in it are just fabulous! Combine it with the fall stamp set Gently Falling and no matter what you do, you'll have a gorgeous project!
On October 2nd, I'm excited to be using both of these products in my Fall / Hallowe'en Scrapbooking Class! But if I'm going to do this class, I had better prep the pages ;) For the first page, I used inspiration from the Mojo Monday sketch which is back after a two-week vacation (thank goodness!!!). As you see on my page below, I changed up the sketch a bit, added some details at the bottom, moved the element at the top left to the top right and omitted the oval to make room for my photo mat. But I think I'm pretty close to the original sketch.
I've also used the new Spice Cake Jumbo Designer Buttons on this page. Although I think that at 1-1/2" in diameter they pretty big for a card, I do think they're absolutely perfect for scrap pages.
Tips & Tricks:
*I created the illusion of leaves 'gently falling' I stamped crumb cake ink on crumb cake card stock. Love that tone-on-tone look!
*Love the swirly DSP trim at the bottom? Cut out your own trim with the Bigz XL Tasteful Trim die.
*Dazzling Details is our new glitter glue-like embellishment. It looks lovely on the veins of leaves :)
*Like the way I curled the tips of the journaling tag? It was easy! I just used my bone folder to distress and curl the paper a bit.
Hope you've enjoyed this page and maybe you'll even join me on October 2nd. 'Til then, keep letting stamps bring out your creativity!
On October 2nd, I'm excited to be using both of these products in my Fall / Hallowe'en Scrapbooking Class! But if I'm going to do this class, I had better prep the pages ;) For the first page, I used inspiration from the Mojo Monday sketch which is back after a two-week vacation (thank goodness!!!). As you see on my page below, I changed up the sketch a bit, added some details at the bottom, moved the element at the top left to the top right and omitted the oval to make room for my photo mat. But I think I'm pretty close to the original sketch.
I've also used the new Spice Cake Jumbo Designer Buttons on this page. Although I think that at 1-1/2" in diameter they pretty big for a card, I do think they're absolutely perfect for scrap pages.
Tips & Tricks:
*I created the illusion of leaves 'gently falling' I stamped crumb cake ink on crumb cake card stock. Love that tone-on-tone look!
*Love the swirly DSP trim at the bottom? Cut out your own trim with the Bigz XL Tasteful Trim die.
*Dazzling Details is our new glitter glue-like embellishment. It looks lovely on the veins of leaves :)
*Like the way I curled the tips of the journaling tag? It was easy! I just used my bone folder to distress and curl the paper a bit.
Hope you've enjoyed this page and maybe you'll even join me on October 2nd. 'Til then, keep letting stamps bring out your creativity!
Thursday, June 23, 2011
Broadsheet Alphabet Collage Teacher Gifts
My daughter started at a brand spankin' new school in February. So even though they have 'some' decor, they definitely need some more. She's just finished Junior Kindergarten and they do a lot of alphabet learning early on.
At a stamping event a few months ago, I saw a lovely alphabet collage using the Broadsheet Alphabet stamp set. I thought it would make a lovely gift for Anna's teacher and ECE teacher. Keep in mind she's in a French school, so some of the images may appear to be in the wrong spaces (like the owl in the 'H' spot, and octopus in the 'P' spot). I did an animal theme and a transportation mode theme.
Little hints:
*I did the collages on a 12x12 page. The base circles are 1-3/4" in diameter, and the circles with the letters are 1-3/8". All the base circles are embossed with the lattice embossing folder.
*All the letters and images are on Stampin' Dimensionals - this gives the collage a bit of a 3D effect.
*I anticipate that the collages will be hung on the classroom walls (I attached Early Espresso and Basic Gray Satin Ribbon to the hooks on both frames and tied a decorative bow at the top). So, to make sure it stands up I used Sticky Strip everywhere, except where I used the Dimensionals and on the buttons. I used Glue Dots to adhere the buttons.
*Want to see more pics of the projects? Check out my facebook page: https://www.facebook.com/media/set/?set=a.10150205488557864.313594.137367652863
The teachers really liked the projects and I'm so glad - lots of time and effort went into them ;) Keep letting stamps bring out your creativity!
At a stamping event a few months ago, I saw a lovely alphabet collage using the Broadsheet Alphabet stamp set. I thought it would make a lovely gift for Anna's teacher and ECE teacher. Keep in mind she's in a French school, so some of the images may appear to be in the wrong spaces (like the owl in the 'H' spot, and octopus in the 'P' spot). I did an animal theme and a transportation mode theme.
Little hints:
*I did the collages on a 12x12 page. The base circles are 1-3/4" in diameter, and the circles with the letters are 1-3/8". All the base circles are embossed with the lattice embossing folder.
*All the letters and images are on Stampin' Dimensionals - this gives the collage a bit of a 3D effect.
*I anticipate that the collages will be hung on the classroom walls (I attached Early Espresso and Basic Gray Satin Ribbon to the hooks on both frames and tied a decorative bow at the top). So, to make sure it stands up I used Sticky Strip everywhere, except where I used the Dimensionals and on the buttons. I used Glue Dots to adhere the buttons.
*Want to see more pics of the projects? Check out my facebook page: https://www.facebook.com/media/set/?set=a.10150205488557864.313594.137367652863
The teachers really liked the projects and I'm so glad - lots of time and effort went into them ;) Keep letting stamps bring out your creativity!
Wednesday, June 30, 2010
Happy Canada Day :)
Tomorrow is a BIG day! BIG BIG day! Yes, the new catalogue becomes live which means we can order from it! But, even more importantly it our great nation's birthday. And to celebrate, I designed a Simply Adorned Charm insert just for this occasion. Actually, I can't tell a fib - I already had this insert designed as I used the same maple leaves on my sister's wedding invitations. But it was perfect for this very holiday.This is what I just love about the Simply Adorned Charms. You can change out the inserts to match any occasion. It doesn't get much easier or creative than that! I can't wait wear my custom necklace tomorrow!
I hope all my Canadian readers have a fantastic Canada Day and all my US readers have a great 4th of July! Keep letting stamps bring out your creativity.

Love this project? Shop Stampin' Up! with me 24/7! (Canada only)
How did I make my Charm insert?
Stamp Set: Autumn Harvest
Card stock: Very Vanilla
Ink: VersaMark, Soft Suede, Ruby Red and Soft Suede Stampin' Write Markers
Other Accessories: Stampin' Sponges, Heat Tool, Gold Stampin' Emboss Powder
Friday, June 18, 2010
Hostess Appreciation Part 1 & Sneak Peak
Last night I held my (hopefully) annual Hostess Appreciation Night. Without hostesses I wouldn't have a business and this was my little way of saying 'thank you' to them. The evening started off with some champagne, followed by two WOW 3D make-and-takes, fantastic door prizes and finally we had some yummy treats! We used all new DSP's, a brand new stamp set, a new punch and new 1/8" Taffeta Ribbon. I love that ribbon! Today I'll show you the projects my hostesses made. I'm still trying to figure out how I've lived without Early Espresso all this time so that's what my hostesses stamped with! They were also my first customers to get a sneak peak at the new cattie!
The first project we made was an altered coaster picture frame. We used the brand new Newsprint DSP and Artistic Etchings stamp set. We also used the new adhesive rhinestones - LOVED those rhinestones when they were in the Eggcellent Easter Kits and I'm so glad they are going to be a permanent fixture in the new cattie :) The frame is held together with the Early Espresso 1/8" Taffeta Ribbon. This ribbon is so yummy - I think it's my new favourite!

That gorgeous medallion is part of the Artistic Etchings Stamp Set and it's perfectly punched out with the 1-3/4" circle punch. So how did I get such a big scallop to mat it? With the new 2-3/8" Scallop Circle Punch!!!

How cool is this Newsprint DSP? Yes, the map and sheet music is part of that awesome DSP! I can't wait to use it on cards and scrapbook pages!
The second project we made was this super cute Milk Carton with DSP carnation. I got my inspiration from a fellow sideline - Janet Sanii. We used the Greenhouse Gala DSP. This DSP has a mod retro feel to it and I LOVE it. Love the colours, the patters, everything! The carnation was made with 6 2-3/8" scallop circles. I'll be back with a tutorial another day - hopefully I won't forget :p They're super easy to make but involve crumpling up DSP which none of my hostesses wanted to do! They said the paper was much too pretty to crinkle up. I can't say I disagree... but the final product is worth it.
Finally, I made all the hostesses cards with the 2010/2011 Level 1 Hostess Set Because I Care as well as a little gift but I'll be back with that in the next post or this one would just get too long! You may be wondering how you could take part of this soiree next year. It's simple - book a stampin' party with me and you've got an automatic invite!
Hope you've enjoyed these sneak peaks and I'll be back with more sneak peaks soon! Keep letting stamps bring out your creativity,
The first project we made was an altered coaster picture frame. We used the brand new Newsprint DSP and Artistic Etchings stamp set. We also used the new adhesive rhinestones - LOVED those rhinestones when they were in the Eggcellent Easter Kits and I'm so glad they are going to be a permanent fixture in the new cattie :) The frame is held together with the Early Espresso 1/8" Taffeta Ribbon. This ribbon is so yummy - I think it's my new favourite!

That gorgeous medallion is part of the Artistic Etchings Stamp Set and it's perfectly punched out with the 1-3/4" circle punch. So how did I get such a big scallop to mat it? With the new 2-3/8" Scallop Circle Punch!!!

How cool is this Newsprint DSP? Yes, the map and sheet music is part of that awesome DSP! I can't wait to use it on cards and scrapbook pages!
The second project we made was this super cute Milk Carton with DSP carnation. I got my inspiration from a fellow sideline - Janet Sanii. We used the Greenhouse Gala DSP. This DSP has a mod retro feel to it and I LOVE it. Love the colours, the patters, everything! The carnation was made with 6 2-3/8" scallop circles. I'll be back with a tutorial another day - hopefully I won't forget :p They're super easy to make but involve crumpling up DSP which none of my hostesses wanted to do! They said the paper was much too pretty to crinkle up. I can't say I disagree... but the final product is worth it.
Finally, I made all the hostesses cards with the 2010/2011 Level 1 Hostess Set Because I Care as well as a little gift but I'll be back with that in the next post or this one would just get too long! You may be wondering how you could take part of this soiree next year. It's simple - book a stampin' party with me and you've got an automatic invite!Hope you've enjoyed these sneak peaks and I'll be back with more sneak peaks soon! Keep letting stamps bring out your creativity,
Sunday, May 30, 2010
Simply Adorned, Simply Beautiful!
Have you seen the new Stampin' Up! Simply Adorned chains and charms? What makes this jewelery so special? YOU decide what it looks like! Available in 5 sizes, these charms open up so that you can insert your own hand stamped image! Talk about customizable and versatile. Going to a birthday party? You can go with a bright and cheery insert. Going to a wedding? Use a simple flower. Any event, any outfit, same but different necklace or bracelet!For my first charm I went with the 1" x 1-1/4" charm - a size that works for me - and turned to one of my favorite and most versatile stamp sets - Vintage Vogue. That small flower is the perfect size for this charm. A little bit of Rock and Roll with Crushed Curry and Rich Razzleberry, a few Old Olive leaves and voila! A perfect casual necklace, just right for any summer event. What I especially love about the charms is that they have beveled glass on the front for a fancier look and flat glass on the back. You can have the same image on both sides, different images, or just an image on the front. Customizable, beautiful, simple, YOU!
The chains are available in two lengths (24" and 34") and are a beautiful vintagey silvery pewter. I got the 24" length because I don't like my chains too long. But this weekend I saw another demonstrator with the 34" chain doubled up and let me tell you, it looked AWESOME! Guess what's going on my next order ;)Hope you've enjoyed reading a bit about Simply Adorned Charms and what they're all about! I can't wait to make more inserts for mine!
Keep letting stamps bring out your creativity!

Click HERE to order Stampin' Up! Products online 24/7!
How did I make my project?
Stamp set: Vintage Vogue (wood mount 117690, clear mount 118598)
Card stock: Whisper White (100730)
Ink: Rich Razzleberry (115658), Crushed Curry (115659), Old Olive (102277)
Accessories: Simply Adorned Chain 24" ( 116800), Simply Adorned Charm 1" x 1-1/4" (116798)
Thursday, August 6, 2009
Dasher - Christmas in August!
I just love Dasher - the new single stamp for only $10.95. So I've bought that stamp - can't beat the price! - and plan on making some lovely Christmas cards using this stamp. We'll also be using this stamp for one of the cards at my Christmas Stamp-a-Stacks. Well, actually, I've already made a cute card with this stamp for a demo swap I joined. I thought Dasher had beautiful lines that would look great embossed in white on a darker cardstock. So of course I chose my new favorite color, Rich Razzleberry and paired it with Old Olive. Who says none of the new In Colors can be used for Christmas cards!?!?! And what goes great with Old Olive and Rich Razzleberry? Chocolate Chip of course :) So without further ado - Dasher...

I got the layout from an old Mojo Monday Challenge and I love the way the ribbon comes under and through the top image. The recipe for Dasher is:
Stamp Sets: Dasher, Teeny Tiny Wishes
Card stock: Old Olive, Chocolate Chip, Rich Razzleberry, Cast-a-Spell DSP
Ink: Craft White, VersaMark
Accessories: Modern Label Punch, Ticket Punch, Slit Punch, Paper Piercer, 5/8" Chocolate Chip Grosgrain Ribbon, Silver Brads, Big Shot, Stampin' Up! Texture Plates, Heat Tool, White Stampin' Emboss Powder
But, if you love Dasher as much as me, you'll be even more excited to see the Dasher Decor Element - only available as a Hostess Benefit with a qualifying workshop of minimum $395 in sales. So be sure to book your Christmas workshop soon! Maybe make it a Stamp-a-Stack!
One thing that did make me a bit sad about the Dasher Decor Element though is that after Christmas I'd have to take it down. And then it would be gone. So, I bought some sturdy 3/16" foam board and a frame (without glass mat, just the wood frame) at the local craft store. Then I put Dasher on the foam board (I have the Chocolate Chip Dasher, but he's also available in Basic Black, Real Red, and Whisper White), mounted him in the frame and voila! A Dasher I can bring out Christmas after Christmas after Christmas! So there is a way to make your Decor Elements more permanent (or less permanent since they're not actually on your wall) than you probably thought! And once again, without further ado... Dasher #2 (though this guy is 17-5/8" x 13").

That's it for tonight and keep letting stamps (and Decor Elements) bring out your creativity!

I got the layout from an old Mojo Monday Challenge and I love the way the ribbon comes under and through the top image. The recipe for Dasher is:
Stamp Sets: Dasher, Teeny Tiny Wishes
Card stock: Old Olive, Chocolate Chip, Rich Razzleberry, Cast-a-Spell DSP
Ink: Craft White, VersaMark
Accessories: Modern Label Punch, Ticket Punch, Slit Punch, Paper Piercer, 5/8" Chocolate Chip Grosgrain Ribbon, Silver Brads, Big Shot, Stampin' Up! Texture Plates, Heat Tool, White Stampin' Emboss Powder
But, if you love Dasher as much as me, you'll be even more excited to see the Dasher Decor Element - only available as a Hostess Benefit with a qualifying workshop of minimum $395 in sales. So be sure to book your Christmas workshop soon! Maybe make it a Stamp-a-Stack!
One thing that did make me a bit sad about the Dasher Decor Element though is that after Christmas I'd have to take it down. And then it would be gone. So, I bought some sturdy 3/16" foam board and a frame (without glass mat, just the wood frame) at the local craft store. Then I put Dasher on the foam board (I have the Chocolate Chip Dasher, but he's also available in Basic Black, Real Red, and Whisper White), mounted him in the frame and voila! A Dasher I can bring out Christmas after Christmas after Christmas! So there is a way to make your Decor Elements more permanent (or less permanent since they're not actually on your wall) than you probably thought! And once again, without further ado... Dasher #2 (though this guy is 17-5/8" x 13").

That's it for tonight and keep letting stamps (and Decor Elements) bring out your creativity!
Thursday, June 11, 2009
A Gift for My Midwife
I'm once again resurrecting my blog. I've had my baby, he's now 6 weeks old and I'm trying to get back to this blog! I had my discharge appointment with my midwife this week and I made her a pregnancy shadow box to show her my gratitude for the wonderful care she gave me and my baby. The practice will be getting a new clinic space in the near future and I thought something new for their walls would be nice.
I made the background of the shadow box by weaving two pieces of Designer Series Paper together. I had never done this technique but I just love it and I'm hooked! It's definitely time consuming, but worth it. I also took advantage of my Big Shot using the Bigz Top Note Die (an SU! exclusive) and I dry embossed it with the Big Shot Texturz Plates. Here's the shadow box - my midwife loved it, hope you like it too!
Full shadow box:
Picture only:
Detail of paper weaving:
The recipe for my shadow box includes
Stamp Sets: She's All That and Everything Baby (both retired)
Carstock: Chocolate Chip, Pink Pirouette, Baja Breeze, Green Tea (retired) and Parisian Breeze DSP
Ink: VersaMark
Accessories: Gold Stampin' Emboss Powder, Heat Tool, Paper Piercer, Flower Fusion Too, Fire and Ice Rhinestone Brads, Corner Rounder Punch, Slit Punch, Kiwi Kiss/Very Vanilla Satin Ribbon, Big Shot, Top Note Die, SU! Texturz Plates
Keep letting stamps bring out your creativity!
I made the background of the shadow box by weaving two pieces of Designer Series Paper together. I had never done this technique but I just love it and I'm hooked! It's definitely time consuming, but worth it. I also took advantage of my Big Shot using the Bigz Top Note Die (an SU! exclusive) and I dry embossed it with the Big Shot Texturz Plates. Here's the shadow box - my midwife loved it, hope you like it too!
Full shadow box:

Picture only:

Detail of paper weaving:

The recipe for my shadow box includes
Stamp Sets: She's All That and Everything Baby (both retired)
Carstock: Chocolate Chip, Pink Pirouette, Baja Breeze, Green Tea (retired) and Parisian Breeze DSP
Ink: VersaMark
Accessories: Gold Stampin' Emboss Powder, Heat Tool, Paper Piercer, Flower Fusion Too, Fire and Ice Rhinestone Brads, Corner Rounder Punch, Slit Punch, Kiwi Kiss/Very Vanilla Satin Ribbon, Big Shot, Top Note Die, SU! Texturz Plates
Keep letting stamps bring out your creativity!
Subscribe to:
Posts (Atom)