Showing posts with label Markers. Show all posts

Sunday, September 9, 2012

A Truly Joyous Celebration

Friday was a super exciting evening in this new household! I had 25 women (and one boy who came with mom) fill my new stampin' studio and my basement. As my husband said, it was a good test for the house and having a party! My kids were super excited to answer the door for everyone and they certainly made fantastic hosts!

I was super excited to show the studio off to everyone and everyone had a great time! Unfortunately, I completely forgot to take pictures :( I was planning on it, but was excited with everything that it slipped my mind. We had three make-and-takes, one of which I used the sketch from this week's Try Stampin' on Tuesday Challenge.


I haven't taken pictures of the other two make-and-takes yet. Still struggling with photographing my cards and other crafts in my new space. But I've ordered a small light tent so my photo issue should be resolved soon :)

Tips & Tricks:
*Did you know you can do the marker-to-stamp technique with our new Silver & Gold Satmpin' Dazzle Marker? Color the stamp with the marker just like you would with any other colored Stampin' Write Marker and stamp! Voila, I've got a silver reindeer with minimal fuss.
*I love the flagged elements on this week's Try Stampin' On Tuesday's sketch. I know many people use a Square Punch to do their flagging but I much prefer to free-hand them.
*I love how festive and diverse the Snow Festival DSP is. So many different patterns in the package but they work so nicely together! And how gorgeous are Cherry Cobbler and Baja Breeze together?
*Are you loving the 3-1/2" Scalloped Tulle Ribbon in the Holiday Mini Catalogue? I wasn't sure how to use it on a card because it's pretty thick. So I folded it over a couple of times, tied a little Baker's Twine ribbon on it, and I had a unique ribbon with lots of dimension.


I'm so glad that everyone enjoyed themselves last Friday. And I really love this sketch, I'll have to use it again! 'Til next time, keep letting stamps bring out your creativity!


Card Recipe:
Stamps: Joyous Celebration, Tiny Tags
Paper: Baja Breeze, Cherry Cobbler, Whisper White, Snow Festival DSP
Ink: Baja Breeze, Cherry Cobbler
Accessories: 3-1/2" Cherry Cobbler Scalloped Tulle Ribbon, Cherry Cobbler Baker's Twine, Wide Oval Punch, Oval Punch, Jewelry Tag Punch, Big Shot, Lacy Brocade Embossing Folder, Stampin' Dimensionals, Silver Stampin' Dazzle Marker

Saturday, June 30, 2012

A Bit of International Bazaar

Bear with me today ladies, my post is likely going to be all over the place... my mind is going a mile a minute! I earned the Grand Vacation Incentive Trip with SU! today. Totally, 100% unexpectedly. I did NOT expect to get the big trip this year. But next April, I am going to FIJI! I'm still in shock, can't believe it and am so excited. The only unfortunate thing is that the trip falls on my son's birthday. But he'll only be 4 and I'm sure he'll understand ;)

I'm going to do a quick post today, I feel like I could probably go off track easily! I really loved Cindy Hall's sketch at Freshly Made Sketches this week. It's clean, neat, fresh ;) I really wanted to play with my new, vibrant and colorful International Bazaar DSP. It has some pretty funky patterns that make a very good background! Most of the colors in it are from the Brights Collection which is probably my favorite. I added a few stamps from Bright Blossoms, a greeting and voila, a clean, fresh card :)

Tips & Tricks:

*SU! doesn't make the 5-1/2" x 5-1/2" envelopes anymore so using my Simply Scored Scoring Tool I made my own. Didn't take more than a few minutes and I could customize it with the International Bazaar DSP.
*I love the little flowers in Bright Blossoms and I love to use the 'marker-to-stamp' technique with them. Since the SU! Markers have the same ink in them as the ink pads, you can stamp with them and get gorgeous multi-colored images.
*I thought my flowers needed a bit of bedazzling. So I added on a few Basic Rhinestones :)
*While I absolutely LOVE my Modern Label Punch, I'm so glad that I can use the Ticket Duo Builder Punch to switch things up a bit from time to time. It worked perfectly on this card.

I hope this bright, cheerful card brightened your day a bit. With all the excitement I've had, I don't think it could get any brighter ;)

'Til next time, keep letting stamps bring out your creativity!


Friday, June 15, 2012

Special Thank You for a Special Teacher

My daughter Anna is finishing up Senior Kindergarten this year and she has been lucky enough to have the most fantastic teacher for the past two years. She is patient, caring and just plain fantastic. We truly couldn't have asked for better. Last year I gave her an alphabet collage (on the left) that she loved. We didn't know she'd have her again this year again and I knew I couldn't really top last year's gift (I gave her 10 handmade cards and garnet earrings straight from the Czech Republic). But I could make her a great card ;)

I used two challenges as the inspiration for my card:
1) The Paper Players challenged us to use Basic Grey, Lucky Limeade and Melon Mambo in our card.
2) Try Stampin' On a Tuesday (a NEW one for me!) gave us a great sketch to work with.


I was pretty happy with the final product and her teacher liked it too :) My daughter goes to an all French school so I used this non-SU! embossing folder that has 'Merci' in it.


Tips & Tricks:

*I colored the apple stamps from Fruits and Flowers with Stampin' Write Markers, cut them out and then re-stamped them with Basic Grey ink and cut out the center heart.
*The apples and hearts are both mounted on Stampin' Dimensionals to make sure that they pop out. I love how easy it is to add texture to cards with these little sticky pop-ups.
*To coordinate my button 'thread' with my card (and to add a bit of visual contrast in colors) I threaded a thin strip of card stock through the button. It really pops!
*I did stamp the whole apple, including the center heart, in Melon Mambo. I wanted that little bit of pink peeking out from under the grey ;)
*I've been in a bit of a Crystal Effects mode lately. I love the glossy look it gives my card elements. I've had the same bottle for almost four years now and used it for many many projects. Talk about good bang for your buck!

I'm glad Anna's teacher loved her card and hopefully this will inspire to make a special card for your child's fantastic teacher. 'Til next time, keep letting stamps bring out your creativity!


Monday, June 11, 2012

With a Cherry On Top!

I'm *just* squeaking in for the Freshly Made Sketches Challenge this week. I had a super busy week with my New Cattie Event as well as Retired Merchandise Sale. I was busy stamping, but also pricing, setting things up, didn't have the time (or energy) to post. Which is really awful, I want to post more than every 8 days :p And here I was doing so well at being consistent.

But I really wanted to make sure I got in this sketch challenge. I really like the simplicity of it, but also the fact that you could make a bit more ornate. It has a great space for a focal image, a spot to use our fab DSP and ribbon. Does it get better than that? True to my style, I did have to change it up a bit and I rotated the image.


These are the cherries from the Mouthwatering stamp set. It was carried over from the 2012 Occasions Mini. Don't they look good enough to eat?

Tips & Tricks:

*Like the two-tone image? I used my 2012-2014 In Color Stampin' Write Markers to stamp the image.
*I'm not much of a green girl, but I'm loving the Gumball Green color! I didn't have any non-Christmas Gumball Green DSP so I dug into the new Christmas Cheer DSP and found this cute polka dot pattern! I think it's fun and works for this non-Christmas card.
*Are you loving the Raspberry Ripple color as much as me? Can you say YUM! And it works for the cherries.
*When I think cherries, I think juicy, plump and sweet. I used a whole lot of Crystal Effects on them to give them that plump sheen. Just make sure you give your image enough time to dry if you use a thick layer of the Crystal Effects.
*When I first heard SU! was retiring the 1/4" Grosgrain Ribbon, I wondered what they could possible replace it with. As usual with SU!, I needn't worry. I LOVE the Stitched 1/4" Grosgrain. The stitching adds just a wee little something special ;)

I hope you've enjoyed this juicy card and I'll be back really soon! In the meantime, if you're in the Ottawa area and looking for bargains on retired stamps, DSP, punches, Big Shot Accessories, etc., send me a note! I still have all the items from the garage sale set up so you can come check them out anytime :)

'Til next time, keep letting stamps bring out your creativity!


Tuesday, May 15, 2012

A Lovely Nature Walk

My daughter Anna (who's 6) and I were flipping through the NEW 2012-2013 Stampin' Up! Catalogue. She loves stampin' and loves picking out new stamp sets. Of course a new stamp set with images of a necklace, lipstick and other girly things was the first one that caught her eye. Another stamp set that she loved was Nature Walk. Although it's not a new stamp set, it is one that has been on my wishlist for a while. I was waiting to see if it would retired before purchasing it and it didn't (YAY!). So I took the plunge and now it is part of my collection :) Anna was very pleased when she saw she it in 'our' studio ;)

Even though I'm not much of a bird girl, I love the image of the bird and the cage. I knew I wanted to feature these elements on the first project I made with the set. This week's Mojo Monday Challenge was the perfect sketch to feature them. I also loved the colors we were challenged to use at Dynamic Duos: So Saffron and Pool Party. This is what I ended up with:


Tips & Tricks:

*I love my little bee tag at the top of my card. It was easy to make with two circle punches and some Linen Thread. Making your own accessories is not only cost-effective, but it's fun, too!
*Love those Stampin' Write Markers! I used them to ink up my egg stamp in two different colors!
*I wanted my bird to be much bolder than the cage. To get the contrast I wanted, I used Crumb Cake ink for the cage and Early Espresso for the bird.
*For my first go, I didn't emboss the top So Saffron mat. But there was just something.... missing. So I embossed it with the Elegant Bouquet Embossing Folder. It adds so much to the card, yet doesn't take away from my bird and cage images.

I'm not sure who I'm going to give this card to but I'm sure they're going to love it. And it will certainly be someone special :) 'Til next time, keep letting stamps bring out your creativity!


Wednesday, May 9, 2012

Bright Blossoms for Mother's Day

Another Mother's Day card coming today :) I made the spiral card last week for my MIL and I needed a card for my own mom too, of course. I was already planning on using the color combo in last week's Pals Paper Arts Challenge ~ Calypso Coral, Baja Breeze and So Saffron ~ but I wasn't sure what sketch to use. I was browsing a friend and downline's blog and came across the Retro Sketches Challenge. I loved this week's sketch so I flipped it and combined it with the color combination I was going to use.


I wanted to show off the color contrast as much as possible. As luck would have it, the Bright Blossoms stamp set (a 2012-2013 cattie sneak peek) has three larger flower images. I stamped and cut each of them out. I used Stampin' Dimensionals to adhere them to my card so that they popped out a bit. I love how it all turned out.

Tips & Tricks:

*I don't *love* cutting images out, I much prefer punches. But sometimes to get the effect I want, it's necessary. I always use my SU! Paper Snips to help me out ~ LOVE them.
*See how the 'Mom' is written in the three-color combination too? I used my Stampin' Write Markers for that. Love how I can stamp with them because they have the same ink in them as the ink pads.
*Yeah, the Seam Binding ribbon frays more easily than others. But I think that just adds to its charm. And you can't deny that the sheen it has is just gorgeous.
*I couldn't make a spiral card for one mom and not the other ;) So I used the smaller floral images from Bright Blossoms for the spiral inside this card.

I hope our moms love their cards! I've just received my new catalog preorder so I've got to run to play ~ after I get my son down for his nap. Be on the look out for more sneak peeks. 'Til then, keep letting stamps bring out your creativity!


Tuesday, March 20, 2012

Easter Wishes

This week's Mojo Monday Challenge was so lovely. I loved the idea of using two contrasting papers on the background. And the scalloped border. I have a Fast & Fabulous Card Class coming up on Wednesday March 28th and used this sketch for an Easter card.

I also won a new stamp set at a downline meeting last week ~ Heaven Blessed ~ and was super excited to use the image of the cute little girl hunting for eggs. For those who have little boys, there's an equally cute little boy image ;)


Tips & Tricks:

*I used the 2011-2012 Hostess DSP, Cheerful Treat, for my card. I know Easter is all about pastels and this DSP is a bit brighter than typical Easter colors, I think it still works :)
*I colored in the whole image of the little girl, but you could easily spot color a few key details such as the eggs, shoes and little girl's hair bow. Use our Stampin' Write Markers for a perfectly coordinated image.
*I love these Twitterpated Designer Buttons. They are so cute and work so well for a spring or Easter project.

Another quick post for tonight ~ exhausted from all the packing and decluttering. I'm very excited by our new house, but very tired from all this house stuff ;) 'Til next time, keep letting stamps bring out your creativity!

Wednesday, January 18, 2012

My Leadership Swaps

Eeeek - my first solo trip since becoming a mother almost 6 years ago! Well, I did go on a crafting week-end getaway last spring, but this is more real. I'm flying to San Antonio, Texas, for Stampin' Up!'s Leadership. I'm excited to learn how to run my business better, meet some absolutely awesome demonstrators and hopefully get a few more ideas for projects ;) I hear that SU! knows how to put on an event and can't wait to experience it!!!

A SU! event also means swaps. What is a swap? I made 50 cards and will swap them with other demonstrators. The idea is that I'll end up with 50 other gorgeous cards that will give me ideas, techniques to show my customers and hopefully samples with stamp sets/techniques I don't have displayed yet :) It is also a great way to break the ice and chat with some wonderful stampin' ladies!

I really wanted to do something special for my swaps and love playing around with vintage techniques. The Rue de Fleurs stamp set in the Occasions Mini is such an AWESOME vintage inspired stamp set. I just love love love the umbrella with watches... I didn't do it for this card, but wouldn't it make for a gorgeous retirement card image? I think that the next retirement card I'll make will use this set. This stamp set is one I really hope makes it into the 2012-2013 IB&C!


I am also loving the upcoming Sale-a-Bration DSP Everyday Enchantment. It is absolutely gorgeous and the catalogue doesn't do it justice. How do you 'buy' it do you ask? Well... you don't! During Sale-a-Bration, you get to choose ONE FREE item from the SAB Brochure for every $60 you order! How awesome is that? It starts on January 24th :)

This card was my original swap idea, but I soon realized that doing three colors on the umbrella, as well as distressing all the edges would take waaaaay too long! So I did the umbrella in Soft Suede only and sponged the edges of the Very Vanilla card stocks. I did tear the top of the DSP and sponged it to antique it and I did curl the edges of the Very Vanilla layer and its Soft Suede mat. So the swaps still took a really long time, but they could have taken longer ;)


Tips & Tricks:

*The umbrella image in this stamp set is so easy to color with markers. Even though it blends together it is well delineated and it's easy to see where to start each color. It does look gorgeous stamped in one solid color too ;)

*I love the play on words in this set. "Thanks" "For Watching Over Me" (see the watches and umbrella?) or "For the Support" (the bust :) ). So witty and fun!
*There is a gorgeous trumpet and pen image in this stamp set - works for women's AND men's cards - now how many stamp sets can do that?
*Like the curled edge on the card stock? So easy to do! Just use your bone folder to 'tease' the card stock. SU! card is nice and thick, so it'll separate into layers. It's also dyed all the way through! No white core... so you can do techniques like this with it.
*Did I mention I hope this set carries over into the next catty??? ;)

I'm off enjoying some more Leadership... 'til next time, keep letting stamps bring out your creativity!

Tuesday, January 10, 2012

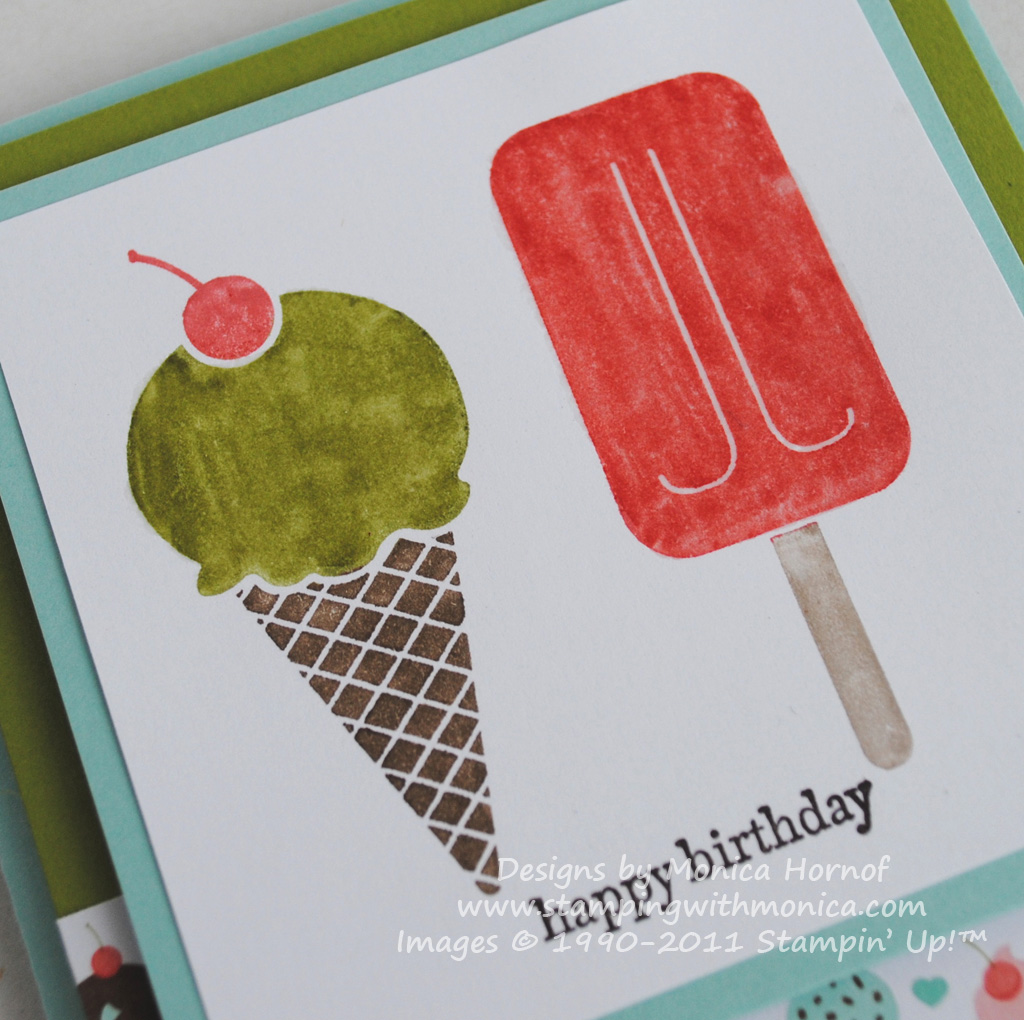
A Yummy Birthday Card

Happy Birthday!!! I'm trying a new challenge this week, the Friday Mashup. Every week, the give us two challenges and we can 1) do one challenge, 2) do the other challenge or 3) 'mash up our creativity' and do both on one card. This week we were asked to make a birthday card and/or use pastel colors on the card. For my first Mashup, I did both :)

I also needed to make a children's card for my Birthday Card Class this Friday ~ so I once again used this challenge to help me along in my class prep :) I'm so busy ~ I can only do so many things at a time so if I can kill two birds with one stone, I will!


After using my cherry-scented embossing powder last week, I was itching to try my melon-scented and vanilla-scented powders as well. I know my ice cream cone is green, but there is no pistachio-scented embossing powder and I wanted to use Lucky Limeade on my card, so vanilla-green it was :) And the melon... mmmmmmmmmm. Think melon-flavored Jolly Ranchers... yummmmmmmy! Love these powders!


Tips & Tricks:

*I used markers to color my stamps and then use my Versamarker overtop the colored images. Then I applied the Scented Embossing Powders and heat embossed them! Super easy to use :)
*Don't you love how the Mouthwatering stamp set coordinates perfectly with the Sweet Shop DSP? Stampin' Up! makes coordination so easy - that's one of the things I love best about their products.
*The Occasions Mini offers Baker's Twine in all of the 2011-2013 In Colors. I love the Twine because it's so cost effective ($3.95 for 25 yards!) and you can wrap it around the card a few times without giving it a second thought :)

Hope you love this card and hope it's tempted some others to join us on Friday at my class! 'Til next time, keep letting stamps bring out your creativity!

Wednesday, January 4, 2012

A 'Tea-rrific' Birthday

Today marks the launch of the Occasions Mini! Gorgeous, gorgeous stuff in there and I have most of it :p One of the best yet, as you've seen from my large multitude of sneak peek samples :) Today's card used the beautiful, simple sketch from Freshly Made Sketches. I have a Birthday Card Class coming up next week (Friday January 13th at 7:30 for those in the Ottawa area) and this sketch is perfect for it. Not only that, but the minute I saw it, the Tea Shoppe stamp set and the 3 cute tea cups stamp immediately popped into my head!

With the stamp set's vintagey but cute feel, I added the 'Happy Birthday' sentiment from Curly Cute. I also couldn't resist using the Beau Chateau DSP to add to the vintage feel. Not sure yet who I'll be giving this card to, but whoever gets it will be very lucky, IMO ;) My class card will be a smidge simpler, to save on time, but gorgeous nonetheless.


Tips & Tricks:

*To add to the vintage feel, I sponged the edges of all the card stock, as well as the surface of the Very Vanilla piece, with Soft Suede ink. It's perfect for adding that vintage feel to any project.
*I embossed the Pink Pirouette card stock with the Vintage Wallpaper Embossing Folder because it's matches well with the Beau Chateau DSP.
*Since our Stampin' Write Markers contain the same ink as our ink pads, you can stamp with them. I do find, however, that Pink Pirouette is a bit on the light-colored side when stamping with markers, so I use the Pretty in Pink color in its place.
*I curled the edges of the card stock with a bone folder and separated the layers. I meant to do the same with the Pink Pirouette color but it tore - so I decided to go with it and keep it torn. I actually really like the way it looks!

Hope you've enjoyed this fresh, vintage card. 'Til next time, keep letting stamps bring out your creativity!

Tuesday, January 3, 2012

Back in the Saddle with a Little Scratch 'n Sniff

Happy New Year everyone! If you check out my blog regularly, you'll see I haven't posted in almost 3 weeks... Yes - 3 weeks! I took a much needed little break. October and November were so so busy that when my last event of December was over I sat myself down on the couch and just chillaxed :)

After sending out all my Christmas cards - handmade of course ;) - I started to get the kids ready for Christmas. Both my daughter (6) and son (almost 3) were super excited about Santa's impending visit:


To get back into the swing of things, I updated my Class List yesterday and today I made my card for the Mojo Monday Challenge. I also used a new product that I haven't had a chance to try out yet. The Scented Stampin' Emboss Powders. I wasn't sure what they looked like, how they work, how to use them. But I stamped my cherry image from the Mouthwatering stamp set and then colored them with my Versamarker. After sprinkling them with the cherry-scented embossing powder, melted the powder with my heat tool and voila! Nice, shiny, scented cherries. The embossing powder comes out a little glossy, but not like the Clear Embossing Powder.


I used the Sweet Shop DSP from the 2012 Occasions Mini, which debuts tomorrow! So exciting! Two of the colors in the DSP are Lucky Limeade and Calypso Coral, so I colored my cherries with my 2012-2013 In Color Markers. Don't you love the new epoxy brads?


Tips & Tricks:

*You can mix your scented embossing powders with the colored embossing powders or just use your Versamarker to emboss with the scented powders. They're thin enough that even if the coverage isn't perfect (like with regular embossing powders) your image will still be fine.
*Love the curled ribbon? It's the new Organdy Ribbon, available during Sale-a-Bration (starting January 24th). My cousin Patti came up with this technique... curl it just like you would curl gift wrap ribbon with the dull side of a blade. Easy peasy and the result is great :)
*I used the hearts Edgelit to emboss the Wisteria Wonder strip in the middle.
*I love the Seambinding Ribbons, and I especially love the fact that it's now available in Pool Party!

I'll be back soon, getting back into the swing of things. 'Til next time, keep letting stamps bring out your creativity!

Sunday, December 11, 2011

Sale-a-Bration will be here soon...

With my Occasions Mini Preorder, I was also able to preorder some Sale-a-Bration (SAB) exclusive stamp sets and accessories. How exciting!!! Even more stuff. Even better was I got it all FREE ~ I love being a demonstrator :)

What is SAB? It's the most wonderful time of the year for SU! customers, hostesses and demonstrators, and runs from January 24th to March 31st. As a customer, you get to choose 1 FREE SAB item with every $60 in merchandise you order! What types of free items are we talking about? SAB exclusive stamps, designer papers and accessories, as well as some catalog merchandise such as the Brights Designer Buttons and Stripes Embossing Folder. Wait, it gets better! There's NO LIMIT!!! If you join SU! during SAB, you get your Starter Kit for $150 (tax free in Ontario ~ Canada only) as well as a FREE package of Designer Paper every month 'til December 2012. Do you see a trend? As in FREE???

You can take advantage of this awesome Demo Starter Deal before Sale-a-Bration through me because I'm going to Stampin' Up! Leadership conference. Sign up on December 13th or 14th and get your business off to a great start in the new year, taking advantage of Sale-a-Bration right from the get-go!!! You can sign up easily at www.stampingwithmonica.com ~ but only December 13th and 14th for the $150 + free DSP deal :)

This week's Pals Paper Arts Challenge asked us to dress up our card for a special occasion. I used some new SAB goodies as well as the Labels Framelits to dress up my card:


Tips & Tricks:

*Love the ribbon? So do I! It's the new Lucky Limeade and Calypso Coral Organdy Ribbon. Get 10 yards of each PLUS 30 Everyday Enchantment Printed Brads (top left - Pool Party flower brad) in a SAB bundle. The ribbon is nice and narrow, but a good weight. Just gorgeous.
*The DSP is also the SAB Everyday Enchantment DSP and it is beautiful. The snippits in the brochure do NOT do it justice!
*I wasn't sure about the SAB Fresh Vintage stamp set, but it's has definitely grown on me. The larger flower image fits perfectly into a medium Labels Framelit. Because the Framelit has not center (it's a frame - go figure ;) ) you can position it perfectly on your stamped image. The square stamp coordinates perfectly with the 1" Square Punch.
*I love the Framelits. I've never used a similar product. I did, however, learn the hard way that making a frame is a two-step process. First cut out your larger die-cut. Then, position the smaller framelit on your larger die-cut and cut out your frame. DO NOT put both the large and small framelits on at the same time... you run the risk of them shifting in the Big Shot and cuttin into each other ~ been there, done that and even though the framelits are super sturdy, I wouldn't want to do it again ;)

Wow! Long post... That's it for today, keep letting stamps bring out your creativity!