Showing posts with label Giftable. Show all posts

Wednesday, October 3, 2012

Thanksgiving Decor and Tulle Rosette Tutorial

If you're in Canada, the upcoming week-end marks our Thanksgiving holiday. Since we moved into our new home a few weeks ago, I'm going to be hosting Thanksgiving this year (usually this is my Mother-in-Law's job ;) ). Being a crafter, I wanted to make some of my own decor for the occasion. We'll be having about 14 people and these will be the table centerpieces:


I had a few sources of inspiration... This week, the Friday Mashup Challenge asked us to make a 'fall leaves' project and/or use twine on our project. This was perfect, because this week the leaves in the Ottawa area are a gorgeous red/burnt orange and they have been inspiring me too. The candle on the left is made with the Gently Falling stamp set. The candle on the right is made with real leaves from our backyard :) Curious on how I made them? Stay tuned for a tutorial.

In addition, I wanted to make my own placeholders. They were pretty time consuming, but 100% worth it!


For both my candle and placeholder bases, I used the Comfort Cafe DSP and the Bigz XL Rosette Die. When I saw the Silver Setting stamp in the new catalogue, I just knew I had to use it for placeholders. Embossed in gold. What's holding the name cards? An old-school wooden clothes pin!

Love the Tulle Rosettes? They are soooo easy to make. This idea was original presented by Shelli Gardner herself at the Hamilton Regional in August this year. I wasn't able to attend (I was moving that day!) but I was fortunate that a fellow demonstrator shared the rosette with us.

You'll need a big sewing needle (check out your local dollar store if you don't have one ;) ), Linen Thread or Baker's Twine (about 8"), and about 30" of the Scalloped Tulle in the Holiday Mini (available in Early Espresso - seen here, Cherry Cobbler or Crumb Cake). Simply run the needle and twine through the centre of the tulle. Let it bunch up because that's the end effect anyhow. It doesn't have to be threaded evenly, just through the centre at 1/2" to 1" intervals:


Once you've run the Linen Thread through the entire length of tulle, scrunch it up with even lengths of twine on each side and tie the twine in a knot. The tulle will fan out into a rosette as shown below.


You can use a button to finish it off since you already have two lengths of twine. I really hope that my guests like the decor. I wanted to do more, but the placeholders and candles took WAY more time than I expected ;) Don't these things always! 'Til next time, keep letting stamps bring out your creativity! And to my Canadian followers, have a fantastic Thanksgiving!


Project Recipe:
Stamps: Gently Falling, Silver Setting
Paper: Comfort Cafe, Soft Suede, Very Vanilla, Comfort Cafe, DSP
Ink: Cajun Craze, More Mustard, Soft Suede, VersaMark
Accessories: Linen Thread, Early Espresso Scalloped Tulle, Cajun Craze Stampin' Write Marker, Big Shot, Bigz XL Rosette Die, Neutral Designer Buttons, Heat Tool, Electric Glue Gun (not SU!)

Friday, June 15, 2012

Special Thank You for a Special Teacher

My daughter Anna is finishing up Senior Kindergarten this year and she has been lucky enough to have the most fantastic teacher for the past two years. She is patient, caring and just plain fantastic. We truly couldn't have asked for better. Last year I gave her an alphabet collage (on the left) that she loved. We didn't know she'd have her again this year again and I knew I couldn't really top last year's gift (I gave her 10 handmade cards and garnet earrings straight from the Czech Republic). But I could make her a great card ;)

I used two challenges as the inspiration for my card:
1) The Paper Players challenged us to use Basic Grey, Lucky Limeade and Melon Mambo in our card.
2) Try Stampin' On a Tuesday (a NEW one for me!) gave us a great sketch to work with.


I was pretty happy with the final product and her teacher liked it too :) My daughter goes to an all French school so I used this non-SU! embossing folder that has 'Merci' in it.


Tips & Tricks:

*I colored the apple stamps from Fruits and Flowers with Stampin' Write Markers, cut them out and then re-stamped them with Basic Grey ink and cut out the center heart.
*The apples and hearts are both mounted on Stampin' Dimensionals to make sure that they pop out. I love how easy it is to add texture to cards with these little sticky pop-ups.
*To coordinate my button 'thread' with my card (and to add a bit of visual contrast in colors) I threaded a thin strip of card stock through the button. It really pops!
*I did stamp the whole apple, including the center heart, in Melon Mambo. I wanted that little bit of pink peeking out from under the grey ;)
*I've been in a bit of a Crystal Effects mode lately. I love the glossy look it gives my card elements. I've had the same bottle for almost four years now and used it for many many projects. Talk about good bang for your buck!

I'm glad Anna's teacher loved her card and hopefully this will inspire to make a special card for your child's fantastic teacher. 'Til next time, keep letting stamps bring out your creativity!


Sunday, June 3, 2012

Teacher's Gift Card Holder

It's that time of year again ~ the end of the school year! I can't believe it's June already, time flies. Soon I'll be knee deep in summer camps, blow-up swimming pools and sunscreen. But, in the meantime I have to focus on making sure that my kids' awesome teachers get a proper thank you.

I used the new DSP, Floral District, as well as the Itty Bitty Banners and Bright Blossoms stamp set. For the card sketch, I used this week's Retro Sketch. I was also inspired by a gift card holder I saw on a blog this week. But, for the life of me, I can't remember which blog it was!


Tips & Tricks:

*For my gift card holder, I scored at 1-1/2" and 6-1/2". To make sure the gift card stays put, I secured the inside flap with the Mini Silver Brads.
*Although the Itty Bitty Banners stamps coordinate with the Bitty Banners Framelits they're super cute on their own too. I love the wavy curves of the "thank you".
*I love the colors in the Floral District DSP. Rich Razzleberry, Baja Breeze, Old Olive and Daffodil Delight... can't go wrong!

*Sometimes the right image is just enough. Even though this flower vase from Bright Blossoms is small, I love it! And it's just right for this card.
*What do you think of the new Stitched Grosgrain Ribbon? I love the little extra effect the stitching adds :)


I hope the ladies who come to my New Catalog Event and BOGO Sale enjoy this make-and-take ~ yup, this is one of the projects they'll be making! I hope they love it :) 'Til next time, keep letting stamps bring out your creativity!


Friday, September 23, 2011

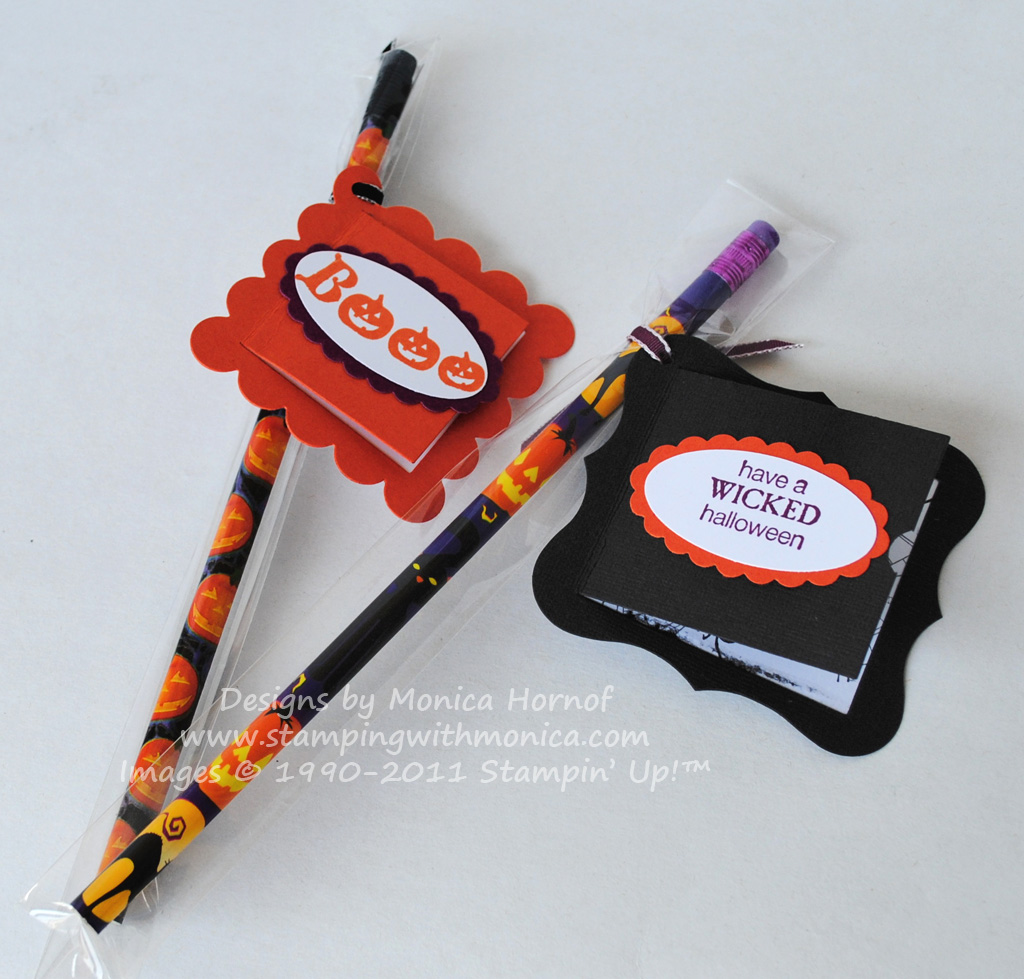
Hallowe'en Tags

Quick post for today, but I just had to share! I have my first Crazy 4 Christmas Class today and as a door prize, I wanted to give away something I'm planning on doing for the children in my kids' classes. It uses the new Peekaboo Frames Bigz L die as well as the 1" x 8" Cellophane Bags - both found in the Holiday Mini. I guess it's kind of odd that I'm giving away Hallowe'en treats for a Christmas card class door prize. But then again, it's an unusually warm September day too... definitely not Christmas-y! So why not mix it up?

I can't even begin to tell you how much I love these products! There are so many things you can do with the Peekaboo Frames die - cards, tags, scrapbook peekaboo pictures or journalling - the sky's the limit! The Cellophane Bags are a perfect treat size. They fit gumballs, jellybeans, M&Ms or a pencil :)


Tips & Tricks:
*To adhere the inner card stock to the frame, I ran my 2-way Glue Pen around the outside of the frame and stuck the card stock on. This prevents adhesive from being on the stamped back of the tag.
*The 1" x 8" Cellophane Bag has adhesive at the top (similar to the Translucent Envelopes) so you can easily close in any treat you want to put in it.
*The Peekaboo Frames die makes making fun tags a snap! I made these beauties in less than 5 minutes each :)
*1/8" Taffeta Ribbon is the perfect size for tags. I used my Crop-a-Dile to make a 1/8" hole in the tags.

'Tis all for this Friday. Until next time, keep letting stamps bring out your creativity!


Wednesday, September 14, 2011

Monogrammed Note Cards

I know I said I'd have a Herringbone Technique Tutorial for you in my next post... but I just have to share this with you ladies first! I have a private stampin' class tomorrow night and one very, VERY excited hostess :) One of my SU! demo friends, Kim Assaly, gives all her hostesses monogrammed note cards and I really like that idea. So I made my first set today. My hostess' name starts with 'M' and I used the lovely Broadsheet Alphabet for these cards.


What I love even more about these note cards is how easy they are! I made them with the Big Shot Movers & Shapers Bigz XL Die. I ran the Marina Mist CS through the die first to make the card base. I then ran a piece of Whisper White CS through the die to punch out the shape. My hostess is getting 3 cards with the Curly Label design and 2 cards with the Scallop Oval design. I used the coordinating punches to punch out stamped 'M's for the cards.


Tips & Tricks:

*Although the Movers & Shapers Die cuts your card to the stand A2 size and suggests you used a piece of card stock that is 12" long, I make it work with the standard 11" long card stock. I trim it to 4-1/4" x 11" and put it right in the space that cuts the card out. If you do this carefully, your card base won't get trimmed at all, just scored in the middle and with a shape punched out.
*Use the coordinating punches (in this case Scallop Oval and Curly Label), which are sized just a smidge smaller, to leave a little border around the stamped image when the card is closed.
*These notes are so elegant on their own I didn't need to do much else to them. I embossed the Whisper White with the Elegant Bouquet embossing folder and added a bit of ribbon and that's it - lovely, elegant note cards :)
*To line up the shape cut out on the Whisper White card stock with the card base properly, cut out the shape with the Big Shot on a 5-1/2" x 4-1/4" piece of card stock. Then trim 1/8" off of each side. This will give you a 5-1/4" x 4" layer with a perfectly positioned cut out.
*Yes, I know. The Marina Mist 3/8" Taffeta Ribbon is retired, but it just looked so lovely on this card so I used it anyways!

These 5 note cards only took me 45 minutes to make!  So next time you need a hostess gift, whether it's a stampin' hostess or a dinner party hostess, why not make her some elegant gift notes? 'Til next time, keep letting stamps bring out your creativity!