Showing posts with label Sunday Stamps. Show all posts

Sunday, September 30, 2012

Carry On Note Cards and Box

It's Sunday! And that means another Sunday Stamps Challenge. The design team that we have for this challenge is really great because they keep challenging me. :) This week, Joan brings us a color challenge: Gumball Green, Marina Mist and Soft Suede. I love all three of these colors but never would have thought to put them together.

Last week, I also got the super cute Hostess Exclusive set, Carry On in an order and really wanted to use it. But I couldn't choose which stamps from the set I should use. So, I used all of them :) I made a set of little mini note cards along with a little box to hold them all. I mixed and matched all the challenge colors in the note cards.


I ordered this stamp set in clear mount and I'm really glad I did. I was able to mount the word stamps together on one block and have perfectly spaced words. My cards are 3"x3" note cards and they fit perfectly in the Mini Envelopes. I love how the picture stamps are small enough to decorate my envelopes, too.

I came up with the pattern for the little box on my own. Below is the pattern. It's handdrawn, so please bear with me. My sister is visiting from Germany and I haven't had much time to stamp ;) You'll need a piece of card stock that is 5-1/4" x 9-1/4" in size (there's a small typo on my pattern, the piece of card stock that will be the flap of the box should be 3/4"). Score at 1" and 4-1/4" on the short side. Score at 1", 4-1/4", 5-1/4" and 8-1/2" on the long side. Cut on the 'cut' lines, fold on the 'fold' lines and put your box together with a strong adhesive such as Sticky Strip.


To decorate my box, I used the Be of Good Cheer DSP (Gumball Green polka dot pattern) and the Comfort Cafe DSP (Soft Suede patterns).

Hope you liked my little box and the note cards. It would definitely make a super cute gift, you could even fill it with Christmas tags. 'Til next time, keep letting stamps bring out your creativity!


Card Recipe:
Stamps: Carry On 
Paper: Gumball Green, Soft Suede, Marina Mist, Very Vanilla, Comfort Cafe DSP, Be of Good Cheer DSP
Ink: Gumball Green, Soft Suede, Marina Mist
Accessories: 1-1/4" Scallop Circle Punch, Brights Glitter Brads, 3/8" Soft Suede Taffeta Ribbon, Stampin' Dimensionals, Stampin' Sponges,


Sunday, September 23, 2012

Some Quintessential Medallions

I've been working on a lot of Christmas cards and this week I wanted to make something that wasn't so festive. I also wanted to use something other than my Christmas stamps. So using Tara's Sketch for the Sunday Stamps Challenge, I decided to play around and use the Quintessential Flower single stamp as well as the Daydream Medallions stamp set.

Not only that, but I went with super bright, summery colors :) Tara had said that her sketch was a launching point, to use our imaginations. And we all know I don't like to follow the 'rules' anyways. So, instead of the tag, I used the gorgeous flower and this is what I came up with :)


Tips & Tricks:
*If you're not afraid of a little bit of texture, layer two embossed pieces of card stock on top of each other. I used the Vintage Wallpaper embossing folder to emboss my Summer Starfruit layer as well as the Raspberry Ripple Strip.
*I tore the top corner of my Summer Starfruit card stock because something was missing. But then I tore too big a piece off. So I stamped the Quintessential Flower on my Raspberry card stock and voila - fixed! As I always tell my my stampers, most of the time, 'mistakes' can be fixed ;)
*I absolutely LOVE that the Quintessential Flower coordinates with our scalloped circle and circle punches. I made my layered flower in less than five minutes!
*Doesn't the medallion make a fabulous background for my flower? It was easy to cut out with the Floral Frames Framelits, too.
*I wanted a nice, bright card and the 2012-2014 In Colors definitely fit the bill! And then I topped it off with a Summer Starfruit In Color Dahlia. :)

I left the card without a greeting. While it would make a fantastic birthday card, it could be a thank you card or a 'just because' card. So I decided to not close any doors ;) 'Til next time, keep letting stamps bring out your creativity.


Card Recipe:
Stamps: Quintessential Flower, Daydream Medallions
Card Stock: Raspberry Ripple, Summer Starfruit, Whisper White
Ink: Raspberry Ripple, Gumball Green, Pink Primrose, Midnight Muse
Accessories: In Color Dahlias, 1/4" Stitched Grosgrain Ribbon, 2-3/8" Scallop Circle Punch, 1-3/4" Scallop Circle Punch, 1-1/4" Circles Punch, Big Shot, Vintage Wallpaper Embossing Folder, Floral Frames Framelits, Stampin' Dimensionals

Saturday, September 8, 2012

A Simple Ornament Keepsakes Card

This week, Sunday Stamps brings you a most fantastic sketch. Just a really great sketch. By Yours Truly - lol! I'm your hostess for the Sunday Stamps Challenge this week! I've been playing with sketches for a while and being part of this design team has forced me to put pen to paper. For this challenge, I came up with this sketch:


I had just gotten the Ornament Keepsakes stamp set and was wanting to play with it. It coordinates perfectly with the Candlelight Christmas DSP and so I came up with this card:


Tips & Tricks:
*How gorgeous are the designs on the ornaments and on the DSP. So vintage but with a modern twist. This DSP coordinates with Early Espresso, Real Red, Very Vanilla and Lucky Limeade. Love it!
*The Ornament Keepsakes stamp set coordinates with the Holiday Framelits. I love how the Framelits let us have perfectly cut out shapes!


*I was so sad when they retired the Many Merry Messages stamp set last year. But I should've known that SU! had something up their sleeve: the More Merry Messages stamp set. It has lovely greetings perfect for all Christmas cards! I love the font of the 'Merry Christmas' greeting.
*Sometimes I find the 1/4" Grosgrain Ribbon seems too wide. This is where I bring in the 1/8" Taffeta Ribbon. It fits perfectly on this card without taking it over.

I hope you like my sketch and you'll join us at Sunday Stamps this week. 'Til next time, keep letting stamps bring out your creativity!

Card Recipe:
Stamps: Ornament Keepsakes, More Merry Messages
Paper: Real Red, Very Vanilla, Candlelight Christmas
Ink: Real Red
Accessories: 1/8" Real Red Taffeta Ribbon, Big Shot, Holiday Framelits, Stampin' Dimensionals


Monday, September 3, 2012

Beautiful Papillons

I'm so excited, my studio is pretty well ready for my Grand Opening on Friday! I did some stenciling on the walls today (with retired Decor Elements stencils), hung my Dasher picture (using the retired Hostess Decor Element), and set up another Expedit shelf in the corner. Looks much better than the plastic organizer I had there before :) I bought three folding tables yesterday, though I need one more. And I have chairs. So bring it on, I'm ready to stamp with you!

Today I have another Sunday Stamps post for you. Yes, I'm very aware it's Monday. But with the long week-end, I got totally confused on days. And I've barely been on the computer! We had a lovely color challenge from Tara (Can't Stamp the Rain). We were challenged to use Sahara Sand, Lucky Limeade and Wisteria Wonder. The last two were easy for me to use. But Sahara Sand? The only card stock that I have in that color is from a multi-colored package of card stock that I bought when I first joined SU! over 4-1/2 years ago! And I don't even have the ink... I much prefer Crumb Cake ;) But I love how it turned out and may have to acquire more of this color:


Tips & Tricks:
*I really had butterflies on the mind when I made this card and loved how fabulously the Papillon Potpourri stamp set paired with the Bigz Beautiful Butterflies die.
*I love the Delicate Designs Embossing Folders for borders. They do leave a little outline on the card stock where the embossing folder ends (it's only about an inch wide) so I covered it up with some 3/8" White Taffeta Ribbon.
*The Papillon Potpourri stamp set coordinates with the Elegant Butterfly Punch. Which means easy cutting, no scissors :)
*Like the greeting? It's from the Memorable Moments stamp set.

I didn't get a chance to take updated pictures of my studio, but I will tomorrow! I still need to sort out a make and take for Friday, too. Talk about cutting it close ;)

'Til next time, keep letting stamps bring out your creativity!


Card Recipe:
Stamps: Papillon Potpourri, Memorable Moments
Paper: Wisteria Wonder, Sahara Sand, Lucky Limeade, Whisper White
Ink: Wisteria Wonder, Lucky Limeade
Accessories: Elegant Butterfly Punch, Scallop Oval Punch, Oval Punch, 3/8" Whisper White Taffeta Ribbon, Big Shot, Bigz Beautiful Butterflies Die, Delicate Designs Embossing Folder, Stampin' Dimensionals

Monday, August 27, 2012

Back with Sunday Stamps

It's been much too long since I last posted. I've been super busy with this new house. Setting everything up has definitely been much more work than I or my husband ever expected! Why didn't anyone warn us??? lol! But it's all good. We're settling in and the kids are loving it. My daughter met some girls on our new street that are her age and she was pretty excited when they asked her to play scooters right away. It was everything I'd hoped for :)

Today I'm back with the Sunday Stamps Challenge. We took a two-week summer break, but now we're back with a gorgeous sketch from Hayley Kew:


I wasn't sure what direction I wanted to take this sketch in. The more I thought about it, the more I thought that the In Color Ruffled Ribbon wold look good layered. So I came up with this:


Tips & Tricks:

*I embossed the Whisper White Background with the Floral Bouquet Embossing Folder. I love how delicate the little flowers look without taking over the card.
*I felt so bad leaving Island Indigo and Pool Party out of this card ~ I had a really hard time deciding which of the five In Colors to use! But I love how this turned out. Wisteria Wonder, Lucky Limeade and Calypso Coral look so fresh together.
*How can you not love the Itty Bitty Banners stamp set and coordinating Framelits? They make creating fun greeting for your card so easy!
*Rhinestones to the rescue again! My blooms from Betsy's Blossoms looked a little plain. Something was missing. So I added some rhinestones and voila! Problem solved ;)

Hope you're still hanging in there with me with my lack of posts. As of today, my studio is functional (see my Facebook Page and don't forget to 'like' it :) ), I should be a bit more productive ;) 'Til next time, keep letting stamps bring out your creativity!


Card Recipe:
Stamps: Betsy's Blossoms, Itty Bitty Banners
Paper: Lucky Limeade, Calypso Coral, Wisteria Wonder, Whisper White
Ink: Lucky Limeade, Calypso Coral, Wisteria Wonder
Accessories: Calypso Coral/Wisteria Wonder/Lucky Limeade Ruffled Ribbon, Adhesive Jewels - Rhinestones, 1-3/8" Circle Punch, 1-1/4" Circle Punch, Big Shot, Floral Bouquet Embossing Folder, Bitty Banners Framelits, Stampin' Dimensionals

Saturday, August 4, 2012

Medallions and Banners

Another HOT week-end in Ottawa ON. It was 35C here today, 35C! And that's without the humidex. For my American friends, that's 95F. Which for Ottawa is pretty extraordinary. Especially because it has been so hot all summer. I spent the day at an outdoor festival and then in my in-law's pool, so I'm pretty spent ;) But not too spent to share this bright, summery card with you :)

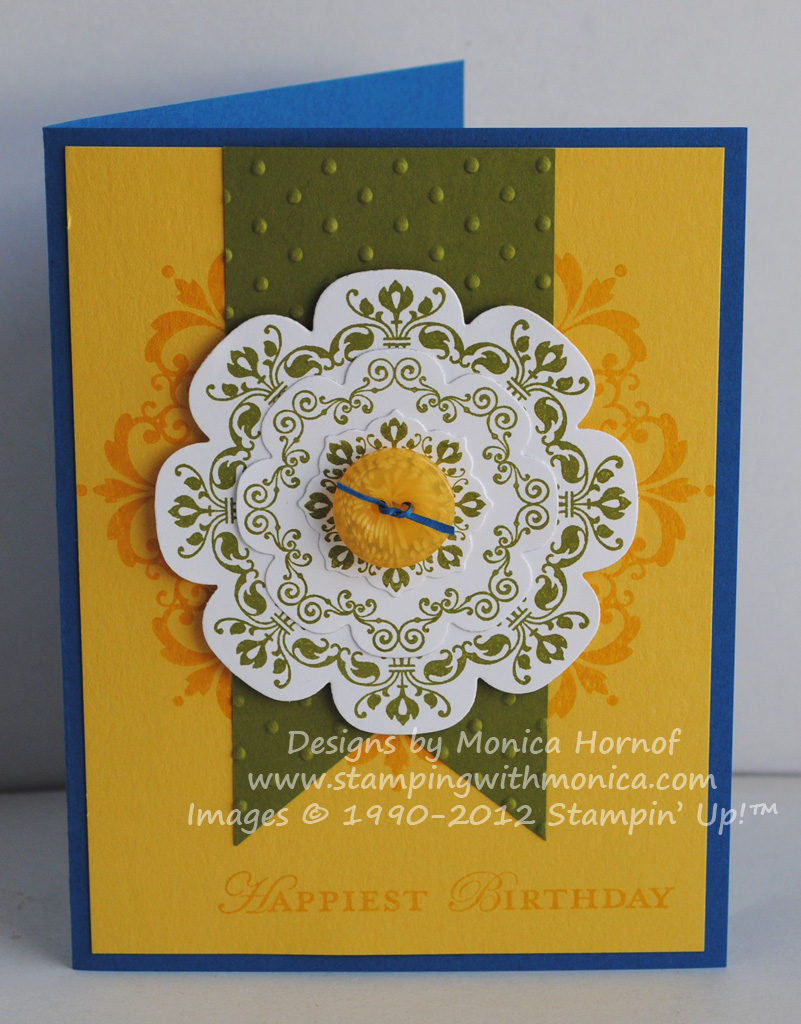
Sunday is almost upon us and this week at Sunday Stamps we have a color challenge. Our designer Lisa Johansen at Snow Moose Creations came up with the challenge of Pacific Point, Daffodil Delight and Old Olive. This is a color combination I don't think I've used before but I loved it. This is why I love challenges so much, they force me to think outside the box. My little Baja Breeze and Wisteria Wonder box :)

Although I was inspired by a card I'd made at a demo meeting, I did tweak the sketch and made it my own :) I'm so excited to be finally coming up with my own sketches. Especially because I have something up my sleeve for the fall. And I'll need some sketches ;)

Tips & Tricks:

*It took a few tries to get my large floral medallion lined up properly on the Daffodil card stock. But that's because I forgot to use my Grid Paper. I think this heat is getting to me ;)
*I'm seriously loving the Floral Frames Framelits. It is soooo easy to create fantastic die-cut stamped images :) I made three different floral frames and love how easy it is to layer them!
*Isn't the button in the middle the perfect finishing touch? I especially love the Pacific Point paper thread through the middle. Add that little 'pop' of color!
*Although I wanted to include a sentiment on my card, I still wanted the flowers to remain front row and center. So I stamped the 'Happiest Birthday' sentiment tone-on-tone on the Daffodil card stock. I love how it turned out.

I hope this card inspired you to craft something bright and sunny and that you'll join us at Sunday Stamps this week for this fab color challenge. 'Til next time, keep letting stamps bring out your creativity!


Card Recipe:

Stamps: Daydream Medallions, Loving Thoughts
Ink: Daffodil Delight, Old Olive
Paper: Pacific Point, Daffodil Delight, Old Olive, Whisper White
Accessories: Designer Buttons - Brights, Big Shot, Perfect Polka Dots Embossing Folder, Floral Frames Framelits, Mini Glue Dots, Stampin' Dimensionals

Saturday, July 28, 2012

Sunday Googly Ghouls

Another Sunday Stamps Challenge. And I guess my post title is a bit odd - but because of the stamp set I used if fits ;)

This challenge was hosted by the fabulous Joan Jeffery of J-J Creations. She has provided us with a gorgeous sketch that can be interpreted in so many different ways. I decided to put my Googly Ghouls stamp set to good use :) I love this set, it's so cute! Can't wait to use it in a Hallowe'en Scrapbooking class.

Although I tend to change up sketches and challenges quite a bit, I loved this sketch so much I pretty much left it as is. I added a scallop circle under my ghouls on the left, but I wanted the mummy to really stand out from the Tangerine Tango, so I left him as is.


Tips & Tricks:

*All the materials in my card are a sneak peek from the Holiday Mini. I absolutely love the Woodgrain Embossing Folder.
*I love the Howlstooth & Scaringbone DSP. If not only for the name ;) There's lots of fun patterns and the colors (Basic Grey, Basic Black, Tangerine Tango and More Mustard) are sooo Hallowe'en!
*You know what I love about the Googly Eyes? They have a little glue dot on the back. So not only are they darned cute, but there's no fuss in getting them onto your card!
*I am loving the Striped Satin Ribbon. It's so perfect with the rest of the Howlstooth & Scaringbone Suite.

If you're loving this Hallowe'en Suite of Products, look for an Accessory Test Drive in September. Try out the products in the suite, a little at a time. More info is available on the blog page above. I'll also be offering a Hallowe'en Scrapbooking Class on September 16th.

'Til next time, keep letting stamps bring out your creativity!


Saturday, July 21, 2012

Sunday Stamps with Postage Due

Another Sunday means another Sunday Stamps Challenge, for which I'm fortunate enough to be a Designer. This week we had a color challenge: So Saffron, Ridinghood Red and Soft Suede. I have to admit, Ridinghood Red is not my favorite red. And since Daffodil Delight came to the Stampin' Up! family, that's really the only yellow I've used. But I absolutely LOVE this color combination and it's so perfect for a vintage-y card.


Even though I still have a few stamp sets I haven't played with, I just *knew* that the Postage Due stamps were perfect for this color combo. It's such a fantastic background stamp and it makes a good focal point, too. I had some 3/8" Ridinghood Red Taffeta Ribbon and it was perfect to add a little something to this card.

Tips & Tricks:

*To age my card a bit, I used my Craft and Rubber Scissors to distress the edges. I also used my Stampin' Sponges and Soft Suede Ink on all of the layers.
*I just love the Eiffel Tower postage stamp image. Even though the postmark on the large background stamp says Manila, I couldn't resist using the Eiffel Tower on my card. It just seems to work so well with the script as well as the bicycle.
 *Tearing the edges of your card stock is another simple way to add a vintage flair to your card. I tear randomly. Most times it works... sometimes I have to re-stamp my image ;)
*Even though this card appears to have a lot of 'elements' to it, because of the large stamp I used and the randomness of the sponging, tearing and distressing, it didn't take too long to put together. It's actually a pretty simple card :)

I hope you'll join us at Sunday Stamps for this wonderful color challenge. I can't wait to see what you come up with! 'Til next time, keep letting stamps bring out your creativity!


Card Recipe:

Stamps: Postage Due
Paper: Ridinghood Red, So Saffron, Very Vanilla
Ink: Ridinghood Red and Soft Suede
Accessories: Stampin' Sponges, Craft & Rubber Scissors, Postage Stamp Punch, Ridinghood Red 3/8" Taffeta Ribbon, Stampin' Dimensionals

Sunday, July 15, 2012

Sunday Lollipops

Before doing today's post, I wanted to update a bit on my 'Papaya Collages' mystery. It's the stamp set I used in my last post. It was bugging me, because no one seemed to know. Then I got a comment on my post from karmi84 saying "i really like the papaya and the colours you have used, it is a really lovely card". And that got me thinking... is the papaya a type of bird? It wasn't easy but I came up with this on Google. The papaya refers to the 'papaya bird'. In Suriname, the Black Spotted Barbet is known as the Papaya Bird. In Hawaii, the House Finch is known as the Papaya Bird. I'm not bird expert, but to me they look like the same bird :) Below are some references. If I'm wrong, feel free to call me on it ;) In the meantime, thanks to karmi84 for help figuring this mystery out!

http://www1.nhl.nl/~ribot/english/canig_ng.htm
http://www.bird-friends.com/BirdPage.php?name=House%20Finch

Onwards and upwards to this week's Sunday Stamps Challenge. We had a lovely sketch to work with today. I really love butterflies, but I wanted to change it up a bit. I've seen these layered circle lollipops done on a few cards now ~ various blogs, Pinterest and other places. I loved them so much, they're so fun and I thought I could use them with this sketch.


Ususally I use colors from colour challenges or I use DSP as my inspiration. For this card, I wanted to do BRIGHT :) And I think I've achieved that with the Melon Mambo, Tempting Turquoise, Tangerine Tango, Daffodil Delight and Old Olive.

Tips & Tricks: 

*This card is easy-peasy, even though there are quite a elements/layers. But it's all punch art! I just punched out a whole pile of different-sized, different-colored circles and put them together with colors I thought looked good.
*Something was missing on the lollipops, they were just too plain. So I used Glue Dots to adhere a flower Brights Designer Button to the middle of each. Problem solved :)
*I wanted to use Baker's Twine for the 'stick' of the lolli. But it was a pain to stick on properly. So I just trimmed little strips of Whisper White Card Stock and used those as sticks.


*For the scalloped layer, I didn't want to take away from the lollipops and ribbon with another layer. So I used my scalloped embossing strip. I like the way it kind of looks like grass.

Even though this card has pink in it, I think it would make a perfect birthday card for any young girl and young boy. What child can resist lollipops? I hope you'll find time to play with us and this great sketch at the Sunday Stamps Challenge.

'Til next time, keep letting stamps bring out your creativity!


Sunday, July 8, 2012

A Fun Sunday Stamps Color Challenge

I really made a concentrated effort to get this post out on, well, Sunday. I'm really enjoying being on the Design Team for the Sunday Stamps Challenge and feel I should really try to get my posts out on the Sunday. So here we are :) This week's challenge was a color challenge: Primrose Petals, Summer Starfruit and Basic Gray. I have to admit though, out of all the new In Colors, Primrose Petals is likely my least favorite. But I decided to really challenge myself and use it as the focal point on this card.


I really love this stamp set, Four Seasons. It has images for spring, fall, Christmas - any holiday really :) It's a Hostess only set, so if you love it, talk to me about booking a private stampin' party for you or your friends. You can also place a $200+ order my Online Store to earn hostess benefits.

Tips & Tricks:

*The larger circle images in the Four Seasons stamp set coordinate with the 2-1/2" Circle Punch and/or the Large Scallop Circle Punch. Coordination made easy!
*Unfortunately, you will need to cut out the butterflies with your Paper Snips. ;) But try it, it's not as bad as you think!
*I've seen this done so many times and never done it, but I love the look... Embossing your cardstock with punched/cut out elements glued onto it. Using the Square Lattice Embossing Folder gives it a quilted look and I love how it turned out.
*I made this card for two downline that were integral in helping me earn the Fiji Incentive Trip so I thought the Create greeting from Loving Thoughts was appropriate here ;) They're both on the Sunday Stamps Design Team though, so they'll see this card before they actually get it... I really have to get better at actually mailing these things out, lol!
*This is the first time I've used the Primrose Petals Stitched Satin Ribbon and I have to say, I have really grown to love the colour! It's good to step out of that box of mine sometimes.

I hope my downline love their card - when they actually get it! 'Til next time, keep letting stamps bring out your creativity!


Monday, July 2, 2012

A Stamp Set Truly Fitting Any Occasion

It's Monday and once again I'm only now getting around to posting my Sunday Stamps post... can I use the excuse of it being a (very busy) long week-end in Canada? Or maybe that my excitement over having earned the Stampin' Up! Grand Vacation to Fiji hasn't completely passed yet ;) Whatever the reason is, I'm late. But better late than never right?

This week at Sunday Stamps we have a sketch challenge. Anyone who's ready my blog knows I like a good sketch challenge. This week's sketch was fun, flexible and not too busy ~ just the way I like it!

When I first saw the A Fitting Occasion stamp set in the new catalogue, I was so excited. I really did fit any occasion and my class-goers could create whatever card they wanted. Although I love clear stamps, I ordered it in wood because of all the small stamps in the set. Also, this way my class-goers could just choose which stamps they wanted to use, without worrying about glass blocks, etc. I did this card at my card class last week. I had prepared a birthday card as well as a new baby card to show how easy it was to customize for *any* occasion.


The A Fitting Occasion stamp set (see all the teeny tiny, easily 'loseable' stamps? That's why I got it in wood):


Tips & Tricks:

*For my class, I brought out the whole A Fitting Occasion stamp set, the ink as well as all the punches that coordinate with the set. Each class-goer could make whatever card they wanted. And was there every a variety!
*For the card stock that has the scalloped edge, I embossed the card stock first and punched second. Otherwise the detail the punch creates could be destroyed.
*My scallop oval and modern labels looked like they were missing something... so I added some Rhinestone Jewels.
*All the little images fit perfectly in a 3/4" circle and all of the circular greetings fit perfectly in a 1" circle. I love how everything coordinates perfectly. Makes things so easy!
*Whatever the occasion, the Perfect Polka Dots Embossing Folder is perfect!

I will be sending the baby card to my cousin and his wife who just welcomed their first child. And I'm sure I'll find someone for the bday card ;) 'Til next time, keep letting stamps bring out your creativity!


Sunday, June 24, 2012

Sunny Colors at Sunday Stamps!

I should've posted this yesterday so that it hit your inboxes this morning - on Sunday! But I compeletely forgot... I am posting now though, and it's still Sunday, so I guess that's not too bad :p This week at Sunday Stamps we had a fun, sunny color challenge: Daffodil Delight, Old Olive and Basic Black. To make this card even more sunny and summery, I used the new Summer Silhouettes stamp set.


I love all different images in this stamp set - so many options. I chose the little dandelions so that I could do some two-step stampin' :)


Tips & Tricks:

*I used black ink for the dandelion 'puffs' but I did second generation stamping so the puffs came in greyish.
*One of the new embossing folders in the Delicate Designs set (there's two) has this cute doily edge border. I trimmed around the round edges to give it a scalloped look.
*I really love the Loving Thoughts stamp set that was carried over from the 2012 Occasions Mini. It has greetings just a bit different than the usual like 'Create', 'Dream', and 'Memories' that are great for a large variety of cards as well as scrapbooking.
*Don't have Old Olive twine? Use a thin 'thread' of card stock instead :)
*Love this card? Come make it at my Fast & Fabulous Card Class this Wednesday from 7:30 - 9. We'll be making 6 cards, 3 each of 2 designs with all new stamp sets! It's a great class for beginners as well as more experienced stampers :)

I hope you enjoyed this Sunday Stamps card. 'Til next time, keep letting stamps bring out your creativity!


Sunday, June 17, 2012

A New Challenge...

... and I'm on the Design Team. That's right! Little 'ol me. I'm so excited! The challenge is called Sunday Stamps and Holly at Holly Beary Creations started it. We'll be alternating between sketch challenges and color challenges and this week we did a sketch challenge.

Isn't this a great sketch? I love it when they're not too busy and still allow some room for creativity! I decided to combine the Sunday Stamps sketch with the Dynamic Duos Color Challenge. This week, we were challenged to use Melon Mambo and Basic Black on our card.


I know I used these Labels Framelits in my last card (hubby's birthday card) but after I decided what I was stamping, I had to use them again ;) I wanted to use the En Francais background stamp and what goes better with that than the Eiffel Tower from Artisitic Etchings? Then I reached into my French Teeny Tiny Wishes and pulled out 'je pense a toi' (thinking of you) and this card was born. I love it all on the Whisper White background - it tones down the darkness of the black and brightness of the melon.

Tips & Tricks:

*I didn't just stamp the En Francais stamp on the Melon Mambo... I heat embossed it with Clear Embossing Powder. I love the extra texture and sheen it gives it. Makes it look like a DSP.
*I love the large scallop edge from the Bigz XL Tasteful Trim die, but something here was missing. I added a few inexpensive Rhinestone 'bedazzlers' and it fixed my 'problem'.
*To make my Eiffel Tower and sentiment really 'pop', I embossed them in Black Embossing Powder. I love the extra gloss and texture heat embossing gives my images - and it costs next to nothing!
*Don't have the Artistic Etchings stamp set yet? Add it to your stash! It is my 'go-to' set for feminine, masculine, birthday, thank you - basically everything cards!
*I again free-handed the notches in the card stock I stamped my greeting on with my Paper Snips. I could have used the Modern Label Punch but with the round look of the Framelits I wanted something a bit more angular.

I usually have a plan for my cards, who's going to get it. But this time, I just let my creativity guide me. I don't really have any upcoming birthdays or other occasions! Whoever it will be I hope they love it. The Melon is so bold, but the Eiffel Tower classic.

'Til next time, keep letting stamps bring out your creativity!