Showing posts with label Big Shot. Show all posts

Monday, January 21, 2013

Oh, Hello Thinking of You

One of the stamp sets we got in our Leadership Kit this year was Oh, Hello from the Spring Mini Catalogue. I'd been thinking about buying the set and was thrilled to find out we were getting it with our kit!

It's so versatile and coordinates perfectly with the Ovals Framelits. I've had a few sympathy and 'thinking of you' cards to send out this week, so I used this stamp set and a lovely sketch from Freshly Made Sketches (though I did take a few creative liberties).


I used the 'chevron' stamp from the Oh, Hello stamp set and colored it with markers for the accents on the ends. I also cut it apart. And doesn't the chevron background for the flower look like DSP? Love that stamp as well as the new ink pads which make everything so crisp!

Tips & Tricks:

*I wasn't sure about the Natural Trim Ribbon from the Mini. But it's so soft and I love how it frays on the ends ever so gently.
*The Needlepoint Border Textured Impressions Embossing Folders are just lovely. They add a very gentle and sweet accent to your projects. For this card, I simply placed it diagonally along my Midnight Muse layer.


*The Tea Lace Paper Doilies. Need I say more? For $3.95/24 doilies, they're not only a great value but so versatile! Here I cut one in half, cut the edges off and layered the them under my oval accent.

I hope this card brightens someone day a bit in a time that may not be so bright. 'Til next time, keep letting stamps bring out your creativity!

Monica

Card Recipe: 
Stamps: Oh, Hello
Paper: Crumb Cake, Midnight Muse, Very Vanilla
Ink: Summer Starfruit, Midnight Muse
Accessories: Summer Starfruit, Midnight Muse and Soft Suede Markers, 7/16" Natural Trim Ribbon, Tea Lace Paper Doilies, Big Shot, Needlepoint Textured Impressions Embossing Folders, Ovals Collection Framelits, Paper Snips, Paper Piercing Tool, Paper Piercing Mat, Occasions Paper Piercing Pack, Stampin' Dimensionals


Wednesday, October 3, 2012

Thanksgiving Decor and Tulle Rosette Tutorial

If you're in Canada, the upcoming week-end marks our Thanksgiving holiday. Since we moved into our new home a few weeks ago, I'm going to be hosting Thanksgiving this year (usually this is my Mother-in-Law's job ;) ). Being a crafter, I wanted to make some of my own decor for the occasion. We'll be having about 14 people and these will be the table centerpieces:


I had a few sources of inspiration... This week, the Friday Mashup Challenge asked us to make a 'fall leaves' project and/or use twine on our project. This was perfect, because this week the leaves in the Ottawa area are a gorgeous red/burnt orange and they have been inspiring me too. The candle on the left is made with the Gently Falling stamp set. The candle on the right is made with real leaves from our backyard :) Curious on how I made them? Stay tuned for a tutorial.

In addition, I wanted to make my own placeholders. They were pretty time consuming, but 100% worth it!


For both my candle and placeholder bases, I used the Comfort Cafe DSP and the Bigz XL Rosette Die. When I saw the Silver Setting stamp in the new catalogue, I just knew I had to use it for placeholders. Embossed in gold. What's holding the name cards? An old-school wooden clothes pin!

Love the Tulle Rosettes? They are soooo easy to make. This idea was original presented by Shelli Gardner herself at the Hamilton Regional in August this year. I wasn't able to attend (I was moving that day!) but I was fortunate that a fellow demonstrator shared the rosette with us.

You'll need a big sewing needle (check out your local dollar store if you don't have one ;) ), Linen Thread or Baker's Twine (about 8"), and about 30" of the Scalloped Tulle in the Holiday Mini (available in Early Espresso - seen here, Cherry Cobbler or Crumb Cake). Simply run the needle and twine through the centre of the tulle. Let it bunch up because that's the end effect anyhow. It doesn't have to be threaded evenly, just through the centre at 1/2" to 1" intervals:


Once you've run the Linen Thread through the entire length of tulle, scrunch it up with even lengths of twine on each side and tie the twine in a knot. The tulle will fan out into a rosette as shown below.


You can use a button to finish it off since you already have two lengths of twine. I really hope that my guests like the decor. I wanted to do more, but the placeholders and candles took WAY more time than I expected ;) Don't these things always! 'Til next time, keep letting stamps bring out your creativity! And to my Canadian followers, have a fantastic Thanksgiving!


Project Recipe:
Stamps: Gently Falling, Silver Setting
Paper: Comfort Cafe, Soft Suede, Very Vanilla, Comfort Cafe, DSP
Ink: Cajun Craze, More Mustard, Soft Suede, VersaMark
Accessories: Linen Thread, Early Espresso Scalloped Tulle, Cajun Craze Stampin' Write Marker, Big Shot, Bigz XL Rosette Die, Neutral Designer Buttons, Heat Tool, Electric Glue Gun (not SU!)

Thursday, September 20, 2012

A 'Scentsational' Christmas

I've had the scented embossing powders (in Peppermint Sticks and Sugar and Spice) for a few weeks now. I just didn't get around to using them. Something about the summer being busy ;) I finally broke out my Peppermint Sticks embossing powder the other day. I had a Demonstrator meeting yesterday (a HUGE perk of being a demo - meeting, stamping and talking with wonderful ladies who love stampin' as much as me!) and committed to making swaps. And swaps were made :)


The sketch for this card came from this week's Retro Sketches Challenge. I changed it up a bit - my greeting is the third element at the bottom of the card and my bow is the little accessory on the ribbon. I absolutely love sketches like this. Clean, simple and they allow me to showcase a really gorgeous DSP (Candlelight Christmas from the Mini).

Tips & Tricks:

*Did you know that with our new Firm Foam Ink Pads you can emboss our Scented Embossing Powders without VersaMark? They leave images a bit more moist, so quickly sprinkle on that powder and emboss with the Heat Tool.
*The Candlelight Christmas DSP is what Christmas is all about. Gorgeous rich colors, snowflakes and stunning patterns.
*My hot cocoa mug image was stamped it with the Scentsational Season stamp set. Then I used the Holiday Collection Framelits to cut it out. So much easier than using my snips ;)
*I am LOVING the new More Merry Messages. I was really sad to see Many Merry Messages retire, but I've forgotten all about it. lol!

I hope the ladies I swapped with last night enjoyed this card. Atleast it smelled delightful ;) 'Til next time, keep letting stamps bring out your creativity!


Card Recipe:
Stamps: Scentsational Season, More Merry Messages
Card Stock: Early Espresso, Very Vanilla, Candlelight Christmas Specialty DSP
Ink: Early Espresso, Cherry Cobbler
Accessories: Cherry cobbler Seam Binding Ribbon, Big Shot, Holiday Collection Framelits, Stampin' Dimensionals

Monday, September 3, 2012

Beautiful Papillons

I'm so excited, my studio is pretty well ready for my Grand Opening on Friday! I did some stenciling on the walls today (with retired Decor Elements stencils), hung my Dasher picture (using the retired Hostess Decor Element), and set up another Expedit shelf in the corner. Looks much better than the plastic organizer I had there before :) I bought three folding tables yesterday, though I need one more. And I have chairs. So bring it on, I'm ready to stamp with you!

Today I have another Sunday Stamps post for you. Yes, I'm very aware it's Monday. But with the long week-end, I got totally confused on days. And I've barely been on the computer! We had a lovely color challenge from Tara (Can't Stamp the Rain). We were challenged to use Sahara Sand, Lucky Limeade and Wisteria Wonder. The last two were easy for me to use. But Sahara Sand? The only card stock that I have in that color is from a multi-colored package of card stock that I bought when I first joined SU! over 4-1/2 years ago! And I don't even have the ink... I much prefer Crumb Cake ;) But I love how it turned out and may have to acquire more of this color:


Tips & Tricks:
*I really had butterflies on the mind when I made this card and loved how fabulously the Papillon Potpourri stamp set paired with the Bigz Beautiful Butterflies die.
*I love the Delicate Designs Embossing Folders for borders. They do leave a little outline on the card stock where the embossing folder ends (it's only about an inch wide) so I covered it up with some 3/8" White Taffeta Ribbon.
*The Papillon Potpourri stamp set coordinates with the Elegant Butterfly Punch. Which means easy cutting, no scissors :)
*Like the greeting? It's from the Memorable Moments stamp set.

I didn't get a chance to take updated pictures of my studio, but I will tomorrow! I still need to sort out a make and take for Friday, too. Talk about cutting it close ;)

'Til next time, keep letting stamps bring out your creativity!


Card Recipe:
Stamps: Papillon Potpourri, Memorable Moments
Paper: Wisteria Wonder, Sahara Sand, Lucky Limeade, Whisper White
Ink: Wisteria Wonder, Lucky Limeade
Accessories: Elegant Butterfly Punch, Scallop Oval Punch, Oval Punch, 3/8" Whisper White Taffeta Ribbon, Big Shot, Bigz Beautiful Butterflies Die, Delicate Designs Embossing Folder, Stampin' Dimensionals

Saturday, August 4, 2012

Medallions and Banners

Another HOT week-end in Ottawa ON. It was 35C here today, 35C! And that's without the humidex. For my American friends, that's 95F. Which for Ottawa is pretty extraordinary. Especially because it has been so hot all summer. I spent the day at an outdoor festival and then in my in-law's pool, so I'm pretty spent ;) But not too spent to share this bright, summery card with you :)

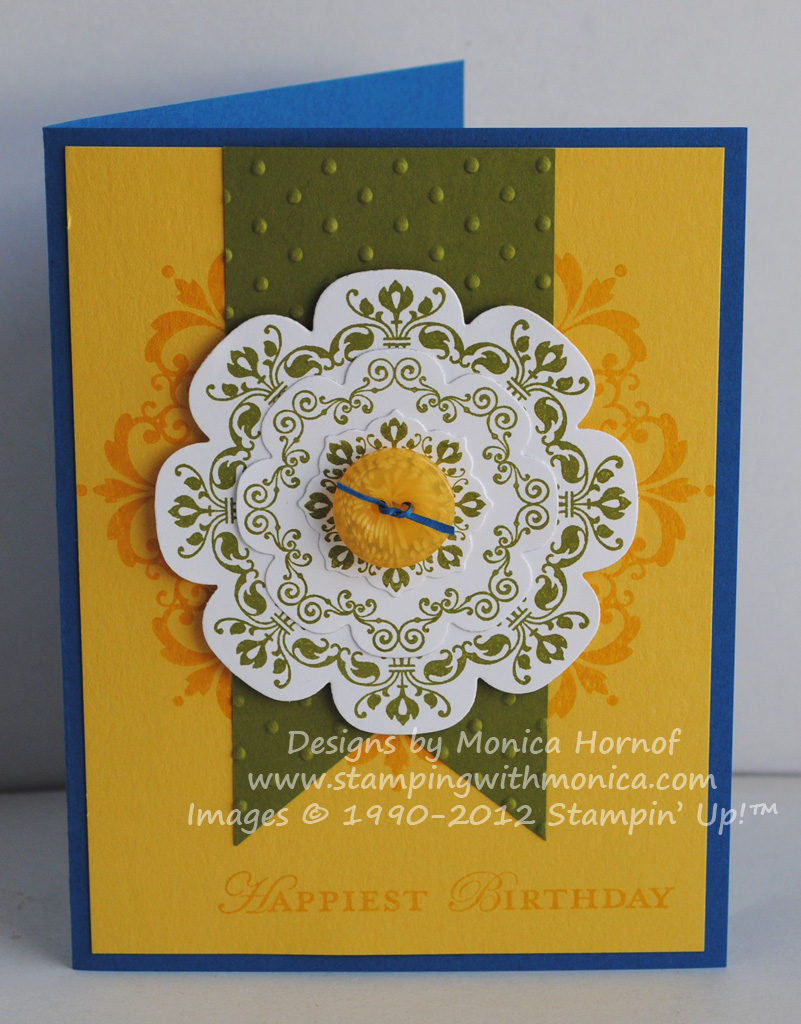
Sunday is almost upon us and this week at Sunday Stamps we have a color challenge. Our designer Lisa Johansen at Snow Moose Creations came up with the challenge of Pacific Point, Daffodil Delight and Old Olive. This is a color combination I don't think I've used before but I loved it. This is why I love challenges so much, they force me to think outside the box. My little Baja Breeze and Wisteria Wonder box :)

Although I was inspired by a card I'd made at a demo meeting, I did tweak the sketch and made it my own :) I'm so excited to be finally coming up with my own sketches. Especially because I have something up my sleeve for the fall. And I'll need some sketches ;)

Tips & Tricks:

*It took a few tries to get my large floral medallion lined up properly on the Daffodil card stock. But that's because I forgot to use my Grid Paper. I think this heat is getting to me ;)
*I'm seriously loving the Floral Frames Framelits. It is soooo easy to create fantastic die-cut stamped images :) I made three different floral frames and love how easy it is to layer them!
*Isn't the button in the middle the perfect finishing touch? I especially love the Pacific Point paper thread through the middle. Add that little 'pop' of color!
*Although I wanted to include a sentiment on my card, I still wanted the flowers to remain front row and center. So I stamped the 'Happiest Birthday' sentiment tone-on-tone on the Daffodil card stock. I love how it turned out.

I hope this card inspired you to craft something bright and sunny and that you'll join us at Sunday Stamps this week for this fab color challenge. 'Til next time, keep letting stamps bring out your creativity!


Card Recipe:

Stamps: Daydream Medallions, Loving Thoughts
Ink: Daffodil Delight, Old Olive
Paper: Pacific Point, Daffodil Delight, Old Olive, Whisper White
Accessories: Designer Buttons - Brights, Big Shot, Perfect Polka Dots Embossing Folder, Floral Frames Framelits, Mini Glue Dots, Stampin' Dimensionals

Tuesday, July 24, 2012

Fun with a Thaumatrope

I first saw a thaumatrope on my friend and downline Tara's blog. I have been wanting to make one ever since, but never got around to it. I have a FREE 'Try Out a Stamping Technique Club' class on Sunday and this is one of the cards and techniques that we'll be doing. I still have room if you'd like to come :) I think the thaumatrope is such a fun element and I love the way it 'floats' in the card :)


The butterfly in the center of the Floral Framelits is a removable thaumatrope. I'd give you a tutorial, but the link I've given you is much better than any tutorial I could give you. That said, here are some pictures of what my thaumatrope looks like.

I tied Early Espresso Baker's Twine on both ends of the scallop circle. I pierced holes through the base of the card and ran the twine through the two holes. If I can give any advice (and Tara gave me this advice too) cut the Baker's Twine longer rather than shorter. You'll need it!


Here's what my thaumatrope looks like when untied. When you spin it around the two colors and butterfly styles blend together. Stunning really.


Tips & Tricks:

*I used the sketch at the Friday Mashup Challenge for this card. I really love the simplicity of it and how versatile it is.
*I used the new Lacy Brocade Embossing Folder for the background on my card. I absolutely LOVE this folder. It will be available in the Holiday Mini on August 1st.
*When using two different-sized framelits to make a frame (like the Cajun Craze Flower) cut your large die-cut shape first. Then put your smaller framelit over the larger die-cut and cut out the smaller image to make your frame. To ensure your framelit doesn't move, put a Post-It note over the framelit/card stock to hold it in place.
*I am absolutely loving the Comfort Cafe DSP. Some patterns are fresh and modern, others are more vintage. I can't believe I wasn't sure about this paper when I first saw it ;)


I'm excited to show this card off to the ladies at my class on Sunday. I still have a few spots available and I'd love for you to join us.

'Til next time, keep letting stamps bring out your creativity!


Sunday, July 22, 2012

Lacy, Lovely & Quintessential

I had put the Lacy & Lovely stamp set on my Wish List when I first started going through the new SU! catalogue. I didn't order it right away but then I used it at a stamper's meeting (a perk of being a Demo - Monthly stamping meetings with my upline!!!) and I knew I had to have it. It was on my next order ;)

This week's Freshly Made Sketches sketch made good use of circles and it was absolutely perfect for both the Lacy & Lovely and Quintessential Flower stamps. I love how I can use many different SU! punches to layer the different images in these stamps.


Tips & Tricks:

*The Lacy & Lovely stamp set is made to coordinate with a variety of SU! Circle Punches, including the 2-1/2", 1-3/8" and 1" Circle Punch. That means perfectly punched out shapes and no cutting! What's better, use other circle or scallop circle punches to punch out even more lovely circle shapes.
*Both stamp sets I used for this card is a dream for those who love to layer!


*When I first saw the Comfort Cafe DSP I wasn't sure what I thought. But after using it a few times, I fell in love with it! It has gorgeous feminine and masculine patterns. And the colors are so soothing. I can understand why it's called 'Comfort' Cafe.
*Do you love the embossed background as much as I do? It's the Lacy Brocade Embossing Folder from the upcoming Holiday Mini. At first I thought it may be a bit busy, but it's not at all! And the pattern is so different from anything else we have in the catalogue.
*Do you see the ribbon I stamped the greeting on? It's also from the Holiday Mini. I received this 7/8" Cotton Ribbon in a special bundle FREE from Stampin' Up! Just one of the many perks of being a Demonstrator :) It's smooth, soft and easy to stamp on. I just love the vintage, soft look of it.


I hope you've liked this card. I don't often use Cajun Craze, but I really love how it works with these colors and have been inspired to use it more! 'Til next time, keep letting stamps bring out your creativity.


Card Recipe:

Stamps: Lacy & Lovely, Quintessential Flower
Paper: Soft Suede, Very Vanilla, Comfort Cafe DSP
Ink: Cajun Craze, Summer Starfruit, Soft Suede, Island Indigo
Accessories: 2-1/2" Circle Punch, 1-3/8" Circle Punch, 1-1/4" Circle Punch, 1-3/4" Scallop Circle Punch, 3/4" Circle Punch, 7/8" Cotton Ribbon, Big Shot, Lacy Brocade Embossing Folder, Stampin' Dimensionals, In Color Dahlias

Tuesday, July 10, 2012

More Daydreams, More Medallions

This week at Try Stampin' on a Tuesday we had a lovely simple sketch. They actually apologized for the simplicity of the sketch. I'm not sure why though, it's a lovely sketch. And because there aren't too many details in the sketch, we can use our imagination a bit more :)

I was trying to decide between using the Oval Accent Clear Bigz Die or the Floral Frames Framelits. Both are new to the catalogue and I haven't used them much yet. In the end, because I knew I wanted to use the Floral District DSP I thought the second largest Floral Frame would look best with the flower-patterned paper.


Because the Daydream Medallions stamp set coordinates with the Floral Frames I was super excited to use this stamp set again. But I didn't want to have a repeat of one of my last cards. So I decided to mix it up and use the Mixed Bunch stamp set and coordinating punch. LOVE how everything with Stampin' Up! works together so well!

Tips & Tricks:

*Before you ADHERE your card together, make sure that you're happy with how it all looks. That way you're not ripping anything apart if you're not happy with it ;)
*My card was missing dimension when I first put it together (see it above ;)). So I took it apart and sponged all the edges. Suddenly the DSP flower, the Razzleberry medallion and the daffodils popped out!
*The white stitching in the Rich Razzleberry 1/4" Stitched Grosgrain Ribbon really pops on this card. I thought I was going to really miss the plain grosgrain ribbon, but the Stitched style is really starting to grow on me.
*When I sponged the daffodil, I had already adhered the button with White Baker's Twine. So I added a bit of color to it by sponging it as well.
*I still can't get over how well these new Firm Foam Ink Pads work. Such a gorgeous, crisp image!

As I mentioned before, this sketch really allowed me some creativity and to combine a few different stamp sets and accessories. I really love simple :) 'Til next time, keep letting stamps bring out your creativity!


Sunday, July 8, 2012

A Fun Sunday Stamps Color Challenge

I really made a concentrated effort to get this post out on, well, Sunday. I'm really enjoying being on the Design Team for the Sunday Stamps Challenge and feel I should really try to get my posts out on the Sunday. So here we are :) This week's challenge was a color challenge: Primrose Petals, Summer Starfruit and Basic Gray. I have to admit though, out of all the new In Colors, Primrose Petals is likely my least favorite. But I decided to really challenge myself and use it as the focal point on this card.


I really love this stamp set, Four Seasons. It has images for spring, fall, Christmas - any holiday really :) It's a Hostess only set, so if you love it, talk to me about booking a private stampin' party for you or your friends. You can also place a $200+ order my Online Store to earn hostess benefits.

Tips & Tricks:

*The larger circle images in the Four Seasons stamp set coordinate with the 2-1/2" Circle Punch and/or the Large Scallop Circle Punch. Coordination made easy!
*Unfortunately, you will need to cut out the butterflies with your Paper Snips. ;) But try it, it's not as bad as you think!
*I've seen this done so many times and never done it, but I love the look... Embossing your cardstock with punched/cut out elements glued onto it. Using the Square Lattice Embossing Folder gives it a quilted look and I love how it turned out.
*I made this card for two downline that were integral in helping me earn the Fiji Incentive Trip so I thought the Create greeting from Loving Thoughts was appropriate here ;) They're both on the Sunday Stamps Design Team though, so they'll see this card before they actually get it... I really have to get better at actually mailing these things out, lol!
*This is the first time I've used the Primrose Petals Stitched Satin Ribbon and I have to say, I have really grown to love the colour! It's good to step out of that box of mine sometimes.

I hope my downline love their card - when they actually get it! 'Til next time, keep letting stamps bring out your creativity!


Wednesday, July 4, 2012

Two-Tone Flourishes

I'm really loving the Flowering Flourishes stamp set. It's so versatile and is great as both a background stamp *and* a stamp for the focal point on a card. The stamp set has three flourishes, a large one, a medium-sized one as well as a small one. I used the medium one on my card.

I used two challenges for my inspiration today. The first was the Dynamic Duos Color Challenge. This week's colors were Crumb Cake and 'Our Choice'. Usually I'd turn to Marina Mist or Rich Razzleberry. But I decided to shake things up this week and use my new fave color, Raspberry Ripple. It's not quite pink, it's not quite red, it's raspberry. It's a very rich color and I love it!

The second challenge I used was the Freshly Made Sketches Challenge. We had a nice, simple, clean sketch to work with this week. And guess what? I pretty much followed it to a tee! I even kept the orientation in the sketch! How often does that happen with me? ;)

Tips & Tricks:

*I just LOVE how rich, solid and bright my images come out when I use the new Firm Foam Ink Pads. No patchiness.
*The sketch I was using for inspiration had a thick band across the width of the card. We don't have the 1-1/4" ribbon anymore and I really wanted to use ribbon ;) So I created my own. I layered two strips of Crumb Cake Seam Binding Ribbon and then ran the Stitched Satin Raspberry Ripple Ribbon across the middle.
*I think the Fancy Fan Embossing Folder is my new favorite. Horizontal, vertical, it looks good in either orientation!
*I know the sketch didn't have the button (or any other element) on it on the ribbon. But I liked the way it looked with it. It was the only thing I changed about the sketch ;)
*Something was missing. I finished the card and I just didn't the way it looked. So I added a few Basic Pearls to the flourishes. Voila - card finished!

This is a great simple, blank note. Perfect for birthday, thank you or 'just because'. Hope you enjoyed my tips today. 'Til next time, keep letting stamps bring out your creativity!


Monday, July 2, 2012

A Stamp Set Truly Fitting Any Occasion

It's Monday and once again I'm only now getting around to posting my Sunday Stamps post... can I use the excuse of it being a (very busy) long week-end in Canada? Or maybe that my excitement over having earned the Stampin' Up! Grand Vacation to Fiji hasn't completely passed yet ;) Whatever the reason is, I'm late. But better late than never right?

This week at Sunday Stamps we have a sketch challenge. Anyone who's ready my blog knows I like a good sketch challenge. This week's sketch was fun, flexible and not too busy ~ just the way I like it!

When I first saw the A Fitting Occasion stamp set in the new catalogue, I was so excited. I really did fit any occasion and my class-goers could create whatever card they wanted. Although I love clear stamps, I ordered it in wood because of all the small stamps in the set. Also, this way my class-goers could just choose which stamps they wanted to use, without worrying about glass blocks, etc. I did this card at my card class last week. I had prepared a birthday card as well as a new baby card to show how easy it was to customize for *any* occasion.


The A Fitting Occasion stamp set (see all the teeny tiny, easily 'loseable' stamps? That's why I got it in wood):


Tips & Tricks:

*For my class, I brought out the whole A Fitting Occasion stamp set, the ink as well as all the punches that coordinate with the set. Each class-goer could make whatever card they wanted. And was there every a variety!
*For the card stock that has the scalloped edge, I embossed the card stock first and punched second. Otherwise the detail the punch creates could be destroyed.
*My scallop oval and modern labels looked like they were missing something... so I added some Rhinestone Jewels.
*All the little images fit perfectly in a 3/4" circle and all of the circular greetings fit perfectly in a 1" circle. I love how everything coordinates perfectly. Makes things so easy!
*Whatever the occasion, the Perfect Polka Dots Embossing Folder is perfect!

I will be sending the baby card to my cousin and his wife who just welcomed their first child. And I'm sure I'll find someone for the bday card ;) 'Til next time, keep letting stamps bring out your creativity!


Tuesday, June 26, 2012

Postage Due!

I am totally in love with this stamp set! Postage Due. It has a gorgeous larger stamp which works well as a background stamp, as well as few other postage-type accent stamps. Even though there are only four stamps, there are so many different things you can do with it. I used it at a meeting with my upline and was sooo glad I ordered it... Now I'm using it :)

For my card, I used the sketch in this week's Mojo Monday Challenge. It was a 'Round or Square' challenge, but I decided to go rectangle. Because since when do I follow rules ;) 

Tips & Tricks:

*Love the little polka dots? I'm using the new Polka Dot Parade DSP. So cute!
*I used the same stamp for the background as well as focal point on my card. I wanted to make sure the 'no. 3' was prominent - it's my favorite number ;)
*I did a lot of sponging on this card. I sponged the edges on the scallop square, on the focal panel as well as the emobssed Soft Suede mat. Sponging is a very cost-effective way to 'embellish' and 'vintage-ize' your cards.
*One thing I love about Stampin' Up! card stock is that it's dyed all the way through - no white core. It's also nice and thick. So to add a little something to my cards I can tease it with the Bone Folder and separate the layers. Another easy, cheap way of adding a little something extra to the card.

We'll be making this card at my Fast & Fabulous Monthly Card Class tomorrow. I hope the ladies love it! I still have a few spaces if you're interested, too. 'Til next time, keep letting stamps bring out your creativity!


Monday, June 25, 2012

A Fun Party Card

I had lots of fun making today's card! I used two card challenges to inspire me for today's cards. I decided not to 'mash it up' at the Friday Mashup Challenge and simply made a 'party time' card. You'd think this would be easy, but it was actually a bit harder than I anticipated... I ended up using the pinwheels from the Sweets for the Sweet stamp set which I found out worked really well with the Patio Party DSP. It has pinwheels in it too :) And do cupcakes say 'party' or what?


I used the sketch from Clean and Simple Stamping this week. I changed it up a smidge (surprise, surprise) but I really love the way the squares are lined up just a bit differently on each side. I did try putting the dahlia in the place indicated on the sketch, but it just didn't look right - it looked *much* better on the ribbon.

Tips & Tricks:

*Do you like the little flower on the Midnight Muse Stitched Satin Ribbon? It's the new In Color Dahlias. I LOVE them! And they are so easy to attach with Glue Dots.
*Since every party needs some bling, I put a few rhinestones on my pinwheels.
*So many people are too scared of cutting out their stamped shapes. But I say you should just try it! These pinwheels are very easy to cut out and I love the two-tone look it gives them!
*What do you think of the background? It's the new Argyle Embossing Folder! One of my favorite accessories from the new cattie :)

I hope this card has put you in a party kind of mood :) I really love this sketch and definitely will use it again!

'Til next time, keep letting stamps bring out your creativity!