Tuesday, May 29, 2012

Chock-Full of Cheer... In May

Well, I am finally, *finally*, feeling pretty much normal, and back to my old stampin' spirit! With the new catalogue preorder I also ordered the Chock-Full of Cheer stamp set as well as the *gorgeous* Be of Good Cheer DSP. There's a super fun challenge called the Merry Monday Challenge. It's Christmas, all year round! How fun :) The idea is that if you do the challenge week after week, you have 52 cards at Christmas :)

So I have a Christmas card for you today! And yes, I know it's May. The fun sketch I used is to the left. The card I created is below.


Tips & Tricks:

*Do you love the DSP? That's the Be of Good Cheer DSP in the new cattie. It uses Cherry Cobbler, Very Vanilla and the new In Color Gumball Green in it. Love. It.
*Love the way I can use our punches with the Chock-Full of Cheer stamp set and make an easy two-colored ornament.
*See that ribbon? What do you think? It's the new In Color Ribbon. It's going to be available in all 5 new In Colors. It's Satin. It's stitched and easy to work with. It's YUMMY! Stay tuned for a Ribbon Share - 2 yards of each for only $15!
*I absolutely love the Rhinestone Jewels - they're just enough to bling up a card for very little cost. Gotta love saving those pennies!
*I may not be a green lover, but I'm really lovin' Gumball Green and used it to stamp the greeting on the same colored card stock. Tone-on-tone stamping is a great way to include a greeting without taking over the card.

Merry Early Christmas ~ 'til next time keep letting stamps bring out your creativity!


Monday, May 28, 2012

Monochromatic Just Believe

Another little lag in my blog posts, but wow, was I sick! I don't remember being that sick in a long time and I'm still not 100%. But today I ate 3 meals, small meals, but 3 meals. And I was hungry! So I see that as progress. I also took the opportunity with my higher energy levels to do some stamping. Can you believe I hadn't stamped in a week?!?!? Craziness!

I don't often do monochromatic cards. Not sure why, guess it's just not my usual style. But going a bit out of my box is not a bad idea once in a while ;) This is just what the Dynamic Duos Challenge had me do: create a card with Bashful Blue and Marina Mist. And even though I didn't have time to enter my card into the Freshly Made Sketches Challenge last week, I did use their sketch because I loved it so much.


Tips & Tricks:

*I was excited to use the Beau Chateau DSP one more time before it retires! It has Marina Mist in which worked perfectly for my color challenge card :)
*I love Bashful Blue, but it's not too dark and was worried my gorgeous flower would show up. And then I realized that this is the perfect image for the Rock and Roll technique. I first stamped my card in Bashful Blue and rolled the edges in Marina Mist. I love how it makes the image POP!
*I added a bit of glitter to the flowers, as well as the grasses at the bottom. Love those Dazzling Diamonds.
*Do you have a hard time inking larger images properly? Can't get the ink on evenly and all over the stamp? Have no fear - Firm Foam Ink Pads will be here June 1st! SU! has changed their ink pads to a new material and holy smokes! What. A. Difference. Just tap your stamp on the pad and voila - perfectly inked stamps big and small! If you're in Ottawa, come and try them at my New Catalogue Event and BOGO Sale. Register here: http://monicasnewcattieparty.eventbrite.com.

I think I'm going to have to do this monochromatic look again sometime, I kinda like it ;) 'Til next time, keep letting stamps bring out your creativity!


Friday, May 25, 2012

Last Post as Guest Designer...

... for the Friday Mashup. It's been a fun RIDE! (Pun totally intended ;) ) This month I was fortunate enough to get one of the Guest Designer spots at one of my fave challenge sites. I can't believe the month is almost over and this means this is my last post in that capacity. I've enjoyed having a 'head's up' on the challenges and having a few days to come up with the perfect design to show off :)

Typically, I'd have this post published on Friday morning. But seeing that my daughter and I are just barely returning to the land of the living from this horrendous flu, we'll have to settle for mid-day Friday. After I'm done posting, it will be naptime... my daughter is already there.

This week's challenge at the Friday Mashup was the 'Boys Will be Boys' challenge:
1. Make a project for that 'Special Man in Your Life'; or
2. Make a project with the 'sketch'; or
3. Mash it up and create a 'Masculine card using the sketch'.

I decided to 'mash it up' (since I love sketches so much' and choose option 3 :) I also did something I very rarely do: I used a retired stamp! Yes, retired! I really try to use current product but sometimes I can only find what I really want in my retired stash. I loved the Motorcycle stamp two years ago when I first lay eyes on it, and I still do. It's especially perfect for my BIL's birthday card.


Sometimes I find blog photography so frustrating... it's not obvious in the above pic, but I embossed the motorcycle and greeting in Pewter Embossing Powder.

Tips & Tricks:

*Who says you have to stick to one type of DSP? I mashed it up some more here by combining a pattern from the Summer Smooches DSP with a pattern from the Floral District DSP. Doesn't sound too 'manly' but I think it works well.
*Sometimes the best card base for a vibrant card it Whisper White Card Stock. I wanted to make sure my DSP and motorcycles really 'popped'!
*I love the thicker look that the Pewter Embossing Powder gives my images. It's great for a strong image such as the motorcycle.

I hope my BIL loves his bday card. He lives in Australia so it's going to be late, but that shouldn't surprise him coming from me ;) 'Til next time, keep letting stamps bring out your creativity!


Thursday, May 24, 2012

My Love of DSP

I'm going to warn you right now, this is going to be a super short blog entry. My 6-year-old daughter and I have been struck down by a particularly nasty flu bug. We've barely left the bed in nearly 48 hours and have consumed very little of anything. I've been planning this blog post for a few days so I have the card all ready to go.


I used the sketch from Clean & Simple Stamping for my card design and lucky for me, they leave their challenges open for two weeks ;) I've been waiting for a sketch to show off the flower vase patterned DSP from Summer Smooches and this one was perfect. I love gorgeous DSP, and I especially love making it a focal point on my cards.

This sketch is a keeper, for sure! I did omit a sentiment, I couldn't figure out how to fit it in and I think the card looks fine without it.

Tips & Tricks:

*Love the butterfly? I used the Blossom Punch and coordinating Mixed Bunch stamp set. Then, I trimmed out the middle 'petals' to make a butterfly.
*I layered two butterflies to give the element even more dimension. To make sure the wings lift up well, I used Glue Dots to stick the two butterflies together.
*When I cut out the middle petals, it looked a bit 'rough'. I used a button in Tempting Turquoise to cover up the imperfections.

This card took me less than 10 minutes to make ~ that's *my* kind of card! So use that DSP, don't hoard it ;) And keep letting stamps bring out your creativity!


Monday, May 21, 2012

Two-Tone Wonderful

I'm really loving the challenge that the Dynamic Duos Challenge presents. I tend to use lots and lots of bright colors, and I definitely have my favorite combinations. So this type of challenge that has me use colors out of my comfort zone are great for getting my creative juices flowing :)

I combined this challenge with the Pals Paper Arts Challenge ~ a love sketch by Margaret Moody. With only two colors to play with (other than neutrals) - Daffodil Delight and Basic Black - I had a bit of a tough time coming up with all the layers. The 'Sweet Dessert Option' that the Dynamic Duos offered us was dry embossing. So that was my solution :) I use one of my Edgelit Embossing Folders to emboss the #3 layer.


Tips & Tricks:

*I absolutely love the Seam Binding Ribbon for this ribbon shirring (folding of the ribbon in waves). It fold so easily and stays folded. Use some Sticky Strip to make sure it stays stuck on the card.
*Isn't Gently Falling a lovely stamp set? Well, good news!!! It has made it into the 2012-2013 Catalogue :)
*Although two-step stampin' can sometimes be a bit frustrating if you want your images lined up perfectly, Gently Falling makes it easy. Even if the outline stamp isn't perfectly lined up with the solid stamp, your image will still look great!


*Doesn't the dry embossing look great? Love had it adds that bit of texture to my card.
*I know the 1/8" Taffeta Ribbon isn't part of the sketch, but the leaf needed just a wee extra detail. I really like how the narrow ribbon adds a very subtle extra touch.

I really like how this card turned out, even though I've never used this color combination before. But I do know I will use this combo again :) 'Til next time, keep letting stamps bring out your creativity!


Friday, May 18, 2012

My little teacups are back!

It's Thursday Night and I'm writing the post for the Friday Mashup Challenge. Gotta say, I love being a Guest Designer for May. There's just something really cool about doing a challenge ahead of time. I hope I've inspired atleast one person, too!

The new SU! Catalogue is definitely exciting, but I was equally excited to see that my favorite stamp set from the 2012 Occasions Mini, Tea Shoppe, is being carried over to the cattie! Which means that I can continue to use it as much as I please! This also means that my blog readers and class-goers like it too ;)

This week's Friday Mashup Challenge was perfect for the Tea Shoppe set.  We were asked to:
1) Make a project with a Decorative Edge; or
2) Make a project with a ribbon or a bow; or
3) Mash it up and create a project with a decorative edge and a ribbon.


The patterns on the tea cups, the greetings in the Tea Shoppe set are just so perfect for decorative edges and ribbon, aren't they?  And who's kidding who, everyone knows I love ribbon and don't need much convincing to add it to my projects ;)

Tips & Tricks:

*Although my card base is Pink Pirouette, I did use Pretty in Pink ink for my teacups. I wanted to make sure they stood out.
*Did you notice the little strip of Twitterpated DSP at the bottom of my card? I cut my card base to the standard 8-1/2" x 5-1/2" size. I folded it in half and the I cut a 1/4" off one side to make it shorter. The DSP is *just* covered up by the decorative edge and adds a lovely special touch to my card.
*I love how the Scallop Trim Border Punch edge matches so perfectly the little scallops in the DSP. It almost seems meant to be!
*Sometimes I stress about the little things. Other times I know not to stress. My scallop edge is intentionally misaligned on the Pink and Espresso card stocks. Lining it up would've driven me nuts ;)

I made this card for a specific stamping friend of mine. She's also my tea friend. She deals loose-leaf tea (which I LOVE) and I am the stamp dealer ;) Hope she loves it! 'Til next time, keep letting stamps bring out your creativity!


Wednesday, May 16, 2012

'Fresh' Flowers

What do you get when you mix a new flower technique with a gorgeous DSP and a lovely 'fresh' sketch? The card I made today!


My main inspiration for this card was this week's Freshly Made Sketch. When I saw the three stripes, I knew I wanted to do something different than just splitting up a large image or a bigger piece of DSP. I have also been wanting to use my new Floral District DSP. My problem is that I couldn't decide which pattern of DSP I should use. So I used most of them :)

And what about those florets? I have been wanting to make these rolled paper flowers for ages and today I just decided to go for it! I found a great tutorial on the Jones Design Company blog. I used a 1-3/4" circle for them and love the final size of them ~ about 3/4" in diameter.

Tips & Tricks:

*The florets are really easy to make! I do recommend using a pen and start winding the floret around it to 'soften' the card stock. Once it is a bit more pliable, take if off the pen and start winding again to tighten the center.
*I used Crystal Effects to glue my floret together (not hot glue like like the tutorial recommends). I also used Crystal Effects to glue my florets to the card. I wanted to make sure they stayed on nice and solid.
*I punched the DSP squares out with my 1" Square Punch. I wanted to make sure I could fit as many gorgeous DSP squares on my card as possible.
*I left 1/8" space between the strips of DSP squares. The mat I used was 4" x 3-1/4".


Who's going to be the lucky recipient of this card? I'm not sure yet, though I have a few friends with birthday coming up :) 'Til next time, keep letting stamps bring out your creativity!


Tuesday, May 15, 2012

A Lovely Nature Walk

My daughter Anna (who's 6) and I were flipping through the NEW 2012-2013 Stampin' Up! Catalogue. She loves stampin' and loves picking out new stamp sets. Of course a new stamp set with images of a necklace, lipstick and other girly things was the first one that caught her eye. Another stamp set that she loved was Nature Walk. Although it's not a new stamp set, it is one that has been on my wishlist for a while. I was waiting to see if it would retired before purchasing it and it didn't (YAY!). So I took the plunge and now it is part of my collection :) Anna was very pleased when she saw she it in 'our' studio ;)

Even though I'm not much of a bird girl, I love the image of the bird and the cage. I knew I wanted to feature these elements on the first project I made with the set. This week's Mojo Monday Challenge was the perfect sketch to feature them. I also loved the colors we were challenged to use at Dynamic Duos: So Saffron and Pool Party. This is what I ended up with:


Tips & Tricks:

*I love my little bee tag at the top of my card. It was easy to make with two circle punches and some Linen Thread. Making your own accessories is not only cost-effective, but it's fun, too!
*Love those Stampin' Write Markers! I used them to ink up my egg stamp in two different colors!
*I wanted my bird to be much bolder than the cage. To get the contrast I wanted, I used Crumb Cake ink for the cage and Early Espresso for the bird.
*For my first go, I didn't emboss the top So Saffron mat. But there was just something.... missing. So I embossed it with the Elegant Bouquet Embossing Folder. It adds so much to the card, yet doesn't take away from my bird and cage images.

I'm not sure who I'm going to give this card to but I'm sure they're going to love it. And it will certainly be someone special :) 'Til next time, keep letting stamps bring out your creativity!


Monday, May 14, 2012

Something Old, Something New

Ever since getting my sneak peak stuff last week I've been dying to try the new Gumball Green In Color with my favorite color, Rich Razzleberry. I've often used Old Olive with Rich Razzleberry and love the combo. And goodness knows, I am not a gal who loves the color green. But I LOVE Gumball Green! It's awesome! And it's *even* better with Rich Razzleberry than Old Olive.


What do you think? And I got my sketch inspiration from the Clean and Simple Stamping website. I love this website, just found it last week and it's full of awesome *simple* sketches. Just what I love for my Fast & Fabulous classes (my next one is on May 30th, the last Wednesday of every month.

Tips & Tricks:

*Like the stamp set? I've again used Everything Eleanor from the upcoming catalogue. It's gorgeous!
*Even though it looks like this card has a few layers (and it does) it's actually very simple! A few flourishes, a flower stamp, a few punches and you're done!
*Don't have the Modern Label Punch yet? I'd definitely recommend it. It's my go-to stamp set for greetings!
*Although I often go for the standard 1/4" mat size, I changed it up a bit on this card and made my first mat a bit smaller. I like how it turned out :)

Hope you've enjoyed this simple, yet not-so-simple card! A woman in my sideline is just starting breast cancer treatment and we're all getting together and sending her little pick-me-up cards. I'm going to send her this one. I hope she enjoys it. 'Til next time, keep letting stamps bring out your creativity!


Sunday, May 13, 2012

*New* In Color Birthday

I have some more product sneak peeks for you today :) I love sneak peeks, and hope you love them as much as I do! My first card is a birthday card for my dad who turns 71 on Tuesday. As part of my Sneak Peek products, I got a FREE bundle from SU! that included the Itty Bitty Banners and Make a Cake Stamp Set, as well as the Patio Party DSP. Love them all, especially all the contrasting patterns in the DSP. I thought it would look fantastic using the Herringbone Technique (see my tutorial). I love how it worked out.


The base color of my card is Summer Starfruit and the mat is Midnight Muse. I did the Happy Birthday greeting in Raspberry ripple. I must say, I think that's my fave new In Color :) And how do you like all the different patterns in the DSP?

Tips & Tricks:

*The Make a Cake stamp set is a two-step stampin' set. You can make a single tier cake, 3-tier cake and add some embellishments. Love sets that provide so much variety and so many options.
*Are you loving the Stitched 1/4" Grosgrain Ribbon as much as I am? It's much easier to work with than I anticipated, too! Always a pleasant surprise.
*I again used the Bitty Banners Framelits for the greeting. So easy to use and gives a perfect little banner everytime!
*Though I often come up with my own cards and ideas, I use a lot of different websites for inspiration. I came across a new one, Clean & Simple Stamping. They have weekly sketch challenges using clean and simple sketches (what else ;) ). I used #189 for this card and made it a bit less simple with the herringbone pattern.

I hope my dad enjoys this card and that he has a great birthday. 'Til next time, keep letting stamps bring out your creativity!


Saturday, May 12, 2012

NEW In Color Sneak Peek!

That's right, today I've got a sneak peak of the new 2012-2014 In Colors for you :) They are
*Raspberry Ripple (my fave of the five colors)
*Primrose Petals
*Midnight Muse
*Summer Starfruit (a color I wasn't sure about but it has really grown on me)
*Gumball Green (a wicked cool Christmas color!)

But it's not just new In Colors that I got in my Fed Ex package on Wednesday. They all came in the NEW FIRM FOAM Ink Pad. What is the 
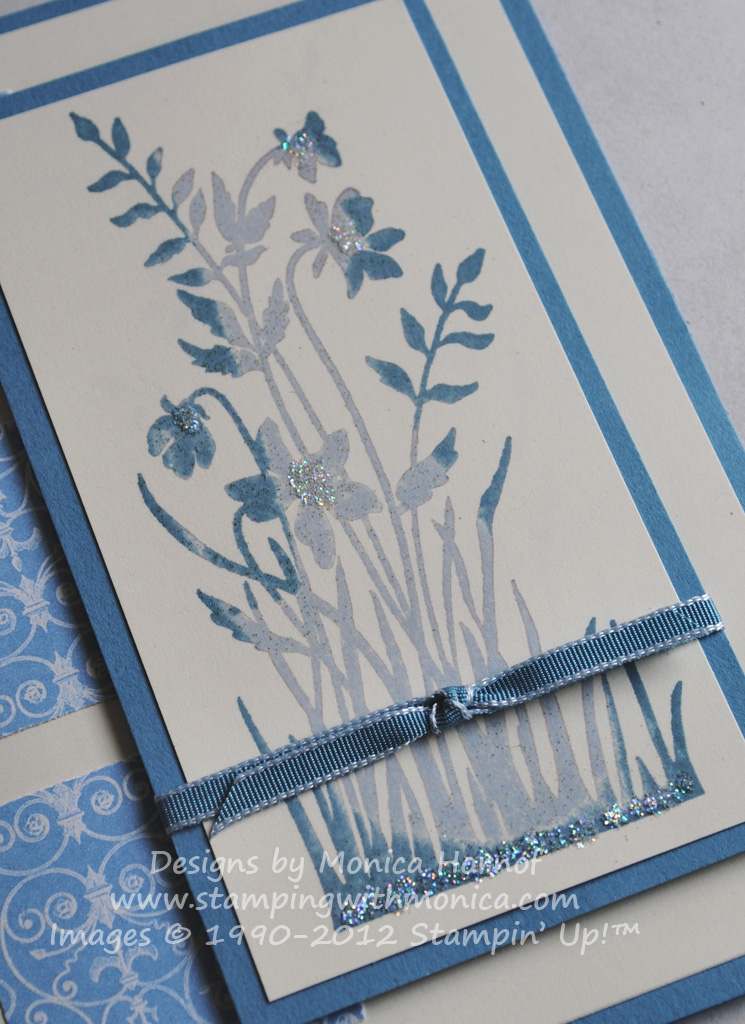
Firm Foam Ink Pad? As of June 1st, SU! is reconfiguring all of its ink pads to this new material (rather than the felt ink pads). I didn't think there could be much more of a difference but holy smokes! The difference is incredible! Not only do larger stamps ink up evenly with ease, but the ink is more saturated on the stamp and don't leave the pattern of the foam material (like the felt does) so you get an even, saturated, crisp stamped image! Take a peek, especially at the large bloom (from the upcoming Betsy's Bloom stamp set) which I stamped with the Midnight Muse color.


If I'd been thinking, I would have stamped a comparison in Night of Navy using the felt ink pad... next time ;) But needless to say, I'll be replacing all my stamp pads. Yes, they are THAT much better.

I got my inspiration for this card using this week's Freshly Made Sketch. I'll be sending this card off on Monday to the Czech Republic - her birthday is Tuesday. Yes, I'm aware it'll be a bit late ;)

Tips & Tricks:

*With the new Firm Foam Ink Pads tapping your stamp lightly on the ink pad is all that's needed. You no longer have to 'smoosh' it around to get even coverage.
*Like the Happy Birthday greeting? I use the new Itty Bitty Banners stamp set and coordinating Bitty Banners Framelits. Love those!
*How awesome is the Raspberry Ripple color with Summer Starfruit (the bird and wing)? LOVE LOVE LOVE it!
*Did you happen to notice the Stitched Whisper White Grosgrain Ribbon? Yup, stitched. It's replacing the current 1/4" Grosgrain Ribbon and it's great!
*The DSPs are the new Patio Party & Floral District DSP. They are both gorgeous!


So as you've likely gathered, I love a lot of new things in the 2012-2013 SU! Catalogue. Some great new stamps, great new accessories and I just LOVE the new In Colors. Here's a side-by-side comparison. The order they're in is: Primrose Petals, Midnight Muse, Summer Starfruit, Raspberry Ripple and Gumball Green. The card base is Raspberry Ripple and the main color of the DSP is Summer Starfruit.


Aren't the colors crisp? The die cut shape is from the new Oval Accent die. And another Itty Bitty Banner. Love :) 'Til next time, keep letting stamps bring out your creativity!

Friday, May 11, 2012

Definitely a Color... Challenge

As guest designer for the Friday Mashup this month (yay for me!) I'm privy to the challenges a bit early so that I can get my card ready for the challenge. In celebration of the upcoming Memorial Day holiday in the US, this week, the Friday Mashup Challenge #58 was to:

1) Make a project that's "patriotic or for remembrance"; or
2) Make a project with the colours "Whisper White, Night of Navy, Poppy Parade, and Daffodil Delight"; or
3) Mash it up and create a project that is "patriotic or for remembrance using the above colors";
4) Donate your card to a wounded soldier or that special service member in your life.

I don't really have any patriotic sets, and in Canada we have our Remembrance Day in November. So I opted to just do the color challenge. And boy, that was a challenge for me. It's not big secret that I've never really liked Poppy Parade (I am pretty sure this is one of the first times I've used the ink in two years...) and adding Daffodil Delight to the mix is just not me... But I'm pretty pleased with what I ended up doing:


I love how it turned out and especially love that Daffodil Delight Seam Binding Ribbon (available in the 2012-2013 catalogue!).

Tips & Tricks:

*The Itty Bitty Bits stamp set coordinates perfectly with the Bitty Punch Pack. Makes accessorizing and coordinating a snap!
*Do you love the Daffodil and Poppy 'thread' I tied in the buttons? It's very thin strips of card stock! Love this technique. I haven't done it in a while and I thought it was fun to alternate the Poppy Parade with Daffodil Delight.
*Don't know how to adhere your buttons? Use Glue Dots! Love those little sticky dots :)

Even though I had a bit of a hard time coming up with this card, I think it turned out beautifully. There is a fellow demonstrator in town who's son is in Afghanistan and I give her a lot of my cards to hand out to the men and women serving there. I will do the same with this card. 'Til next time, keep letting stamps bring out your creativity!


Wednesday, May 9, 2012

And now... A card for Dad!

I've made quite a few cards for mom lately so I thought that this time, I should maybe make a card for Dad :) Father's Day is coming up in a few weeks and I've got to start planning for my May Fast & Fabulous class! I love the Best Dad Ever stamp set for anything masculine, but especially Father's Day cards. Even if a Dad doesn't actually *wear* ties, a tie still says 'Dad'. ;)

This week, I also decided to participate in a brand spanking new challenge called the Dynamic Duos. It's Challenge #1! So exciting! This weeks Challenge asked us to use Pool Party and Lucky Limeade. Those are the ONLY colors we could use except any neutrals (Whisper White, Very Vanilla, Crumb Cake, etc.). I love this type of Challenge, it really stretches the imagination!

So how'd I do? I think it turned out pretty well! Other than the Whisper White, I really only did use the two colors we were supposed to use :) I did recycle last week's Freshly Made Sketch for this card too... I had made a spinner card with the sketch, but I think this works well too - love this sketch!

Tips & Tricks:

*I just love the 2011-2013 In Colors so much that I got the In Color DSP Paper Stack. DSP in the five gorgeous colors. That's where the Pool Party polka dot DSP came from :)
*To match my polka dot DSP with the Pool Party card stock, I embossed it with the Polka Dot Embossing Folder.
*I love doing the two-tone ties. They're so easy to cut out. I mount the cut out tie on Stampin' Dimensionals to give my card a bit of extra dimension.
*I love Whisper White as a card base! It's easy to write in, as well.
*For my greeting, I used a 1/2" strip of card stock and then free-handed the notches. You don't *always* need a punch ;)


I hope my class-goers love this card, and I hope that the Dads do too :) 'Til next time, keep letting stamps bring out your creativity!


Bright Blossoms for Mother's Day

Another Mother's Day card coming today :) I made the spiral card last week for my MIL and I needed a card for my own mom too, of course. I was already planning on using the color combo in last week's Pals Paper Arts Challenge ~ Calypso Coral, Baja Breeze and So Saffron ~ but I wasn't sure what sketch to use. I was browsing a friend and downline's blog and came across the Retro Sketches Challenge. I loved this week's sketch so I flipped it and combined it with the color combination I was going to use.


I wanted to show off the color contrast as much as possible. As luck would have it, the Bright Blossoms stamp set (a 2012-2013 cattie sneak peek) has three larger flower images. I stamped and cut each of them out. I used Stampin' Dimensionals to adhere them to my card so that they popped out a bit. I love how it all turned out.

Tips & Tricks:

*I don't *love* cutting images out, I much prefer punches. But sometimes to get the effect I want, it's necessary. I always use my SU! Paper Snips to help me out ~ LOVE them.
*See how the 'Mom' is written in the three-color combination too? I used my Stampin' Write Markers for that. Love how I can stamp with them because they have the same ink in them as the ink pads.
*Yeah, the Seam Binding ribbon frays more easily than others. But I think that just adds to its charm. And you can't deny that the sheen it has is just gorgeous.
*I couldn't make a spiral card for one mom and not the other ;) So I used the smaller floral images from Bright Blossoms for the spiral inside this card.

I hope our moms love their cards! I've just received my new catalog preorder so I've got to run to play ~ after I get my son down for his nap. Be on the look out for more sneak peeks. 'Til then, keep letting stamps bring out your creativity!